SecureShellTunneling: Difference between revisions
No edit summary |
No edit summary |
||
| (5 intermediate revisions by 3 users not shown) | |||
| Line 1: | Line 1: | ||
==Port Forwarding== | ==Port Forwarding== | ||
When you want to just forward a specific port locally to a remote port. | ===OpenSSH=== | ||
When you want to just forward a specific port locally to a remote port with Linux or macOS systems. | |||
<ul> | <ul> | ||
<li>This example will create a local port 9999 that will be forwarded to the remote host webserver.umiacs.umd.edu and its port 8000 through the host | <li>This example will create a local port 9999 that will be forwarded to the remote host webserver.umiacs.umd.edu and its port 8000 through the host nexusclip00.umiacs.umd.edu. | ||
<pre>ssh -NfL 9999:webserver.umiacs.umd.edu:8000 | <pre>ssh -NfL 9999:webserver.umiacs.umd.edu:8000 nexusclip00.umiacs.umd.edu</pre> | ||
</li> | </li> | ||
<li>This example will create a local port 13389 that will be forwarded to a remote host that is running a [[Remote Desktop |RDP]] client like Windows through the host | <li>This example will create a local port 13389 that will be forwarded to a remote host that is running a [[Remote Desktop |RDP]] client like Windows through the host nexusclip00.umiacs.umd.edu | ||
<pre>ssh -L 13389:my-desktop.ad.umiacs.umd.edu:3389 | <pre>ssh -L 13389:my-desktop.ad.umiacs.umd.edu:3389 nexusclip00.umiacs.umd.edu</pre> | ||
</li> | </li> | ||
<li>The following example outlines how to use SSH tunnel for printing to the UMIACS CUPS server. | <li>The following example outlines how to use SSH tunnel for printing to the UMIACS CUPS server. | ||
<pre>ssh $<USERNAME>@ | <pre>ssh $<USERNAME>@nexusclip00.umiacs.umd.edu -T -N -L 3631:print.umiacs.umd.edu:631</pre> | ||
</li> | </li> | ||
<li>Once the tunnel is established you can follow the normal [[Printing | Printing]] instructions substitution 'print.umiacs.umd.edu' for 'localhost:3631', or print via the a command such as the following: | <li>Once the tunnel is established you can follow the normal [[Printing | Printing]] instructions substitution 'print.umiacs.umd.edu' for 'localhost:3631', or print via the a command such as the following: | ||
| Line 19: | Line 20: | ||
</ul> | </ul> | ||
===PuTTY=== | |||
Windows users can achieve the same types of tunnels using PuTTY or a similar SSH client. In PuTTY, the port forwarding configuration dialogue can be found under "Connection>SSH>Tunnels". | |||
[[Image:PuTTYWin7Tunnel.png]] | |||
This example will create a local port '''8889''' that is attached to the remote host '''clipsm301.umiacs.umd.edu''' on its port '''8000'''. | |||
==SOCKS Proxy== | ==SOCKS Proxy== | ||
===OpenSSH=== | |||
[[SSH]] can also tunnel all traffic coming into a certain port through a SOCKS v5 proxy. Many browsers and some operating systems can be setup to then connect to this proxy to allow them again to look like they are coming from the host name you specify in your [[SSH]] command. | [[SSH]] can also tunnel all traffic coming into a certain port through a SOCKS v5 proxy. Many browsers and some operating systems can be setup to then connect to this proxy to allow them again to look like they are coming from the host name you specify in your [[SSH]] command. | ||
<pre>ssh -ND 7777 | <pre>ssh -ND 7777 nexusclip00.umiacs.umd.edu</pre> | ||
Please note: when you configure proxy settings for a browser (or your whole operating system) all the traffic for that browser (or the OS) will be sent through the proxy. This can have performance implications. | Please note: when you configure proxy settings for a browser (or your whole operating system) all the traffic for that browser (or the OS) will be sent through the proxy. This can have performance implications. | ||
== | ===PuTTY=== | ||
= | |||
Windows users can tunnel traffic coming into a certain port through a SOCKS v5 proxy by using PuTTY or a similar SSH client. Many browsers and some operating systems can be setup to connect to this proxy to allow them to look like they are coming from the host name you specify. | Windows users can tunnel traffic coming into a certain port through a SOCKS v5 proxy by using PuTTY or a similar SSH client. Many browsers and some operating systems can be setup to connect to this proxy to allow them to look like they are coming from the host name you specify. | ||
| Line 53: | Line 52: | ||
Please note that when you configure proxy settings for a browser or your whole operating system, all the traffic for that browser or your OS will be sent through the proxy. This can have performance implications. | Please note that when you configure proxy settings for a browser or your whole operating system, all the traffic for that browser or your OS will be sent through the proxy. This can have performance implications. | ||
== Example: SOCKS proxy, Browser configuration == | === Example: SOCKS proxy, Browser configuration === | ||
There are too many variations here to cover them all, but they all follow the same general pattern and the following example should be generally applicable. We'll use Firefox for this example. Screenshots are from Firefox 37.0.2. | |||
There are too many variations here to cover them all, but they all follow the same general pattern and the following example should be generally applicable. We'll use Firefox for this example. Screenshots are from | |||
# Under <code>Preferences > Advanced > Network > Connection > Settings...</code>, choose <code>Manually proxy configuration:</code>. | |||
# Enter <code>127.0.0.1</code> for the proxy. | |||
# Enter the port you chose earlier for dynamic forwarding (7777 in the example above). | |||
# Check <code>Use this proxy server for all protocols</code>, and then click OK. | |||
'''NOTE:''' this will continue to send all browser traffic through your SSH tunnel until the configuration is reverted. The SSH connection must be established for traffic to pass through to the destination network. Firefox has a very useful plugin called "FoxyProxy" that allows conditional proxies to be set up, if you're interested in adding some intelligence/complexity to your proxy configuration. | '''NOTE:''' this will continue to send all browser traffic through your SSH tunnel until the configuration is reverted. The SSH connection must be established for traffic to pass through to the destination network. Firefox has a very useful plugin called "FoxyProxy" that allows conditional proxies to be set up, if you're interested in adding some intelligence/complexity to your proxy configuration. | ||
[[Image:FF_Proxy_1.png|400px]] [[Image:FF_Proxy_2.png|400px]] | |||
Latest revision as of 20:11, 6 June 2023
Port Forwarding
OpenSSH
When you want to just forward a specific port locally to a remote port with Linux or macOS systems.
- This example will create a local port 9999 that will be forwarded to the remote host webserver.umiacs.umd.edu and its port 8000 through the host nexusclip00.umiacs.umd.edu.
ssh -NfL 9999:webserver.umiacs.umd.edu:8000 nexusclip00.umiacs.umd.edu
- This example will create a local port 13389 that will be forwarded to a remote host that is running a RDP client like Windows through the host nexusclip00.umiacs.umd.edu
ssh -L 13389:my-desktop.ad.umiacs.umd.edu:3389 nexusclip00.umiacs.umd.edu
- The following example outlines how to use SSH tunnel for printing to the UMIACS CUPS server.
ssh $<USERNAME>@nexusclip00.umiacs.umd.edu -T -N -L 3631:print.umiacs.umd.edu:631
- Once the tunnel is established you can follow the normal Printing instructions substitution 'print.umiacs.umd.edu' for 'localhost:3631', or print via the a command such as the following:
lpr -H 127.0.0.1:3631 -P $<PRINTER NAME> $<FILENAME>
PuTTY
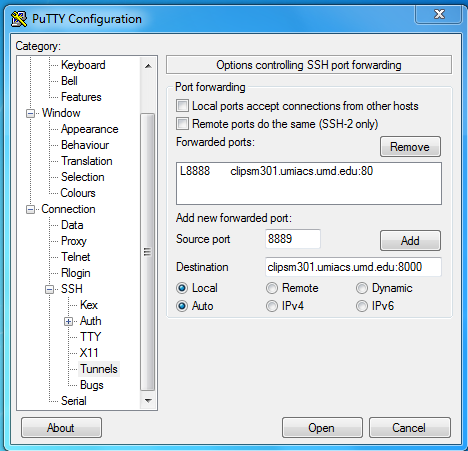
Windows users can achieve the same types of tunnels using PuTTY or a similar SSH client. In PuTTY, the port forwarding configuration dialogue can be found under "Connection>SSH>Tunnels".
This example will create a local port 8889 that is attached to the remote host clipsm301.umiacs.umd.edu on its port 8000.
SOCKS Proxy
OpenSSH
SSH can also tunnel all traffic coming into a certain port through a SOCKS v5 proxy. Many browsers and some operating systems can be setup to then connect to this proxy to allow them again to look like they are coming from the host name you specify in your SSH command.
ssh -ND 7777 nexusclip00.umiacs.umd.edu
Please note: when you configure proxy settings for a browser (or your whole operating system) all the traffic for that browser (or the OS) will be sent through the proxy. This can have performance implications.
PuTTY
Windows users can tunnel traffic coming into a certain port through a SOCKS v5 proxy by using PuTTY or a similar SSH client. Many browsers and some operating systems can be setup to connect to this proxy to allow them to look like they are coming from the host name you specify.
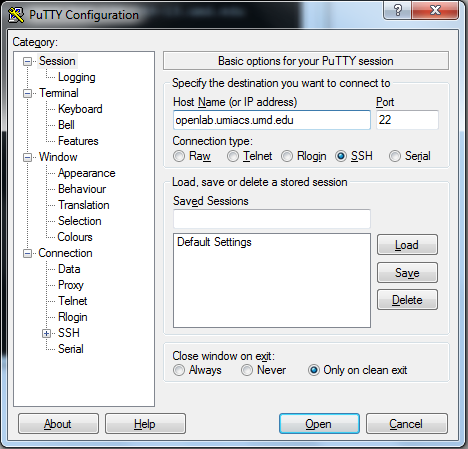
In PuTTY under Sessions set the Host Name:
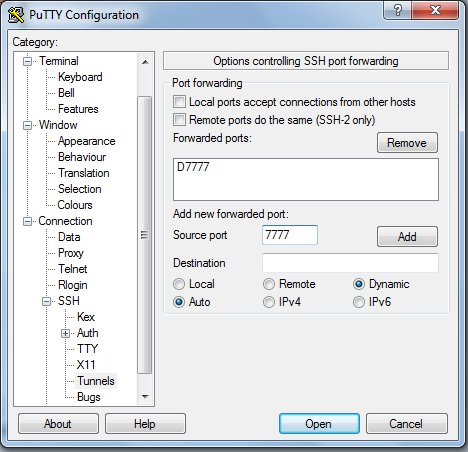
Then under Connection > SSH > Tunnels enter a port number and set the type of forwarding to "Dynamic" and press add:
Click Open and log into the host. As long as this PuTTY window is open and you are logged in, you can use the SOCKS proxy.
Please note that when you configure proxy settings for a browser or your whole operating system, all the traffic for that browser or your OS will be sent through the proxy. This can have performance implications.
Example: SOCKS proxy, Browser configuration
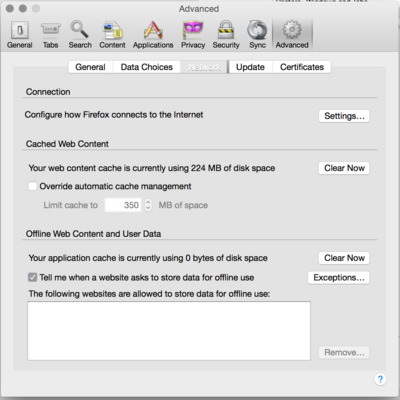
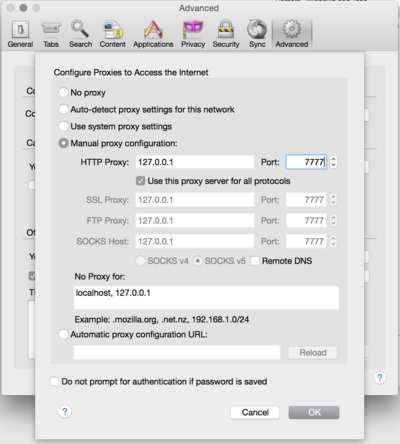
There are too many variations here to cover them all, but they all follow the same general pattern and the following example should be generally applicable. We'll use Firefox for this example. Screenshots are from Firefox 37.0.2.
- Under
Preferences > Advanced > Network > Connection > Settings..., chooseManually proxy configuration:. - Enter
127.0.0.1for the proxy. - Enter the port you chose earlier for dynamic forwarding (7777 in the example above).
- Check
Use this proxy server for all protocols, and then click OK.
NOTE: this will continue to send all browser traffic through your SSH tunnel until the configuration is reverted. The SSH connection must be established for traffic to pass through to the destination network. Firefox has a very useful plugin called "FoxyProxy" that allows conditional proxies to be set up, if you're interested in adding some intelligence/complexity to your proxy configuration.
