Creating service admin user on macOS: Difference between revisions
Jump to navigation
Jump to search
No edit summary |
(Updating Images and Directions for Sonoma) |
||
| (One intermediate revision by the same user not shown) | |||
| Line 5: | Line 5: | ||
# Navigate to System Preferences. (Click on the Apple Logo at the top lefthand side of the screen, and select "System Preferences" from the dropdown menu.) | # Navigate to System Preferences. (Click on the Apple Logo at the top lefthand side of the screen, and select "System Preferences" from the dropdown menu.) | ||
# From the System Preferences menu, select "Users and Groups" . | # From the System Preferences menu, select "Users and Groups" . | ||
# On the righthand side of the screen where it lists the users currently on the machine, click on the 'Add User' button. | |||
# On the | # By default, the new account will be set to a Standard account. Select the "New User" dropdown menu and choose "Administrator" from the list. | ||
# By default, the new account will be set to a Standard account. Select the "New | #: [[Image:AdminSonoma1.png|400px]] | ||
#: [[Image: | |||
# The new user's full name should be "Service Admin," and the account name should be "serviceadmin". | # The new user's full name should be "Service Admin," and the account name should be "serviceadmin". | ||
# The password is up to you, so long as it's not the same as your UMIACS account password or your UMD Directory ID password. | # The password is up to you, so long as it's not the same as your UMIACS account password or your UMD Directory ID password. | ||
#: [[Image: | #: [[Image:AdminSonoma.png|400px]] | ||
# Select "Create User". | # Select "Create User". | ||
When prompted by the Terrapin Tech sore, you should give this account's credentials to the technician, '''not''' your UMIACS account credentials. Once the service is completed, the account can be deleted. | When prompted by the Terrapin Tech sore, you should give this account's credentials to the technician, '''not''' your UMIACS account credentials. Once the service is completed, the account can be deleted. | ||
Latest revision as of 19:24, 4 January 2024
When taking an Apple product to the Terrapin Tech store, it is critical that you create a Service Admin User on your computer before having it serviced. The technicians at the store require an admin user name and password, and if the pre-existing password is the same as your UMIACS domain login password, revealing it to the technicians would represent a security vulnerability. To remedy this, you must create a new temporary user account with administrator privileges that the technicians can use to service your machine.
Creating the new account
- Make sure you are logged in to an administrator account on your MacBook.
- Navigate to System Preferences. (Click on the Apple Logo at the top lefthand side of the screen, and select "System Preferences" from the dropdown menu.)
- From the System Preferences menu, select "Users and Groups" .
- On the righthand side of the screen where it lists the users currently on the machine, click on the 'Add User' button.
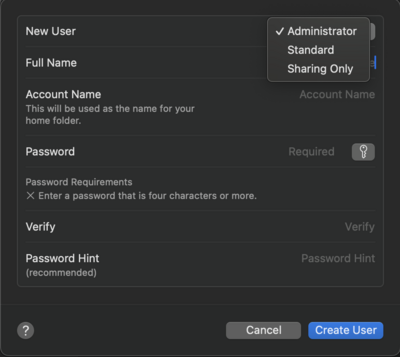
- By default, the new account will be set to a Standard account. Select the "New User" dropdown menu and choose "Administrator" from the list.
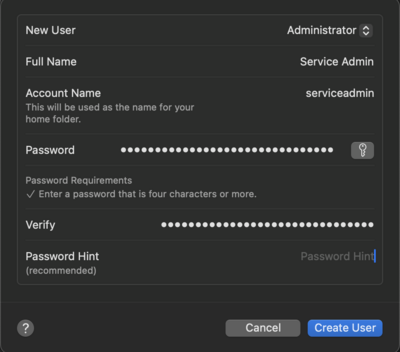
- The new user's full name should be "Service Admin," and the account name should be "serviceadmin".
- The password is up to you, so long as it's not the same as your UMIACS account password or your UMD Directory ID password.
- Select "Create User".
When prompted by the Terrapin Tech sore, you should give this account's credentials to the technician, not your UMIACS account credentials. Once the service is completed, the account can be deleted.

