WinSCP: Difference between revisions
No edit summary |
No edit summary |
||
| Line 6: | Line 6: | ||
==Logging Into WinSCP== | ==Logging Into WinSCP== | ||
When launching WinSCP, it | When launching WinSCP, it asks you to log into a remote host. | ||
* If you would like to upload files to [[OBJ]], follow the login instructions on the [[S3Clients#WinSCP | S3 Clients]] page. | * If you would like to upload files to [[OBJ]], follow the login instructions on the [[S3Clients#WinSCP | S3 Clients]] page. | ||
To access a UMIACS directory: | To access a UMIACS directory, such as /fs/nexus-scratch: | ||
* For the File protocol, select SFTP. | * For the File protocol, select SFTP. | ||
* For the host name, enter your [[Nexus#Access | Nexus submission node]]. | * For the host name, enter your [[Nexus#Access | Nexus submission node]]. | ||
| Line 18: | Line 18: | ||
After logging in, WinSCP shows two directories. | After logging in, WinSCP shows two directories. | ||
The left side shows a directory on | The left side shows a directory on your computer and the right side shows a directory on the remote host. | ||
==Changing Directories== | ==Changing Directories== | ||
===Changing Local Directory=== | ===Changing the Local Directory=== | ||
To change the directory on your computer, select Open Directory from the Local menu. | To change the directory on your computer, select "Open Directory" from the "Local" menu. | ||
This | This controls the section on the left-hand side. | ||
[[Image:WinSCP_change_local_dir.png|500px]] | [[Image:WinSCP_change_local_dir.png|500px]] | ||
===Changing Remote Directory=== | ===Changing the Remote Directory=== | ||
To change the UMIACS directory, select Open Directory from the Remote menu. | To change the UMIACS directory, select "Open Directory" from the "Remote" menu. | ||
This | This controls the section on the right-hand side. | ||
[[Image:WinSCP_change_remote_dir.png|600px]] | [[Image:WinSCP_change_remote_dir.png|600px]] | ||
==Transferring Files== | ==Transferring Files== | ||
To transfer files between your computer and the remote directory, simply drag the files from one side to the other. | |||
You can also select the files and use the corresponding button. | |||
===Uploading Files=== | ===Uploading Files=== | ||
To upload files from your computer to the remote directory, select one or more files on the left-hand side and then click the Upload button. | To upload files from your computer to the remote directory, select one or more files on the left-hand side and then click the Upload button. | ||
[[Image:WinSCP_upload_local_file.png|300px]] | [[Image:WinSCP_upload_local_file.png|300px]] | ||
After clicking the Upload button, another window pops up. You can enter a different directory to change where the files are uploaded. Click OK to start the upload. | |||
===Downloading Files=== | ===Downloading Files=== | ||
| Line 45: | Line 50: | ||
[[Image:WinSCP_download_remote_file.png|300px]] | [[Image:WinSCP_download_remote_file.png|300px]] | ||
After clicking the Download button, another window pops up. You can enter a different directory to change where the files are downloaded. Click OK to start the download. | |||
==Opening Files== | |||
Double clicking on a file will open the file in a text editor. This works for small, simple files, such as .txt and .html files. | |||
To open more complex files, such as .pdf files, select the file and then click "Open" from the "Files" menu. | |||
[[Image:WinSCP_open_file.png|500px]] | |||
Revision as of 05:32, 25 June 2025
WinSCP is a free Windows file transfer application used to copy data to and from a remote host.
WinSCP is installed on all UMIACS-supported Windows workstations.
For all other Windows hosts, WinSCP can be downloaded from https://winscp.net/eng/index.php.
Logging Into WinSCP
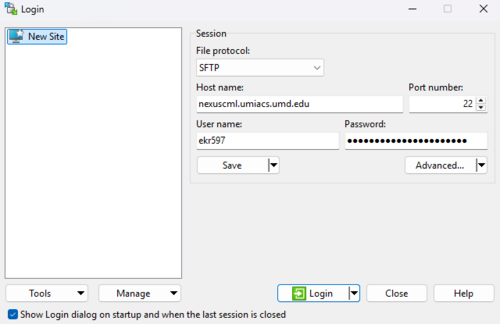
When launching WinSCP, it asks you to log into a remote host.
- If you would like to upload files to OBJ, follow the login instructions on the S3 Clients page.
To access a UMIACS directory, such as /fs/nexus-scratch:
- For the File protocol, select SFTP.
- For the host name, enter your Nexus submission node.
- Enter your UMD username and password.
After logging in, WinSCP shows two directories.
The left side shows a directory on your computer and the right side shows a directory on the remote host.
Changing Directories
Changing the Local Directory
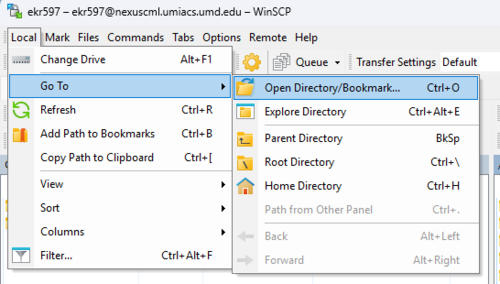
To change the directory on your computer, select "Open Directory" from the "Local" menu.
This controls the section on the left-hand side.
Changing the Remote Directory
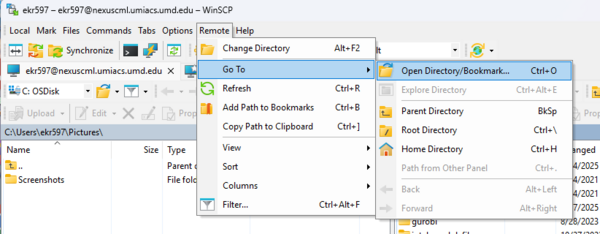
To change the UMIACS directory, select "Open Directory" from the "Remote" menu.
This controls the section on the right-hand side.
Transferring Files
To transfer files between your computer and the remote directory, simply drag the files from one side to the other.
You can also select the files and use the corresponding button.
Uploading Files
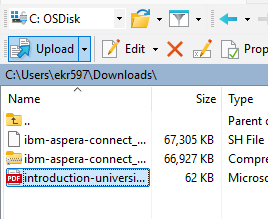
To upload files from your computer to the remote directory, select one or more files on the left-hand side and then click the Upload button.
After clicking the Upload button, another window pops up. You can enter a different directory to change where the files are uploaded. Click OK to start the upload.
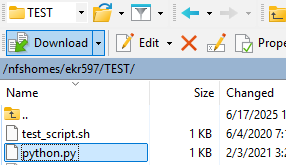
Downloading Files
To download files from the remote directory to your computer, select one or more files on the right-hand side and then click the Download button.
After clicking the Download button, another window pops up. You can enter a different directory to change where the files are downloaded. Click OK to start the download.
Opening Files
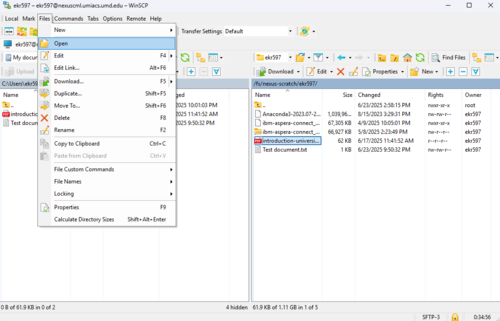
Double clicking on a file will open the file in a text editor. This works for small, simple files, such as .txt and .html files.
To open more complex files, such as .pdf files, select the file and then click "Open" from the "Files" menu.
