WindowsPython: Difference between revisions
No edit summary |
|||
| Line 1: | Line 1: | ||
Python can be user installed. | |||
Below are installation instructions for both .exe and MSI installers. MSI installers have been discontinued for Python version 3.5 and above. | |||
== Installing Python via .exe == | == Installing Python via .exe == | ||
# Download Python application of the version you want from [https://www.python.org/download/ here]. Note that there are options for the 32-bit or 64-bit version, but you might need to do some searching. | # Download Python application of the version you want from [https://www.python.org/download/ here]. Note that there are options for the 32-bit or 64-bit version, but you might need to do some searching. | ||
# Click run, to run the installer. | # Click run, to run the installer. | ||
| Line 13: | Line 12: | ||
== Installing Python via MSI == | == Installing Python via MSI == | ||
# Download Python windows MSI installer from [https://www.python.org/download/ here]. | # Download Python windows MSI installer from [https://www.python.org/download/ here]. | ||
# Click run, to run the installer. | # Click run, to run the installer. | ||
#* [[File:click_run_msi.PNG|750px]] | #* [[File:click_run_msi.PNG|750px]] | ||
Revision as of 14:22, 11 August 2016
Python can be user installed. Below are installation instructions for both .exe and MSI installers. MSI installers have been discontinued for Python version 3.5 and above.
Installing Python via .exe
- Download Python application of the version you want from here. Note that there are options for the 32-bit or 64-bit version, but you might need to do some searching.
- Click run, to run the installer.
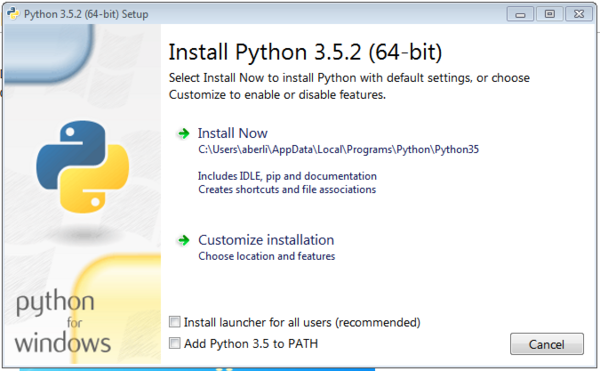
- Select Install Now. Make sure that you uncheck the "Install launcher for all users" box. Leaving this checked will cause the installation to fail.
- Finish the installation here.
This installer will automatically allow you to access Python from the command line by just typing py instead of the full path.
Installing Python via MSI
- Download Python windows MSI installer from here.
- Click run, to run the installer.
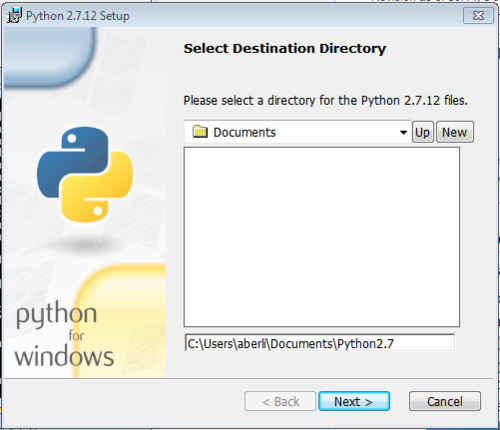
- Select a home directory as the install folder (i.e.
C:\Users\[YOURUSERNAME]\Documents\Pythonx.x.x) where x represents the version number. - Finish the installation.
If you want to be able to access Python from the command line by just typing python instead of the full path (i.e. \temp\pythonfolder\python) you have to add the python folder to your path.
- Navigate to
Control Panel->System and Security->System - Select
Advanced system settingsfrom the sidebar - In the
Advancedtab click theEnvironment Variables...button - Check if a Variable called
Pathexists in the list of user variables- If it exists, add the python directory to the end of the Path value separated by a semicolon (i.e.
C:\Things\In\Path;C:\Path\To\Python\Folder) - If it does not, press the New button and set the variable name to
Pathand the value to the path to your python directory
- If it exists, add the python directory to the end of the Path value separated by a semicolon (i.e.
Installing Modules
Using an executable
Alternatively, python executable modules can be found on the web, and the executable installed
Using python
Modules can be installed as the normally would using python.
For instance if the python directory is in your path you merely navigate to the module directory and run:
python setup.py install
Using easy_install
- These steps assume that Visual Studio is installed (It is by default)
First, we configure python to work with Visual Studio
- Open the file
msvc9compiler.pyfrom the locationC:\Path|To\Python\Folder\...\Lib\distutils\msvc9compiler.pyusing a text editor such as notepad - Replace the line containing
toolskey = "VS%0.f0COMNTOOLS" % versionwith the followingtoolskey = "vs110COMNTOOLS", where 110 is a three digit number corresponding to the version number of Visual Studio 2012- To do this, type
Ctr + ato highlight all the text, and typeCtrl + fto search for the line to be replaced, and edit the file to replace it
- To do this, type
- Also replace the line containing
mfinfo = self.manifest_get_embed_info(target_desc, Id_args)with the line:mfinfo = None
Next we install the module
- Download the easy_install graphical installer from here
- Run the downloaded file, it should open a command line and finish the installation
- The installed files should be located in
C:\Path\To\Python\Folder\..\Scripts
- The installed files should be located in
- There are several different python modules, so note the name of the module you want to install. numPy will be installed here.
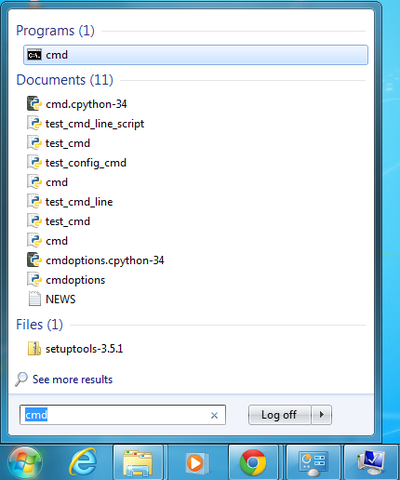
- Open a command prompt, by pressing the start button, and searching
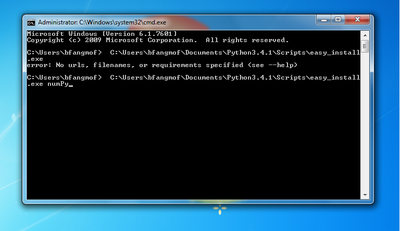
cmd - At the prompt, type the full path to easy_install executable and the name of the python module you need. ie.
C:\Path\To\Python\Folder\..\Scripts\easy_install.exe module_Name- where module_Name is the name of the module, numPy in this case
- Finally, press enter to run and install the module
Popular Executable Modules
- numPy
- Can be installed with the installer found here
- sciPy
- Can be installed with the installer found here
- iPython
- Can be installed with the installer found here


