InputMethodEditors: Difference between revisions
Jump to navigation
Jump to search
No edit summary |
Added alt text to all the images |
||
| (25 intermediate revisions by one other user not shown) | |||
| Line 4: | Line 4: | ||
IMEs are a per user setting and can be added/removed/customized without any need for administrative privileges. To add an IME to your account please follow these instructions. | IMEs are a per user setting and can be added/removed/customized without any need for administrative privileges. To add an IME to your account please follow these instructions. | ||
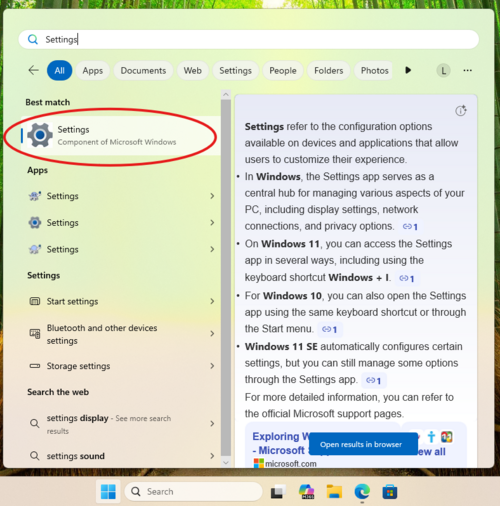
#Click the Windows button and type in settings. <br/><br/>[[]]<br/><br/> | #Click the Windows button and type in settings. <br/><br/>[[File:Settngs.png|500px |alt=Searching for Windows Settings in the Start menu]]<br/><br/> | ||
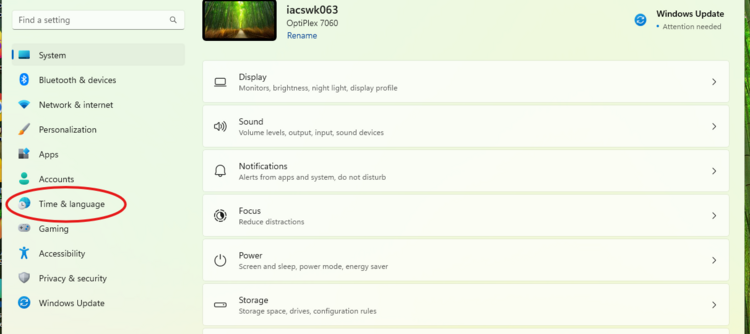
#Click "Time & Language". <br/><br/>[[File: | #Click "Time & Language". <br/><br/>[[File:Time&Language.png|750px |alt=Selecting Time&Language on the Windows Settings sidebar]]<br/><br/> | ||
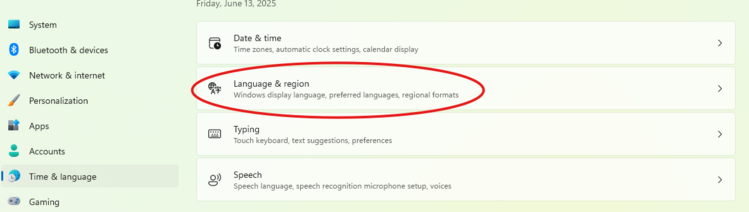
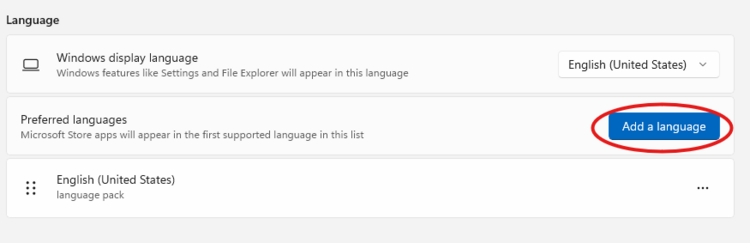
#Click "Language & region". <br/><br/>[[File: | #Click "Language & region". <br/><br/>[[File:Language&Region.png|750px |alt=Selecting Language & Region in the Time & Language menu ]]<br/><br/> | ||
#Click "Add a language". <br/><br/>[[File: | #Click "Add a language". <br/><br/>[[File:AddLanguage.png|750px |alt=Clicking "Add a language" in the Menu]]<br/><br/> | ||
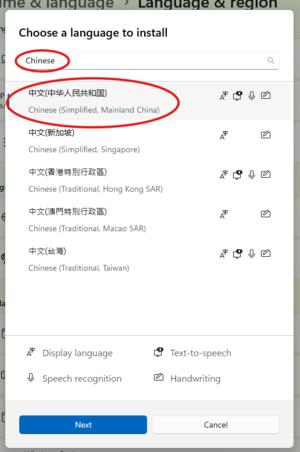
#A new dialogue box will open. Type in the language you want to add and click the corresponding option below. <br/><br/>[[File: | #A new dialogue box will open. Type in the language you want to add and click the corresponding option below. <br/><br/>[[File:Type&Save.png|300px |alt=Searching Chinese in the menu and selecting Simplified Chinese]]<br/><br/> | ||
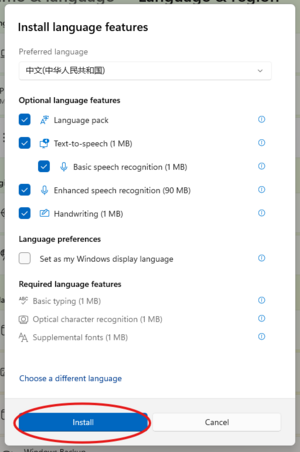
#Another dialogue box will open with a list of language features, check the options you want to enable, then click install. <br/><br/>[[File: | #Another dialogue box will open with a list of language features, check the options you want to enable, then click install. <br/><br/>[[File:Install.png|300px |alt=Selecting specific language features to install]]<br/><br/> | ||
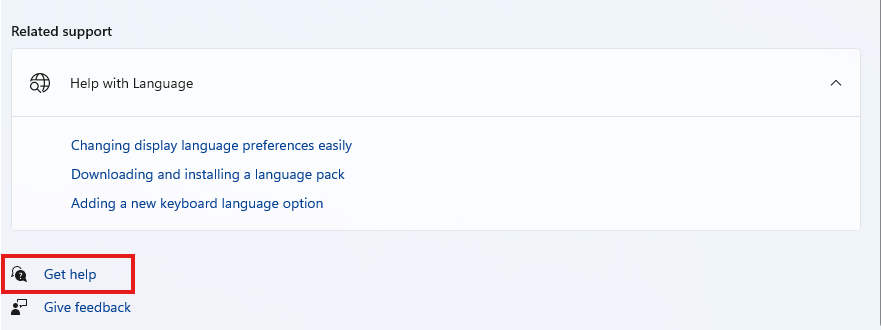
#The new IME should now be setup. To configure an IME or access the help pages about it to learn how to use it, click the "get help" button at the bottom of the page. <br/><br/>[[File:GetHelp.png |alt=Clicking Get Help in the Language menu]]<br/><br/> | |||
#The new IME should now be setup. | |||
Latest revision as of 17:33, 23 March 2026
Input method editors or IMEs make it easier to type in languages (usually but not limited to East Asian ones) that are made up of thousands of characters that can't fit on a standard keyboard
Adding an IME
IMEs are a per user setting and can be added/removed/customized without any need for administrative privileges. To add an IME to your account please follow these instructions.
- Click the Windows button and type in settings.
- Click "Time & Language".
- Click "Language & region".
- Click "Add a language".
- A new dialogue box will open. Type in the language you want to add and click the corresponding option below.
- Another dialogue box will open with a list of language features, check the options you want to enable, then click install.
- The new IME should now be setup. To configure an IME or access the help pages about it to learn how to use it, click the "get help" button at the bottom of the page.