MacOSPrinting: Difference between revisions
updated the printer driver download option since stapling was not working on macOS |
|||
| (75 intermediate revisions by 19 users not shown) | |||
| Line 1: | Line 1: | ||
__NOTOC__ | __NOTOC__ | ||
We support printing from user managed | We support printing from user managed macOS 15.x or later machines. | ||
[[ | '''Note: You must be on a UMIACS network directly or connected to the [[VPN]] in order to print.''' | ||
[[Image: | =System Settings= | ||
To start, open your System Settings from the Dock or Applications folder. Once you have opened it, click '''Printers & Scanners'''. | |||
[[Image:Ventura_Print00.png|300px]] | |||
=Print & Fax= | =Print & Fax= | ||
On the '''Printers & Scanners''' page, create a new local printer by clicking the '''Add Printer, Scanner, or Fax...''' button that is below the printer list. | |||
=Add Printer= | =Add Printer= | ||
This will bring up | This will bring up the Add Printer dialog. | ||
'''Note:''' If you just want basic printing, use the steps below. If you would like to enable all the advanced options for the printer, jump over this section to '''"Enabling Advanced Printer Options"'''. | |||
* Jump over to the '''IP''' tab | |||
* Set Protocol to '''Internet Printing Protocol - IPP''' | * Set Protocol to '''Internet Printing Protocol - IPP''' | ||
* Set Address to '''print.umiacs.umd.edu''' | * Set Address to '''print.umiacs.umd.edu''' | ||
* Set the | * Set the Queue to printers/queue; in this example for cps432-3208 it would be '''printers/cps432-3208'''. You have to make sure the queue is prefixed by '''printers/'''. For clarification, the queue is typically the printer name. | ||
* Set Name to the | * Set Name to the name of the printer you are trying to use. This makes it easily Identifiable in your list of printers. | ||
* It will always select '''Generic Postscript Printer'''. If you need to access the more advanced features of a queue/printer you will need take extra steps, please see the Advanced section at the bottom of this page. | * It will always select '''Generic Postscript Printer'''. If you need to access the more advanced features of a queue/printer or you were '''not able to print by choosing Generic Postscript Printer''', you will need to take extra steps, please see the Advanced section at the bottom of this page. | ||
* Select Add | * Select Add | ||
* You will be asked about enabling duplex. If you know the printer has the option, which is true for most of our printers, go ahead and enable it. Then hit OK. If you're not sure, just leave it disabled. You can always enable it after the queue is added. | * You will be asked about enabling duplex. If you know the printer has the option, which is true for most of our printers, go ahead and enable it. Then hit OK. If you're not sure, just leave it disabled. You can always enable it after the queue is added. | ||
[[Image: | [[Image:AddPrinter_BigSur.png]] | ||
You should now be able to print to this printer/queue from any macOS print menu. | |||
=Enabling Advanced Printer Features= | |||
Some printers may have features not accessible with the default drivers provided above. If this is the case, follow the guide below to identify, and install your print drivers from their manufacturer. | |||
'''Note:''' If you already installed the printer with generic drivers, you will need to highlight the printer and click '''-''', before attempting to add it again. You may also need a system update to get the latest drivers from Apple, if your printer does not have software drivers listed in the next steps. | |||
'''Step 1:''' Locate your printers name and search for its Make and Model here: http://print.umiacs.umd.edu/printers/ | |||
'''Step 2:''' Follow the '''Add Printer''' steps above until you get to '''Generic Postscript Printer'''. Select '''Software''', then '''Add'''. | |||
[[Image:SelectSoftware_BigSur.png]] | |||
'''Step 3:''' A window labeled "Printer Software" will now pop up. Scroll through the list to find your specific make and model of printer. Click on it, and hit Ok. | |||
'''NOTE''': If you cannot find the printer's make and model and need Advanced Printing Features, try downloading HP Easy Admin from HP's [https://support.hp.com/ph-en/document/c06164609| website]. After, enter the model of the printer, for instance "HP LaserJet Enterprise Flow MFP M633z", then download the software. Lastly, try reinstalling the printer from step 1. | |||
[[Image:PrinterSoftware_BigSur.png]] | |||
'''Step 4:''' Click Add on the next window and it should install your printer's software suite. You should have a list of options (if they are available) that looks similar this: | |||
[[Image:InstallOptions_BigSur.png]] | |||
'''Final Step:''' Enable the Options you wish to use, Click '''OK'''. You should now be able to print to this printer/queue from any macOS print menu. | |||
=Printing With Stapler= | |||
For print jobs using the stapler, follow the guide below. Printers with staplers are located in Iribe, in rooms 3149, 3208, 4149, 4208, and 5208. | |||
To add/ connect to a printer with stapling capabilities: | |||
'''Step 1:''' Follow the "Enabling Advanced Printer Features" guide until you reach Step 4. | |||
'''Step 2:''' In the window that appears labeled "Setting up [your printer name]" set "HP 3-Bin Stapler/Stacker" to "Mailbox Mode". | |||
[[Image:Mailbox_Mode.png|500px|]] | |||
'''Step 3:''' Select "OK" in the bottom right corner. | |||
'''To Print:''' To complete the print job using the stapler once the printer has been added: | |||
'''Step 1:''' In Preview, when trying to print, select the "Show Details" button in the bottom left corner. | |||
[[Image:Show_Settings.png|500px|]] | |||
'''Step 2:''' In the middle right, where it says "Preview," select "Printer Features" instead of "Preview". | |||
[[Image: | [[Image:Printer_Features.png|500px|]] | ||
'''Step 3:''' Set "Feature Sets" to "Finishing". | |||
[[Image:Finishing.png|500px|]] | |||
'''Step 4:''' A "Staple" dropdown list will appear at the bottom of the window. Select your preferred staple option. | |||
[[Image:Staple.png|500px|]] | |||
'''Step 5:''' Press "Print" in the bottom right corner. | |||
=Printing Stored Jobs= | |||
'''Pre-requisite:''' Requires [[MacOSPrinting#Enabling_Advanced_Printer_Features | advanced print features]] to be enabled. | |||
If you are printing a sensitive document and do not want the printer to print it right away, you can configure a stored job. The stored job lets you hold a print job until you enter a PIN to release the job. You can configure a stored job following the instructions below: | |||
[[ | # Go to File > Print or Press Command + P to open the Printer menu. | ||
# Select the printer where you want to send the print job. | |||
# Click the dropdown list under Copies & Pages and select '''Job Storage'''. | |||
#:[[File:Step03.png|400px]] | |||
# From the Mode dropdown list, select '''Personal Job''' (or '''Stored Job''' if you want to share the document with others). | |||
#:[[File:Step04.png|400px]] | |||
# Leave the username to default or specify a custom username. | |||
# Check the box '''Use PIN to Print''' and enter a 4-digit number. Hit '''Print'''. | |||
#:[[File:Step06.png|400px]] | |||
'''To print the stored jobs:''' | |||
# From the Home screen of the printer tap on '''Print from Job Storage''' (or '''Print''' > '''Print from Job Storage'''). | |||
# In the '''Stored Job to Print''' screen, select the name of the folder where the job is stored. By default, the name of the folder will be your username unless you customized it earlier. | |||
# Select the name of the document and enter the PIN. | |||
# Hit '''Print'''. | |||
Latest revision as of 16:32, 15 October 2025
We support printing from user managed macOS 15.x or later machines.
Note: You must be on a UMIACS network directly or connected to the VPN in order to print.
System Settings
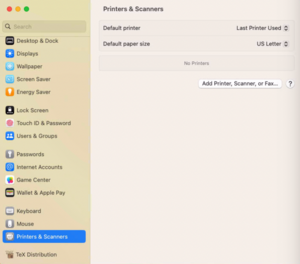
To start, open your System Settings from the Dock or Applications folder. Once you have opened it, click Printers & Scanners.
Print & Fax
On the Printers & Scanners page, create a new local printer by clicking the Add Printer, Scanner, or Fax... button that is below the printer list.
Add Printer
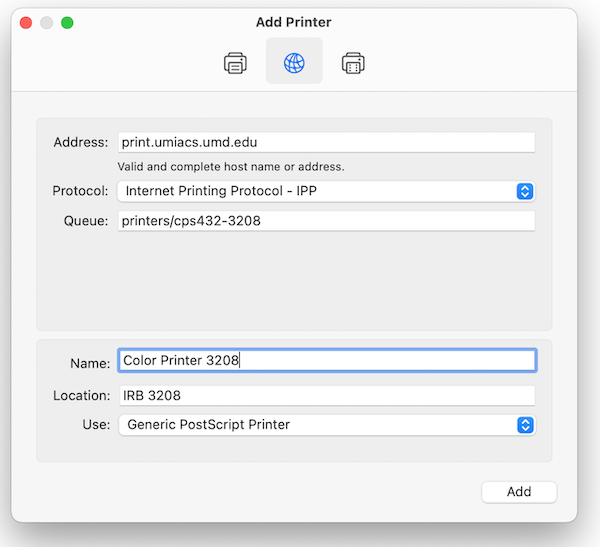
This will bring up the Add Printer dialog.
Note: If you just want basic printing, use the steps below. If you would like to enable all the advanced options for the printer, jump over this section to "Enabling Advanced Printer Options".
- Jump over to the IP tab
- Set Protocol to Internet Printing Protocol - IPP
- Set Address to print.umiacs.umd.edu
- Set the Queue to printers/queue; in this example for cps432-3208 it would be printers/cps432-3208. You have to make sure the queue is prefixed by printers/. For clarification, the queue is typically the printer name.
- Set Name to the name of the printer you are trying to use. This makes it easily Identifiable in your list of printers.
- It will always select Generic Postscript Printer. If you need to access the more advanced features of a queue/printer or you were not able to print by choosing Generic Postscript Printer, you will need to take extra steps, please see the Advanced section at the bottom of this page.
- Select Add
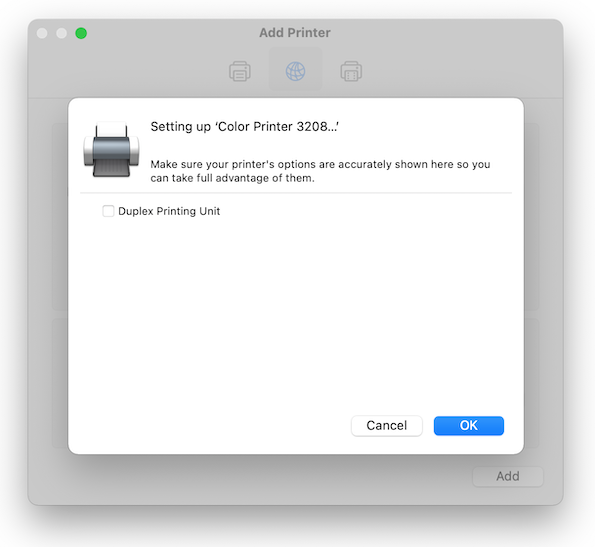
- You will be asked about enabling duplex. If you know the printer has the option, which is true for most of our printers, go ahead and enable it. Then hit OK. If you're not sure, just leave it disabled. You can always enable it after the queue is added.
You should now be able to print to this printer/queue from any macOS print menu.
Enabling Advanced Printer Features
Some printers may have features not accessible with the default drivers provided above. If this is the case, follow the guide below to identify, and install your print drivers from their manufacturer.
Note: If you already installed the printer with generic drivers, you will need to highlight the printer and click -, before attempting to add it again. You may also need a system update to get the latest drivers from Apple, if your printer does not have software drivers listed in the next steps.
Step 1: Locate your printers name and search for its Make and Model here: http://print.umiacs.umd.edu/printers/
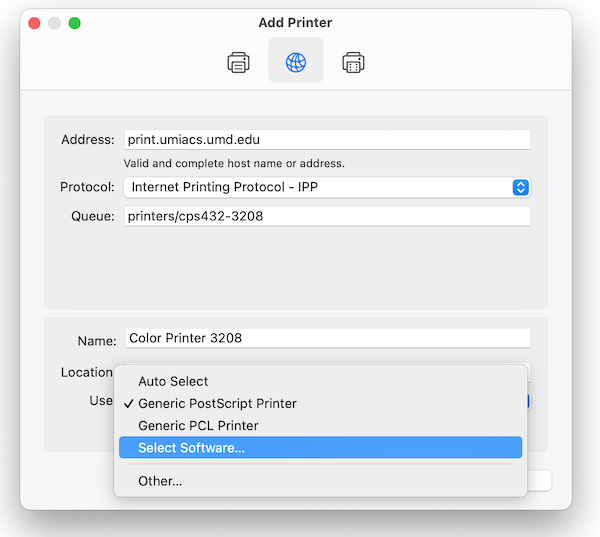
Step 2: Follow the Add Printer steps above until you get to Generic Postscript Printer. Select Software, then Add.
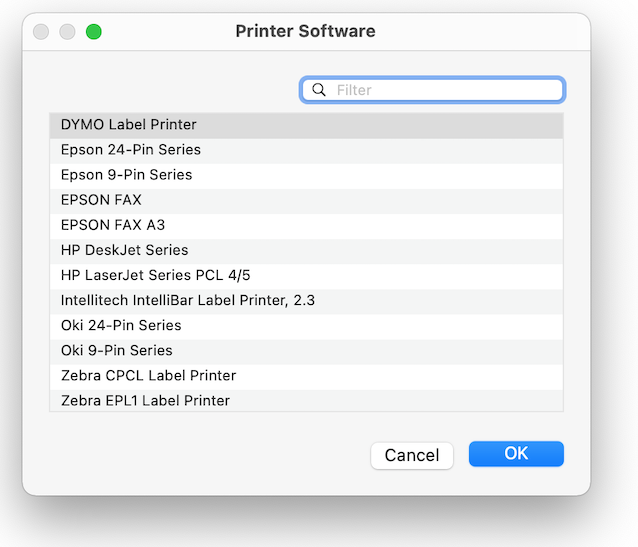
Step 3: A window labeled "Printer Software" will now pop up. Scroll through the list to find your specific make and model of printer. Click on it, and hit Ok.
NOTE: If you cannot find the printer's make and model and need Advanced Printing Features, try downloading HP Easy Admin from HP's website. After, enter the model of the printer, for instance "HP LaserJet Enterprise Flow MFP M633z", then download the software. Lastly, try reinstalling the printer from step 1.
Step 4: Click Add on the next window and it should install your printer's software suite. You should have a list of options (if they are available) that looks similar this:
Final Step: Enable the Options you wish to use, Click OK. You should now be able to print to this printer/queue from any macOS print menu.
Printing With Stapler
For print jobs using the stapler, follow the guide below. Printers with staplers are located in Iribe, in rooms 3149, 3208, 4149, 4208, and 5208.
To add/ connect to a printer with stapling capabilities:
Step 1: Follow the "Enabling Advanced Printer Features" guide until you reach Step 4.
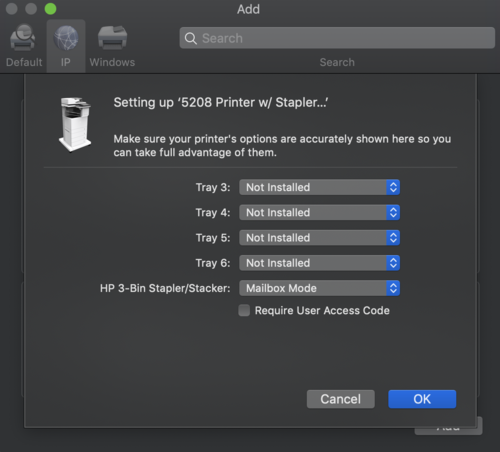
Step 2: In the window that appears labeled "Setting up [your printer name]" set "HP 3-Bin Stapler/Stacker" to "Mailbox Mode".
Step 3: Select "OK" in the bottom right corner.
To Print: To complete the print job using the stapler once the printer has been added:
Step 1: In Preview, when trying to print, select the "Show Details" button in the bottom left corner.
Step 2: In the middle right, where it says "Preview," select "Printer Features" instead of "Preview".
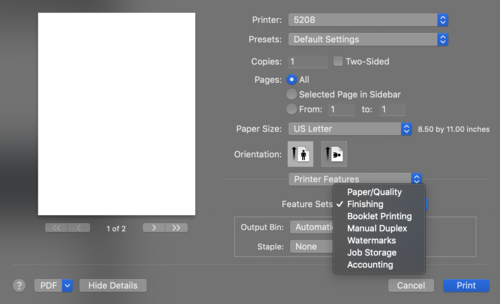
Step 3: Set "Feature Sets" to "Finishing".
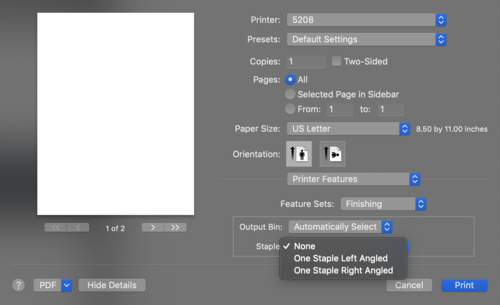
Step 4: A "Staple" dropdown list will appear at the bottom of the window. Select your preferred staple option.
Step 5: Press "Print" in the bottom right corner.
Printing Stored Jobs
Pre-requisite: Requires advanced print features to be enabled. If you are printing a sensitive document and do not want the printer to print it right away, you can configure a stored job. The stored job lets you hold a print job until you enter a PIN to release the job. You can configure a stored job following the instructions below:
- Go to File > Print or Press Command + P to open the Printer menu.
- Select the printer where you want to send the print job.
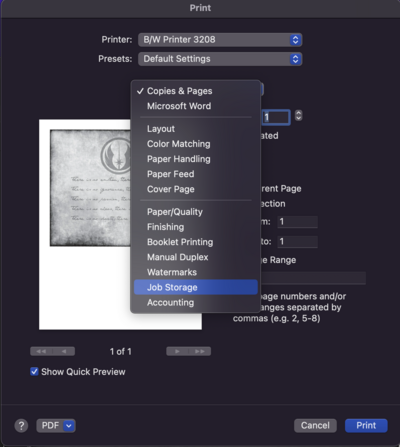
- Click the dropdown list under Copies & Pages and select Job Storage.
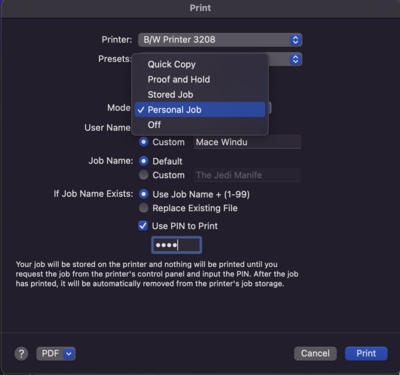
- From the Mode dropdown list, select Personal Job (or Stored Job if you want to share the document with others).
- Leave the username to default or specify a custom username.
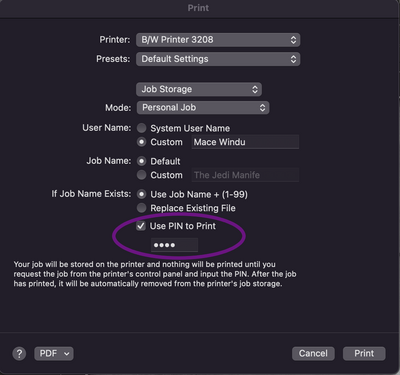
- Check the box Use PIN to Print and enter a 4-digit number. Hit Print.
To print the stored jobs:
- From the Home screen of the printer tap on Print from Job Storage (or Print > Print from Job Storage).
- In the Stored Job to Print screen, select the name of the folder where the job is stored. By default, the name of the folder will be your username unless you customized it earlier.
- Select the name of the document and enter the PIN.
- Hit Print.
