InputMethodEditors: Difference between revisions
Jump to navigation
Jump to search
No edit summary |
No edit summary |
||
| Line 7: | Line 7: | ||
#Click "Time & Language". <br/><br/>[[File:ime_2.png]]<br/><br/> | #Click "Time & Language". <br/><br/>[[File:ime_2.png]]<br/><br/> | ||
#Click "Language & region". <br/><br/>[[File:ime_3.png]]<br/><br/> | #Click "Language & region". <br/><br/>[[File:ime_3.png]]<br/><br/> | ||
# | #Click "Add a language". <br/><br/>[[File:ime_4.png]]<br/><br/> | ||
#A new dialogue box will open | #A new dialogue box will open. Type in the language you want to add and click the corresponding option below. <br/><br/>[[File:ime_5.png]]<br/><br/> | ||
#Another dialogue box will open with a list of | #Another dialogue box will open with a list of language features, check the options you want to enable, then click install. <br/><br/>[[File:ime_6.png]]<br/><br/> | ||
#The dialogue box should have closed and you will now see your changes displayed in the list of active IMEs. Click "Apply" to close the dialogue box and apply your changes. <br/><br/>[[File:ime_7.png]]<br/><br/> | #The dialogue box should have closed and you will now see your changes displayed in the list of active IMEs. Click "Apply" to close the dialogue box and apply your changes. <br/><br/>[[File:ime_7.png]]<br/><br/> | ||
#The new IME should now be setup. If this is the first time you've added an IME a new icon should appear in the bottom right corner of your screen near the taskbar that allows you to switch between IMEs and configure them. <br/><br/>[[File:ime_8.png]]<br/><br/> | #The new IME should now be setup. If this is the first time you've added an IME a new icon should appear in the bottom right corner of your screen near the taskbar that allows you to switch between IMEs and configure them. <br/><br/>[[File:ime_8.png]]<br/><br/> | ||
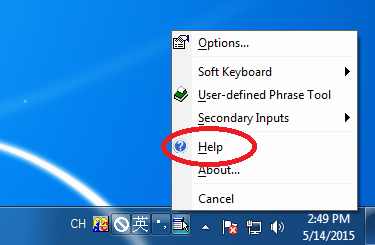
#To configure an IME or access the help pages about it to learn how to use it, click the Options Menu icon on the right side of the language bar. <br/><br/>[[File:ime_9.png]]<br/><br/> | #To configure an IME or access the help pages about it to learn how to use it, click the Options Menu icon on the right side of the language bar. <br/><br/>[[File:ime_9.png]]<br/><br/> | ||
Revision as of 16:17, 16 June 2025
Input method editors or IMEs make it easier to type in languages (usually but not limited to East Asian ones) that are made up of thousands of characters that can't fit on a standard keyboard
Adding an IME
IMEs are a per user setting and can be added/removed/customized without any need for administrative privileges. To add an IME to your account please follow these instructions.
- Click the Windows button and type in settings.
[[]] - Click "Time & Language".

- Click "Language & region".

- Click "Add a language".
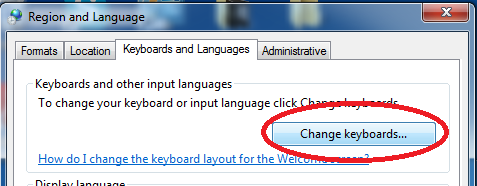
- A new dialogue box will open. Type in the language you want to add and click the corresponding option below.
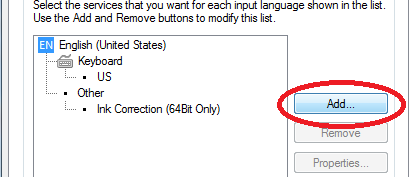
- Another dialogue box will open with a list of language features, check the options you want to enable, then click install.
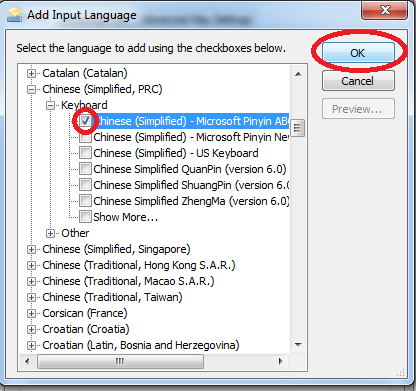
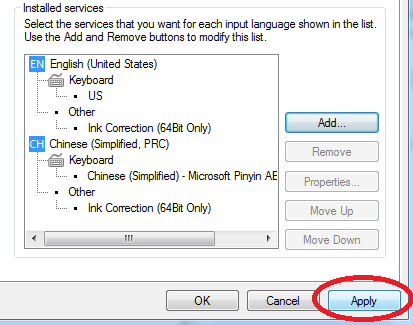
- The dialogue box should have closed and you will now see your changes displayed in the list of active IMEs. Click "Apply" to close the dialogue box and apply your changes.
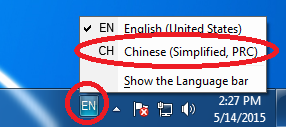
- The new IME should now be setup. If this is the first time you've added an IME a new icon should appear in the bottom right corner of your screen near the taskbar that allows you to switch between IMEs and configure them.
- To configure an IME or access the help pages about it to learn how to use it, click the Options Menu icon on the right side of the language bar.
