MacOSPrinting: Difference between revisions
Jump to navigation
Jump to search
No edit summary |
No edit summary |
||
| Line 16: | Line 16: | ||
[[Image:osxprint.jpg]] | [[Image:osxprint.jpg]] | ||
<hr> | |||
We support printing from user managed Mac OS X 10.5/10.6 machines. Please note that you have to be on a UMIACS network directly or connected to the [VPN]. | |||
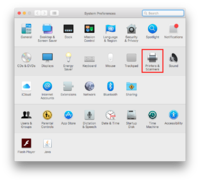
To start you need to open up you will need to open your System Preferences from your Dock or the Applications folder. Once you have opened it you will need to click '''Print & Fax''' from the Hardware pane. | |||
[[Image:osx-print00.png|thumb|200px]] | |||
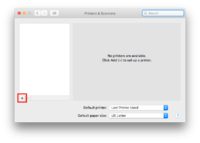
When the '''Print & Fax''' window appears you will need to create a new local printer by clicking the '''+''' icon in the lower left corner of the first pane in the window. | |||
[[Image:osx-print01.png|thumb|200px]] | |||
This will | |||
[[Image:osx-print02.png|thumb|200px]] | |||
{{Image image=osx-print02.png}} | |||
[[Image:osx-print03.png|thumb|200px]] | |||
Revision as of 21:22, 7 April 2011
OS X (versions 10.3 and 10.4)
If you are printing from OS X please follow these steps:
- Go to Applications->Utilities
- Click on:
- Press the Add icon
- Choose IP Printer
- Select 'Line Printer Daemon - LPD' for Protocol
- Address: lpr1.umiacs.umd.edu
- Queue: enter the printer name you wish to use (e.g. ps3142)
- Name: default is lpr1.umiacs.umd.edu, you WILL want to change this or if you add another printer they will both have the same name. Put in the name you want for the printer (e.g. ps3142).
- Print Using: the default will work most of the time. However, if you wish to use advanced features like duplexing, click the pull-down and choose "Select a driver to use..." This will bring up a list of printer models and a search field. You can then search for and select the appropriate driver for the printer you are adding.
- click add
We support printing from user managed Mac OS X 10.5/10.6 machines. Please note that you have to be on a UMIACS network directly or connected to the [VPN].
To start you need to open up you will need to open your System Preferences from your Dock or the Applications folder. Once you have opened it you will need to click Print & Fax from the Hardware pane.

When the Print & Fax window appears you will need to create a new local printer by clicking the + icon in the lower left corner of the first pane in the window.

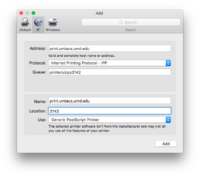
This will

Template:Image image=osx-print02.png