Google Drive/Backup and Sync: Difference between revisions
No edit summary |
No edit summary |
||
| Line 47: | Line 47: | ||
==Linux Setup== | ==Linux Setup== | ||
In order to sync files to Google Drive on Linux systems, use of the command line program Rclone is necessary. | In order to sync files to Google Drive on Linux systems, use of the command line program Rclone is necessary. | ||
The first step is to SSH into one of UMIACS' hosts with X11 forwarding enabled (Use the -XY flag) or gain physical access to the command line. | |||
Then load into the Rclone module using: | |||
<pre> | <pre> | ||
module load rclone | module load rclone | ||
</pre> | </pre> | ||
If the module is NOT installed on the machine, use this command to install it: | |||
<pre> | <pre> | ||
sudo curl https://rclone.org/install.sh | sudo curl https://rclone.org/install.sh | ||
</pre> | </pre> | ||
Once installed, load into it using the previous command. | |||
To make a new remote, run the command <tt>rclone config</tt>. This should produce output similar to what is below: | |||
<pre> | |||
n) New remote | |||
r) Rename remote | |||
c) Copy remote | |||
s) Set configuration password | |||
q) Quit config | |||
n/r/c/s/q> | |||
</pre> | |||
Choose to make a new remote, and give it a name. There should then be prompt asking for the type of storage to configure. Input <tt>drive</tt> for Google Drive. | |||
<pre> | |||
Type of storage to configure. | |||
Enter a string value. Press Enter for the default (""). | |||
Choose a number from below, or type in your own value | |||
1 / 1Fichier | |||
\ "fichier" | |||
2 / Alias for an existing remote | |||
\ "alias" | |||
3 / Amazon Drive | |||
\ "amazon cloud drive" | |||
4 / Amazon S3 Compliant Storage Provider (AWS, Alibaba, Ceph, Digital Ocean, Dreamhost, IBM COS, Minio, Tencent COS, etc) | |||
\ "s3" | |||
5 / Backblaze B2 | |||
\ "b2" | |||
6 / Box | |||
\ "box" | |||
7 / Cache a remote | |||
\ "cache" | |||
8 / Citrix Sharefile | |||
\ "sharefile" | |||
9 / Dropbox | |||
\ "dropbox" | |||
10 / Encrypt/Decrypt a remote | |||
\ "crypt" | |||
11 / FTP Connection | |||
\ "ftp" | |||
12 / Google Cloud Storage (this is not Google Drive) | |||
\ "google cloud storage" | |||
13 / Google Drive | |||
\ "drive" | |||
14 / Google Photos | |||
\ "google photos" | |||
15 / Hubic | |||
\ "hubic" | |||
16 / In memory object storage system. | |||
\ "memory" | |||
17 / Jottacloud | |||
\ "jottacloud" | |||
18 / Koofr | |||
\ "koofr" | |||
19 / Local Disk | |||
\ "local" | |||
20 / Mail.ru Cloud | |||
\ "mailru" | |||
21 / Mega | |||
\ "mega" | |||
22 / Microsoft Azure Blob Storage | |||
\ "azureblob" | |||
23 / Microsoft OneDrive | |||
\ "onedrive" | |||
24 / OpenDrive | |||
\ "opendrive" | |||
25 / OpenStack Swift (Rackspace Cloud Files, Memset Memstore, OVH) | |||
\ "swift" | |||
26 / Pcloud | |||
\ "pcloud" | |||
27 / Put.io | |||
\ "putio" | |||
28 / QingCloud Object Storage | |||
\ "qingstor" | |||
29 / SSH/SFTP Connection | |||
\ "sftp" | |||
30 / Sugarsync | |||
\ "sugarsync" | |||
31 / Tardigrade Decentralized Cloud Storage | |||
\ "tardigrade" | |||
32 / Transparently chunk/split large files | |||
\ "chunker" | |||
33 / Union merges the contents of several upstream fs | |||
\ "union" | |||
34 / Webdav | |||
\ "webdav" | |||
35 / Yandex Disk | |||
\ "yandex" | |||
36 / http Connection | |||
\ "http" | |||
37 / premiumize.me | |||
\ "premiumizeme" | |||
38 / seafile | |||
\ "seafile" | |||
Storage> drive | |||
</pre> | |||
Revision as of 17:33, 24 February 2021
Currently, Backup and Sync is the only option for continuous backup of local files on a machine. This means that after selecting designated locations on the machine, these locations and all of the files within them will be backed up to Google Drive.
Windows Setup
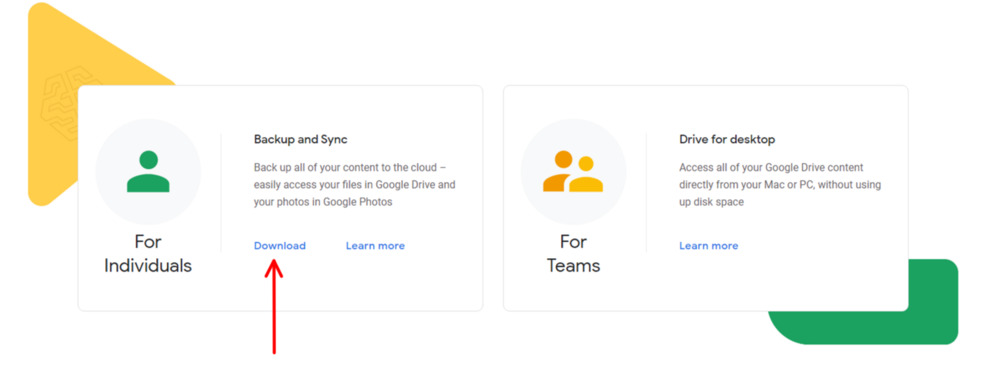
- Google Drive Backup and Sync can be downloaded here: https://www.google.com/drive/download/
Once at the webpage, navigate to the lower left-hand box labeled "Backup and Sync" and click the download button.
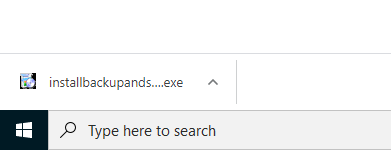
- Select the file "installbackupandsync.exe" in the lower left-hand corner of your browser and select "Yes" to install the software on your machine.
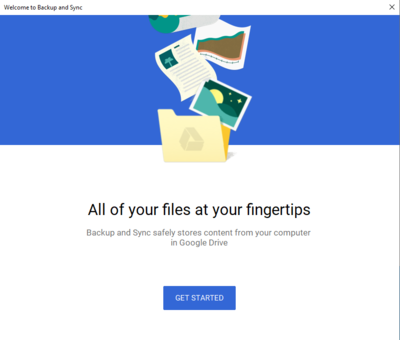
- After a few seconds a pop-up window should appear with a "Get Started" button. If the window does not appear, minimize your browser or any other windows on your desktop as it might be hiding beneath them.
- Select the "Get Started" button.
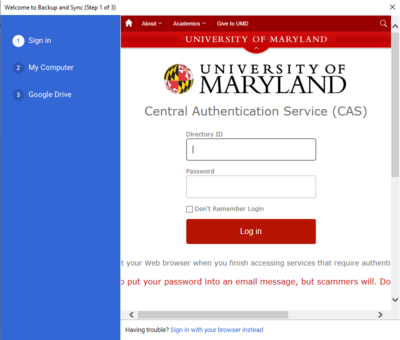
- The window will then prompt for sign in with a Google account. Sign into your UMD account using your $USERNAME@umd.edu email.
- You will then be brought to the UMD CAS Dual Factor Authentication Screen. Sign in with your normal credentials and dual factor authenticate.
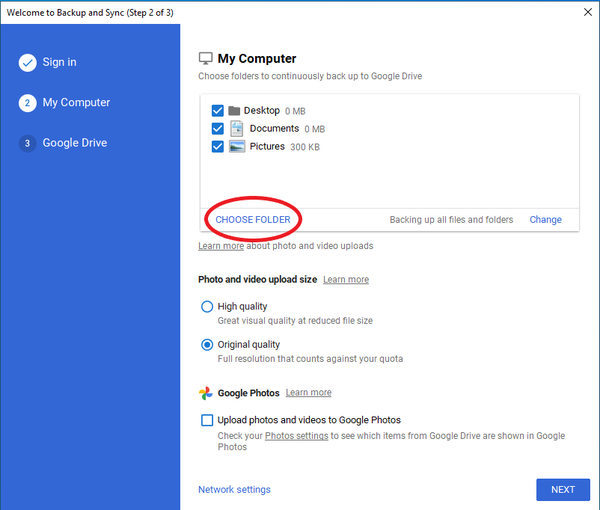
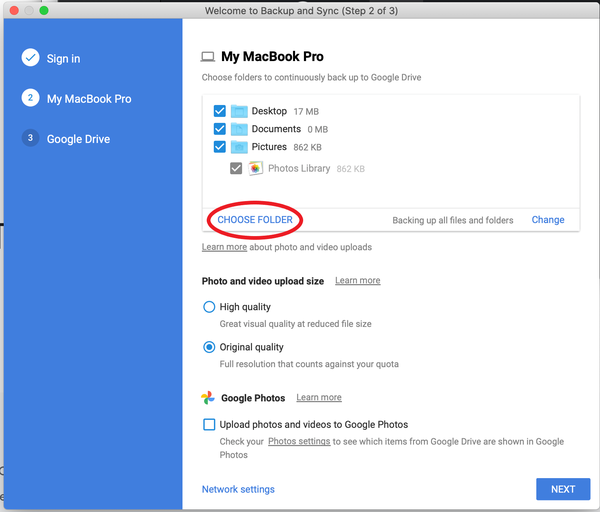
- Upon a successful sign in, you will be brought to the "My Computer" screen. At this point, select the folders and locations that you wish to have backed up to Google Drive. Any folders or locations which are not selected will not be recoverable via Google Drive.
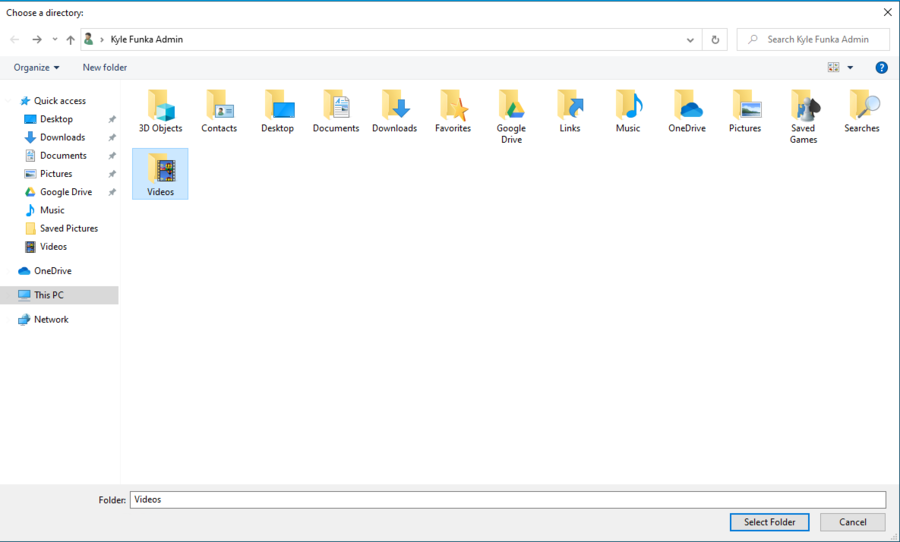
- In order to add a folder to be backed up, select the "CHOOSE FOLDER" button.
- This will bring you to your File Explorer where you can select a specific folder on the machine that you would like to be backed up. In this example the "Videos" folder was selected to be backed up.
:
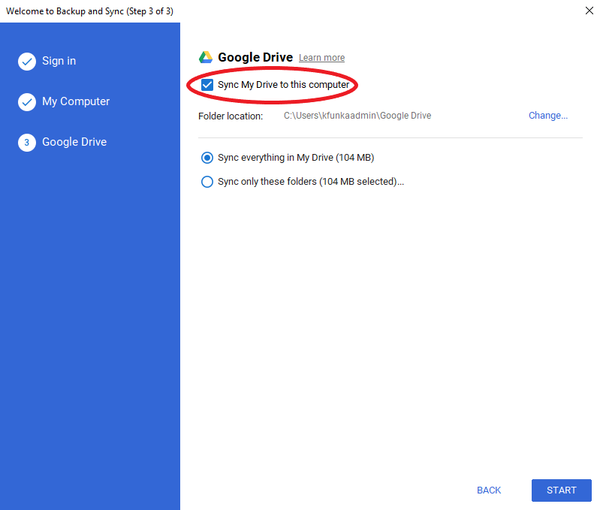
- After this there will be a prompt to "Sync My Drive to this computer". If this checkbox is selected, a file location will be created on the computer labeled "Google Drive" that will be synced with all of the files uploaded to your Google Drive from any device, not just the files selected in the previous step for backup.
:
- At this point, Backup and Sync has been installed. Any folders with green checkmarks next to them in File Explorer are backed up to Google Drive.
MacOS Setup
- Google Drive Backup and Sync can be downloaded here: https://www.google.com/drive/download/
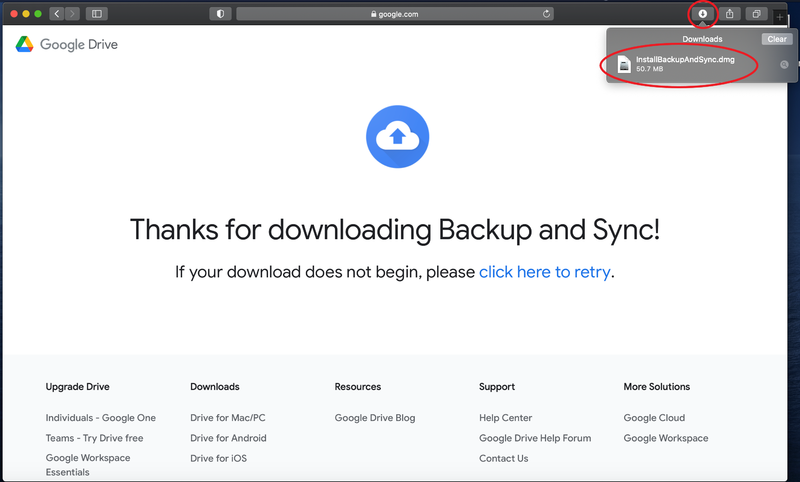
Once at the webpage, navigate to the lower left-hand box labeled "Backup and Sync" and click the download button. If the download does not work select the "click here to retry" hyperlink in the next window.
- Select the icon in the top right of the browser window with the downward arrow in the white circle. A file named "InstallBackupAndSync.dmg" should appear. Select this file.
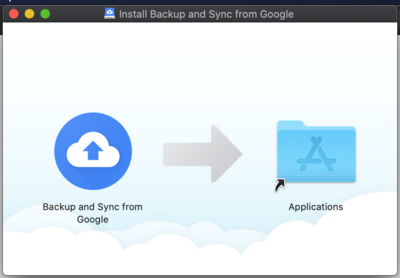
- Another window should pop up with the "Backup and Sync from Google" icon and an arrow pointing to the "Applications" folder. Drag and drop the "Backup and Sync from Google" icon into the "Applications" folder to begin the installation.
- If it does not open automatically, open the "Applications" folder, then double click the "Backup and Sync from Google" icon.
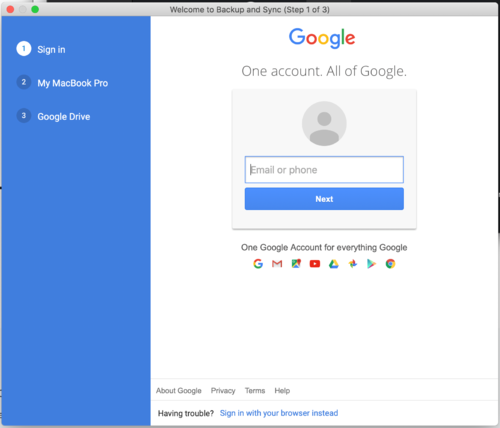
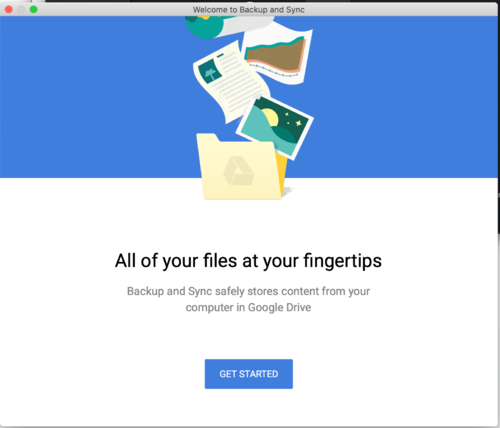
- Accept any permissions that the install requires and a window should pop up. Select the "GET STARTED" button.
:
- The window will then prompt for sign in with a Google account. Sign into your UMD account using your $USERNAME@umd.edu email.
- You will then be brought to the UMD CAS Dual Factor Authentication Screen. Sign in with your normal credentials and dual factor authenticate.
- Upon a successful sign in, you will be able to select the folders and locations that you wish to have backed up to Google Drive. Any folders or locations which are not selected will not be recoverable via Google Drive.
- In order to add a folder to be backed up, select the "CHOOSE FOLDER" button.
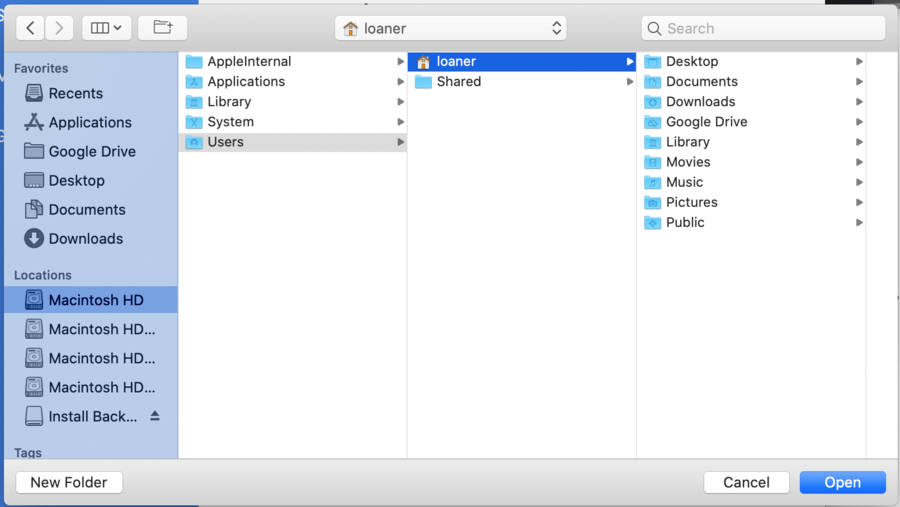
- This will bring you to your file explorer where you can select a specific folder on the machine that you would like to be backed up. Select the folder and then click the "Open" button to add it to the locations that will be backed up.
:
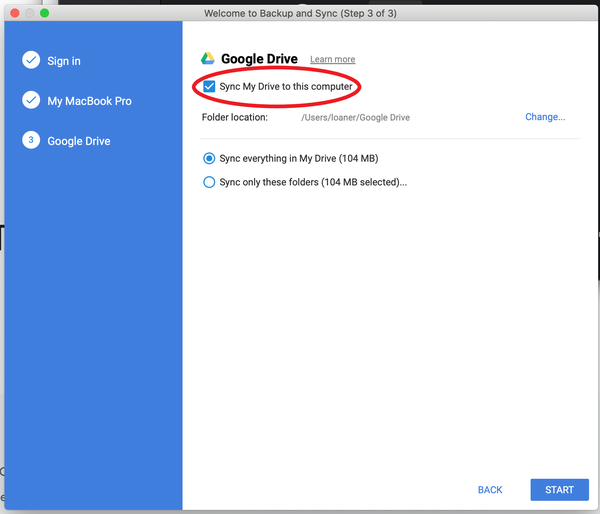
- After this there will be a prompt to "Sync My Drive to this computer". If this checkbox is selected, a file location will be created on the computer labeled "Google Drive" that will be synced with all of the files uploaded to your Google Drive from any device, not just the files selected in the previous step for backup.
:
- At this point, Backup and Sync has been installed. Any folders with green checkmarks next to them in File Explorer are backed up to Google Drive.
Linux Setup
In order to sync files to Google Drive on Linux systems, use of the command line program Rclone is necessary. The first step is to SSH into one of UMIACS' hosts with X11 forwarding enabled (Use the -XY flag) or gain physical access to the command line. Then load into the Rclone module using:
module load rclone
If the module is NOT installed on the machine, use this command to install it:
sudo curl https://rclone.org/install.sh
Once installed, load into it using the previous command.
To make a new remote, run the command rclone config. This should produce output similar to what is below:
n) New remote
r) Rename remote
c) Copy remote
s) Set configuration password
q) Quit config
n/r/c/s/q>
Choose to make a new remote, and give it a name. There should then be prompt asking for the type of storage to configure. Input drive for Google Drive.
Type of storage to configure.
Enter a string value. Press Enter for the default ("").
Choose a number from below, or type in your own value
 1 / 1Fichier
   \ "fichier"
 2 / Alias for an existing remote
   \ "alias"
 3 / Amazon Drive
   \ "amazon cloud drive"
 4 / Amazon S3 Compliant Storage Provider (AWS, Alibaba, Ceph, Digital Ocean, Dreamhost, IBM COS, Minio, Tencent COS, etc)
   \ "s3"
 5 / Backblaze B2
   \ "b2"
 6 / Box
   \ "box"
 7 / Cache a remote
   \ "cache"
 8 / Citrix Sharefile
   \ "sharefile"
 9 / Dropbox
   \ "dropbox"
10 / Encrypt/Decrypt a remote
   \ "crypt"
11 / FTP Connection
   \ "ftp"
12 / Google Cloud Storage (this is not Google Drive)
   \ "google cloud storage"
13 / Google Drive
   \ "drive"
14 / Google Photos
   \ "google photos"
15 / Hubic
   \ "hubic"
16 / In memory object storage system.
   \ "memory"
17 / Jottacloud
   \ "jottacloud"
18 / Koofr
   \ "koofr"
19 / Local Disk
   \ "local"
20 / Mail.ru Cloud
   \ "mailru"
21 / Mega
   \ "mega"
22 / Microsoft Azure Blob Storage
   \ "azureblob"
23 / Microsoft OneDrive
   \ "onedrive"
24 / OpenDrive
   \ "opendrive"
25 / OpenStack Swift (Rackspace Cloud Files, Memset Memstore, OVH)
   \ "swift"
26 / Pcloud
   \ "pcloud"
27 / Put.io
   \ "putio"
28 / QingCloud Object Storage
   \ "qingstor"
29 / SSH/SFTP Connection
   \ "sftp"
30 / Sugarsync
   \ "sugarsync"
31 / Tardigrade Decentralized Cloud Storage
   \ "tardigrade"
32 / Transparently chunk/split large files
   \ "chunker"
33 / Union merges the contents of several upstream fs
   \ "union"
34 / Webdav
   \ "webdav"
35 / Yandex Disk
   \ "yandex"
36 / http Connection
   \ "http"
37 / premiumize.me
   \ "premiumizeme"
38 / seafile
   \ "seafile"
Storage> drive
