OBJ/WebHosting
On the settings page for each bucket, there is a section allowing you to specify a configuration for a website hosted in your bucket. You can choose keys located in your bucket to act as the index file (what will be displayed when someone visits your website) and the error file (what will be displayed when an error is encountered loading your website). These settings can be updated at any time.
Because hosting a website through your bucket requires others to have access to any keys associated with your website, setting up a website configuration will automatically set the visibility of your bucket to public and remove the bucket level ACLs. You will not be able to set the bucket back to private without first removing the website configuration, which can be done on the bucket settings page.
The Object Store only has the capability to support static content and client-side scripting in bucket websites.
Hosting a Website
Hosting a website in OBJ is quite easy and can be done in a few simple steps. There are two different ways you can set up your OBJ bucket to host a static website.
First Method (Using the Web Interface):
- Log into OBJ and create a bucket. Make sure to choose a bucket name carefully since this will be part of the web URL.
- Upload your index.html file and optional error.html file (and any other required files for your website) on the bucket that you just created.
- Once the bucket is created, click on Bucket Settings
- On the settings page, click on the blue Make Public button.
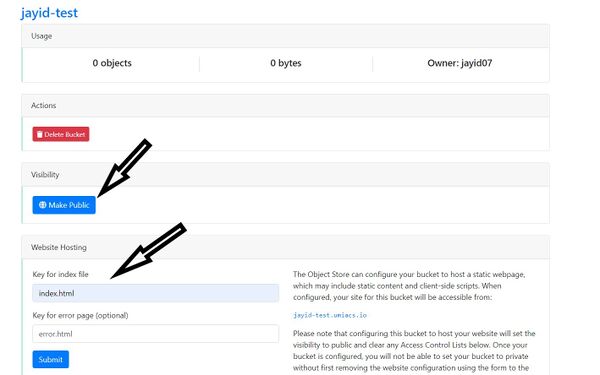
- Under Website Hosting, enter the name of your index.html (and optionally error.html) file and hit Submit.

Second Method (Using the UMobj CLI):
- Set up your environment variables.
- On the shell enter
mkobj <bucket_name>to create a bucket. Your bucket name must be unique. You can enterlsobj -lto see the existing buckets. - Copy all the required files to the bucket:
cpobj [source_directory]/file_name <bucket_name>:. For example,cpobj /fs/www-users/jayid-test/index.html jayid-test: - Create a web configuration for your bucket:
webobj -m create -c website --index=index.html --error=error.html <bucket_name>
Note: Once the bucket is configured and all the required files are uploaded, please log into your UMIACS Directory and update the Home Page attribute to http://<Bucket_name>.umiacs.io. Replace <Bucket_name> with the name of the bucket you created.
Accessing the Website
You can access your personal website by using the default URL which has the form http://<Bucket_name>.umiacs.io. Alternatively, you can also visit www.umiacs.umd.edu/~username to visit your website.
Disabling a Website
If you no longer wish to host a website, you can disable the bucket's web configuration.
Using the web interface:
- Click on the bucket where you are hosting your website and then click on Bucket Settings.
- On the settings page you can, click on Remove Website Configuration. Alternatively, you can also click on the Make Private button to make your bucket private and remove any associated web configuration.
Using the CLI:
Enter the following command in the terminal: webobj -m delete -c website <bucket_name>