OpenCVVersions: Difference between revisions
Jump to navigation
Jump to search
(Created page with "== WIN32 == # Download the current OpenCV version [http://sourceforge.net/projects/opencvlibrary] # Run the exe and extract the files to a folder you have access to such as <c...") |
No edit summary |
||
| (6 intermediate revisions by 2 users not shown) | |||
| Line 1: | Line 1: | ||
== | == Windows == | ||
# Download the | These directions are for 64-bit systems. | ||
# | |||
First, we install OpenCV | |||
# Download the desired version of OpenCV from [https://opencv.org/releases/ here] | |||
# Double click the downloaded executable to install, and select <code> run</code> at the prompt | |||
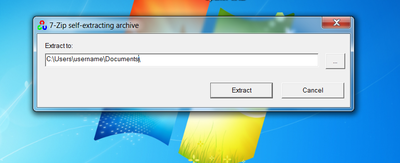
# Choose a home directory as installation location home directory as shown below, where "username" is the actual username. | |||
# Click extract, to install OpenCV files | |||
#* [[File: Install_location.png|400px]] | |||
#** Click to enlarge | |||
==== Without CUDA ==== | ==== Without CUDA ==== | ||
<ol> | <ol> | ||
The path to the folder you extracted is from here on refered to as ''{OPENCV}'' | |||
</ol> | </ol> | ||
==== Project Set-Up ==== | Next, we setup environmental variables | ||
#Navigate to <code>Control Panel</code> -> <code>System and Security</code> -> <code>System</code> | |||
# Select <code>Advanced system settings</code> from the sidebar | |||
# In the <code>Advanced</code> tab click the <code>Environment Variables...</code> button | |||
# Check if a Variable called <code>Path</code> exists in the list of user variables (the top variables) | |||
#* If it exists, click edit to edit the variable, and add a semicolon, then the following to the end of the Path value <code>''{OPENCV}''\build\x64\vc10\bin</code> | |||
<!---#** vc10 should be replaced with vc11 or vc12 depending on the version of visual studio installed In this case: --> | |||
#* If it does not, press the New button and set the variable name to <code>Path</code> and the value to the path to your opencv directory (''{OPENCV}'') | |||
==== Visual Studio Project Set-Up ==== | |||
# Go to Project -> Properties | # Go to Project -> Properties | ||
#* Configuration Properties -> C/C++ -> General | #* Configuration Properties -> C/C++ -> General | ||
| Line 13: | Line 29: | ||
#** Executable Directories...add: '''{OPENCV}''\build\x64\vc10\bin;' | #** Executable Directories...add: '''{OPENCV}''\build\x64\vc10\bin;' | ||
#** Library Directories...add: '''{OPENCV}''\build\x64\vc10\lib;''{OPENCV}''\build\x64\vc10\staticlib;' | #** Library Directories...add: '''{OPENCV}''\build\x64\vc10\lib;''{OPENCV}''\build\x64\vc10\staticlib;' | ||
==== More Information ==== | |||
* For using OpenCV with Visiual Studio; http://docs.opencv.org/doc/tutorials/introduction/windows_install/windows_install.html#windows-installation | |||
* For using OpenCV with CUDA; http://blog.cuvilib.com/2011/03/22/how-to-build-opencv-2-2-with-gpu-cuda-on-windows-7/ | |||
Latest revision as of 16:51, 21 April 2020
Windows
These directions are for 64-bit systems.
First, we install OpenCV
- Download the desired version of OpenCV from here
- Double click the downloaded executable to install, and select
runat the prompt - Choose a home directory as installation location home directory as shown below, where "username" is the actual username.
- Click extract, to install OpenCV files
- Click to enlarge

Without CUDA
-
The path to the folder you extracted is from here on refered to as {OPENCV}
Next, we setup environmental variables
- Navigate to
Control Panel->System and Security->System - Select
Advanced system settingsfrom the sidebar - In the
Advancedtab click theEnvironment Variables...button - Check if a Variable called
Pathexists in the list of user variables (the top variables)- If it exists, click edit to edit the variable, and add a semicolon, then the following to the end of the Path value
{OPENCV}\build\x64\vc10\bin - If it does not, press the New button and set the variable name to
Pathand the value to the path to your opencv directory ({OPENCV})
- If it exists, click edit to edit the variable, and add a semicolon, then the following to the end of the Path value
Visual Studio Project Set-Up
- Go to Project -> Properties
- Configuration Properties -> C/C++ -> General
- Additional Include Directories...add: '{OPENCV}\build\include;'
- Configuration Properties -> VC++ Directories
- Executable Directories...add: '{OPENCV}\build\x64\vc10\bin;'
- Library Directories...add: '{OPENCV}\build\x64\vc10\lib;{OPENCV}\build\x64\vc10\staticlib;'
- Configuration Properties -> C/C++ -> General
More Information
- For using OpenCV with Visiual Studio; http://docs.opencv.org/doc/tutorials/introduction/windows_install/windows_install.html#windows-installation
- For using OpenCV with CUDA; http://blog.cuvilib.com/2011/03/22/how-to-build-opencv-2-2-with-gpu-cuda-on-windows-7/