Adobe Illustrator for Beginners: Difference between revisions
mNo edit summary |
No edit summary |
||
| Line 74: | Line 74: | ||
'''Deleting Elements:''' | '''Deleting Elements:''' | ||
In order to delete elements on the canvas, simply select the item so it is highlighted with a border around it and click Command+X or | In order to delete elements on the canvas, simply select the item so it is highlighted with a border around it and click delete. | ||
'''Cutting Elements:''' | |||
If you want to remove something and copy it at the same time, you can highlight it then click Control+X (or Command+X for Macs). This will copy it to your clipboard and if you paste (using Control or Command + V) it will create a copy. | |||
Revision as of 17:04, 16 February 2020
Overview
On this page we will go over the basic skills needed to start a small project in Adobe Illustrator. This page will be useful for beginners who have never used Adobe Illustrator before. It will include very basic information and demonstrations for the starting tools that you will need and help explain the layout of Adobe. Once you get accustomed to this page (or already are) and would like more information, you can go to Adobe Illustrator for more help on the rest of Adobe.
Getting Started
Signing In
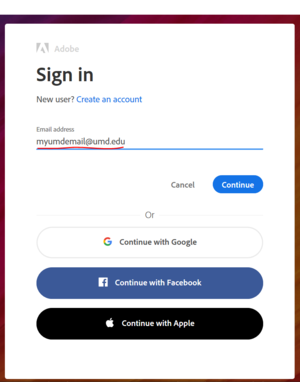
Adobe Illustrator is a paid program that requires a valid log in to be able to use. Fortunately, UMD provides all students with access to many Adobe products. If you just enter your UMD email (ending in @umd.edu not @terpmail.umd.edu) then you will be redirected to the Central Authentication Service (CAS) screen like if you were logging onto Testudo. Just enter your credentials and Adobe will load up.
If you are using Adobe on your personal computer you will only need to login once before it remembers you but if you are using the computers at Sandbox, you will need to log in every time to computer logs off since the computer is reset upon login. Logging in to Adobe Illustrator here will also give you access to other Adobe products you have on your computer so you don't need to login multiple times.
Creating the Canvas
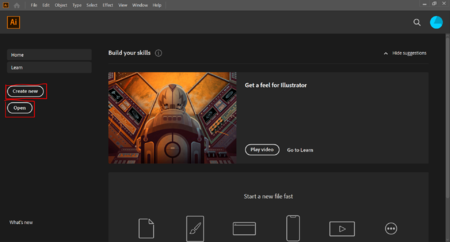
When you first open Adobe Illustrator, it might seem confusing about where to start, but for starting out all you need to know about the main screen is the "Create New", and "Open" buttons. The "Create New" button is for creating a new canvas with specified dimensions. "Open" can be used to open previously saved Adobe files by browsing your files for the saved file and opening it.
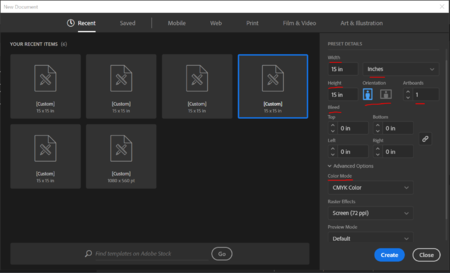
Then you will be greeted by a screen asking for a choice of dimensions and presets to start your project. On the left, you will see squares representing the settings for projects you have used recently. On the right, you can see the details of that preset like height/width, units of measurement, orientation, etc. The four texts, top/bottom/left/right are the bleed settings that allow you to have a margin of error by printing a little more passed the work space if you accidentally go over the edge. This is mostly useful for doing printing of things done in Adobe. In the advanced options you can change the Color Mode. If you are using Adobe for the laser cutters, it is recommended that you change the mode to RGB because in order to make 255 BLUE or 255 RED for vector or cutting, you need to be in RGB mode. The artboard setting allows you to create new artboards (will later explain what artboards are in the next section).
If you find yourself constantly using the same preset, you should try renaming the preset so you always know which you want and make it easier to find.
Once you are satisfied with your settings, you can hit create to start your project!
Adobe Illustration Basic Knowledge
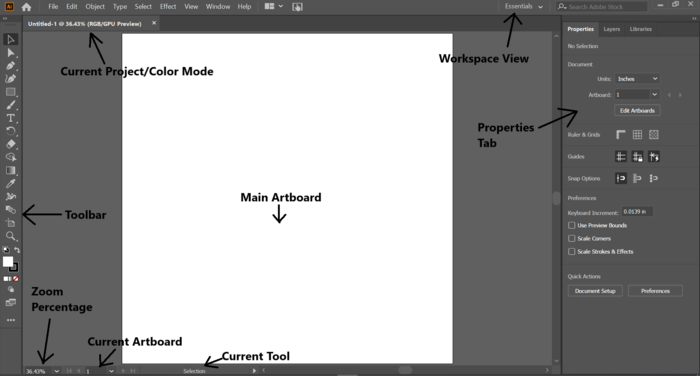
Once loaded up you will see a screen with a blank white box and many tools and buttons on the left and right side. The blank white box in the middle of the screen is called your artboard. This is where you will do any of your work to be printed. Without bleeding margins, only things inside the artboard will be printed. You can create multiple artboards and work on multiple at once and choose which one to print as well. More information on this can be found on Using Artboards in the Adobe Illustrator article.
Toolbar: On the left you see the tools tab. The tab holds many preset tools that are commonly used but can be changed depending on what tools you want to use. You can edit the tools in the toolbar by clicking the three dots at the bottom of the toolbar.
Current Project Tab: On the top left, you can see the current project tab. This shows you the name of your current project as well as what color mode you are in. The color mode can be changed in File -> Document Color Mode. Changing this will change how the colors are created. If you are new, either will work unless you are using Adobe for the laser cutter in which case you will want to use RGB mode to set full red or blue for cuts.
Zoom Control: At the bottom on the left you can see the zoom percentage. This shows you how close you are to the artboard, the higher the percent, the larger everything will look. The most useful part of this is at the bottom of the drop down menu, there is a "Fit on Screen" that will zoom in just enough that the current artboard is as big as possible without going over the screen.
Artrboard Navigation: To the right of the zoom is the current artboard. Generally this will always say 1 unless you create more artboards. You can use the single arrows to navigate to the next and previous artboard and the other skip arrows to go to the last and first artboard.
Main Artboard: The main artboard is the base one created by using the settings set in the create screen. There will always be this base one created because most projects only need one artboard but this one is no different than any other artboard.
Current Tool Display: The last thing on the right of that is the current tool. This is also useful for when using hotkeys to change tools, like holding shift or alt will update the tool name at the bottom to tell you what it does.
Properties Tab: On the right side of the screen you will see the properties tab. This tab will show you the properties of whatever you have selected. Currently, nothing is selected so it is showing you the document properties. The properties tab holds a lot of useful information about editing objects...
Workspace Menu: At the top righthand side of the screen before the search bar you will see a menu for different workspaces. We will be working with Essentials Classic so it is important to change that to understand how this workspaces operates. Many tutorials will also use Essentials Classic so switching from Essentials can help when using outside resources as well.
Properties Basics
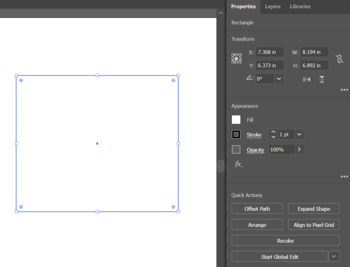
The properties are the settings you can change about objects to modify how they look. You can look at the object properties by using the selection tool (Hotkey - V) and clicking on a shape or object. This will change the tab on the right from the document properties to object properties.
In this tab you can see many options with your object. At the top you can see the name of what is selected to not mistakenly change the wrong object.
Transform: This tab is used for translating/rotating/resizing the object. The X and Y spaces are for locating the object at a specific point on your artboard. The point that they measure from is chosen by the square made up of 9 squares to the left of the text boxes. The highlighted box is the location of the reference point. So if you wanted to measure from the top left you would click the top left box. The x and y axis both start on the top left. The X increases as you go right and the Y increases as you go down.
The text box below the X and Y is the rotation. You can manually enter an amount of degrees or click the drop down for 30 degree increments. This will turn your object a certain amount out of a 360 degree circle. Directly to the right of that is the flip buttons. This will mirror your object over the horizontal or vertical axis from where the reference point is.
The last two text boxes above the flip buttons and to the right of the X and Y text boxes are the Width and Height text boxes. You can manually enter a width or height instead of dragging the size to be bigger or smaller in the artboard. The lock looking button to the right of the width and height is used to maintain proportions when changing the height or width. When clicked, changing either the height or width will change the other.
There is also a quick access version of the transform tab which allows you to execute actions such as scale, reflect, rotate, move, and shear (although it might be easier to just click and drag your object to move it). You can access this menu by right-clicking on the object you would like to manipulate and clicking transform in order to view these options.
- Quick Access Menu
- Move: Tool helps manipulate selected object around canvas.
- Rotate: Tool allows you to rotate object in terms of degrees. After rotating object, new position becomes the object at 0 degrees regardless of whether or not the object lies evenly.
- Reflect: Tool reflects the object on the axis of your choosing in degrees. Automatically reflects 90 degrees
- Scale: This tool allows you to reduce or increase the size of your objects size by a percentage of the current size. Setting this percentage to 100 keeps the image at the same size, requiring a larger number to increase size and a smaller number to decrease size.
- Shear: Used to shift part of the image.
Appearance:
Quick Actions:
Miscellaneous
Importing Images: There are two ways you can import photos and images into your canvas in Illustrator. If your image has been copied to your clipboard, you can simply paste in onto the canvas using Command+V or Ctrl+V or go into the dropdown edit menu at the top of the screen and select Paste. In order to import images from a file, go to the dropdown File menu at the top of the screen and select open to browse your computer files.
Deleting Elements: In order to delete elements on the canvas, simply select the item so it is highlighted with a border around it and click delete.
Cutting Elements: If you want to remove something and copy it at the same time, you can highlight it then click Control+X (or Command+X for Macs). This will copy it to your clipboard and if you paste (using Control or Command + V) it will create a copy.
