Adobe Illustrator
Preface: This page works in conjuction with Adobe Illustrator for Beginners. If you are unsure of what something is then you should check the beginner page, otherwise if you want to learn how to use something then this page is for you.
Overview
Adobe Illustrator (often shortened to AI or Illustrator) is a graphic design and illustration application widely used by artists and graphic designers. AI provides an enormous range of functionality for drawing vector-based art and combining these drawings with raster-based bitmap images. Because of this robust feature set it can be difficult to learn. Books, online tutorials and how-to videos often focus on the use of AI for creating commercial art projects. The purpose of this page is to explain the important subset of Illustrator features useful for creating projects to be cut and engraved on a laser cutter as well as to explain some of the specifics needed to prepare an Illustrator drawing to successfully cut and engrave on the ULS laser cutters used in Sandbox.
Sandbox has elected to focus on the use of Adobe Illustrator for laser projects in part because this program is available at no cost to all current UMD students via the Terpware site. You can install Illustrator and create designs on your own computer and bring the completed design as an .AI file to be cut and engraved at Sandbox.
Other popular software used to prepare projects for laser cutting are Corel Draw, which is similar in functionality to Illustrator, and Inkscape which is primarily a vector drawing program. It is also possible to use a CAD program such as AutoCAD or Fusion 360 to create a laser project. Use of these other software packages will not be discussed in this page.
Adobe Illustrator may also be used to prepare projects to be cut on the Glowforge laser cutter but many projects may instead be done completely within the Glowforge web application. This page does not discuss importing Illustrator files into the Glowforge web application.
Since AI is a vector-based drawing program with raster editing features it is a popular choice for preparing projects to be cut on a laser cutter as laser projects often combine vector lines to be cut (or scored) and raster images to be engraved. Using a vector drawing program is important for the cutting and scoring operations done on a laser as this allows you to draw an object to exact dimensions -- much as you would do with a more specialized computer aided design (CAD) software package -- and to have this object sent to the laser as a precise vector to be cut.
If you were to draw a square or similar shape in both a vector drawing program and a raster drawing program the resulting images might look similar but the model used to store these images would be very different. The vector program would create a mathematical representation of the shape and store this as a series of vectors, lines and arcs. The raster drawing program would store the image as a bitmap, an array of dots that create the shapes. both Adobe Illustrator and Adobe Photoshop a raster-based program such as Adobe Photoshop
The basic process for sending a file from Adobe Illustrator to the ULS laser cutter is:
- Draw the shapes to be cut and engraved in Illustrator.
- Import any images needed into Illustrator and adjust them to engrave correctly or trace them if you intend to cut or score these shapes.
- Verify that the stroke width and color of all objects you've drawn are set correctly to tell the laser cutter to cut, score, or raster engrave that object.
- Use Illustrator's Print command to send the shapes to the ULS print driver.
- Switch to the ULS Universal Control Panel (UCP) application to correctly position your project and to set the power settings for the material you are cutting.
If you would like anything added to the wiki please comment in the discussion tab at the top or inform a manager.
Adobe Illustrator Basics
The easiest way to get started is clicking create new and either using one of the preset templates for size or go to art & illustration and making a large canvas by changing the size to some large number bigger than you need like 15 inches by 15 inches (Make sure you change the units from points to inches).
Make sure you are in RGB mode under "Advanced Options" because if you aren't then you won't be able to make a full blue line for vector cutting (To change, go to File->Document Color Mode).

Basic Tools
There are many basics for Adobe Illustrator that can help you out. All of these can be found on then default toolbar. Here will be a general idea of many tools, but some (pen, curvature tool...) will be explained in more detail here.
- Shape Tool: This tool can be used to make shapes that can be filled in or set the outline as a vector or as a cut. Right clicking this will let you select one of many types of shapes. This tool defaults to building out from a corner and is any dimensions. If you want to build out from the center of the new shape, then you can achieve this by holding the "alt" button while creating a shape. If you would like your shape to be normal (all sides are equal), then you can hold shift. You can also combine these two buttons to create a normal shape from the center by holding "shift"+"alt" while building the shape. To copy a shape, you can hold select on the shape and hold alt to copy it and move it somewhere.

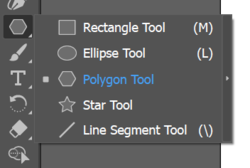
- Polygon Tool: The polygon tool is a subtool of the shapes tool. This tool allows you to draw a shape with a variable amount of sides. This can be found by right clicking the shape builder tools. To input the desired number of sides, just click (rather than dragging to create a shape) and enter the sides in the text box. You can also enter the radius from center to each corner. The polygon tool always builds a normal shape (all sides equal length). If you don't know exact size for radius, you can enter the sides, create a random size shape, then delete that shape. Now the number of sides is saved and you can drag out to create a shape like normal. You can't use alt to build out from the center but holding shift while building will disable rotating on the shape and it will print with horizontal side down.
This is the tool.
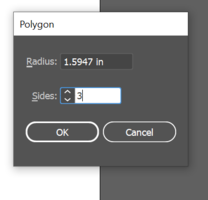
Single clicking with the tool will bring up these settings.


- Shape Builder Tool (Shortcut - Shift + M): This is a very useful tool for merging multiple shapes into one. First, you need to select all the shapes overlapped with sides desired to be removed. Next you click the Shape Builder tool on the toolbar. Then you draw a line from the first shape through the path you want deleted into the second shape. Adobe will do its best to merge the paths of the two or more shapes. After you have drawn the line and before releasing your click, the red outlines will be the combined shape and the blue edge will be the deleted edge.
This is the shape builder tool
This shows you how the merged shapes will look
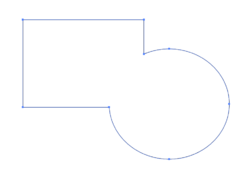
This is the final shape


And once this new shape has been created, you can do everything you could with a normal square or any other shape. You can change the outline to something else or change the fill and now everything inside will be that same fill.
- Eyedropper Tool (Shortcut - I): If you had some fill with a predetermined color that you wanted to add more of, you can use the eyedropper tool to copy that exact color. While selecting the eyedropper tool just click on a point and whatever color that is will be copied. Then you can draw or create shapes of that exact color.

- Type Tool (Shortcut - T): This tool allows you to write text in with many different properties such as fonts, spacing between letters, spacing between letters, and many other options. Clicking anywhere with this tool selected will open up a typing bar at that location. Right clicking on this will allow you to change the writing type to typing on a path or typing vertically. You can change the fill in the properties to change the inside coloring of the text and can outline the text by changing the stroke to a certain color.

- Rotate Tool (Shortcut - R): This tool allows you to change the orientation of an object to face a different direction. Holding left click on a selected object then moving the mouse will rotate. You can also enter in a rotation amount by right clicking, selecting transform, then entering an amount in "angle" or entering an amount in the transform properties of the object. You must be already selection an object or group to rotate before using the tool. By default, rotate won't snap to any certain benchmarks, but if you hold shift while rotating, it will snap to 45 degree intervals from the current orientation (45 from current, 90, 135...).

This is not an exhaustive list but just a few that you will find very common.
Using Artboards

Artboards are used in Adobe Illustrator as separate pages in other applications such as Microsoft Word. These are completely separate canvases that can be designed on independent of the others. You always start with one artboard with the size designated when creating the project. Then when designing, you can print a single one out at a time. This can be useful for creating multiple similar designs so you don't have to keep switching between tabs.


Artboards can even be created of any size regardless of other artboards. You could have a 10x10 inch square and a 15x15 inch square as two artboards in the same project. A key thing to remember is you might be tempted to make the size of your artboard equal to the size of the laser cutting bed. You want to resist this urge and make the artboard the size of your material size. This will help when designing your project to make sure you don't make it too large and if there are multiple parts, that they all fit in the material.

There are some settings that help when printing. The ignore artboards checkbox allows you to combine all artboards into one and print them all. The range allows you to limit which artboards are shown (using a dash 1-3 (1,2,3) or commas 1,3 (1,3)). Skip blank artboards does exactly what it says. Your artboards might be rotated and looking weird and if they do try unchecking the auto-rotate and manually choose which orientation to the right of the checkbox.
Selection Tools
Selection tools are the tools that allow you to control and manipulate multiple objects at once. There are a few different selection tools each with their own purpose. Selection (V): This is the basic selection button. Clicking will select the object or group underneath the cursor. Used for moving objects/groups without changing shape. By using this selection, you can duplicate shapes by holding alt and dragging the shape to another location.

Direct Selection (A): Used for selection individual points or paths and editing them. This can be used for moving points on a path while keeping the shape of the rest of the object's paths.

Lasso Selection (Q): This tool is very useful for selecting multiple objects in a weird shape. This allows you do draw the bounds of some shape and everything inside will be selected. For example, rather than the normal selection only able to do rectangles, you can make a selection in the shape of a triangle.
Setting Colors in Illustrator to Specify Cutting/Scoring/Engraving Action on ULS Laser Cutters
After creating your drawing, selecting the drawing objects in Adobe Illustrator and setting the fill or stroke color for each object allows you to control the operation of the laser and determines whether the machine engraves an image on the surface of your work or cuts through the work. This functionality allows you to create a drawing and prepare it for laser cutting before entering the makerspace. The ULS lasers in Sandbox are able to perform three basic operations: Engraving in a raster pattern (raster engraving), Cutting along a line (Vector Cutting), and scoring along a vector line (Vector Engraving). It's important to understand how these operations are selected in Illustrator.
- Raster Operation: This operation moves the laser head back and forth across the work while varying the laser output power to engrave each pixel of the image onto the workpiece. In operation it looks much like an inkjet printer moving back and forth across the paper.
- Raster Engrave: Filling or stroking an object in Illustrator using black or grey will cause the laser to burn that image onto the surface of the work. Black will create the darkest possible result on the laser, lighter raster engraving results can be achieved by selecting a fill that is less than 100% black. While colors can be used to raster engrave shades of grey, it's far less confusing to stick with percentages of black since specific colors are used to select vector operations described below or (for more advanced work) to specify the order of laser operations.
- Vector Operations: Vector operations differ from Raster operations in that the laser head directly follows a line drawn in Illustrator and either engraves along that line or cuts along that line. The line drawn in Illustrator must be set to a line width of 0.001" then set with a stroke color to indicate whether that line should be cut or engraved. If the line width or stroke color is not correctly set, the line will raster engrave rather than vector engrave or vector cut. This is the most common error experienced by users of our ULS laser cutters.
- Vector Cut: A line drawn in Illustrator and set to width of 0.001" with a stroke color of RGB red (RGB value of 255 RED/0 Blue/0 Green) will cause the ULS laser to follow that line while cutting through the work. Differences in material thickness or density are mostly handled automatically; the laser requires you to set the material type and thickness in the software control panel before allowing the job to run. These control panel settings direct the ULS laser to automatically set the laser intensity, frequency, and speed necessary to cut that material. This automatic setting may be overridden if necessary but generally works very well.
- Vector Engrave: A line drawn in Illustrator and set to a width of 0.001" with a stroke color of RGB blue (RGB value of 255 BLUE/ 0 RED/ 0 GREEN) will cause the ULS laser to score this line. ULS refers to this operation as Vector Engrave which can be confusing since other laser manufacturers refer to this operation as Scoring. Vector engraving creates a smoother, less aliased line than raster engraving and is a much faster operation. Since vector engraved lines can't be set to different line widths, one common approach is to raster engrave a wider line (by filling it with black or grey) then vector engraving the line surrounding the filled area. This is useful for outlining type or images.
- White Fills and Layered Objects can be Problematic
- White fills (RGB 255, 255, 255) will not engrave so they should be avoided when preparing art for the laser cutter. These white fills can be problematic since many who use Illustrator for print production work use white fill to cover objects they don't want to print. This doesn't work the same for laser cutting, the underlying objects can end up cutting or engraving. Layered Objects may cause unexpected laser results. If your Illustrator document is giving you trouble on the laser and it's complicated -- with lots of images and layered objects, try simplifying it.
- Don't use CMYK colors
- Since vector operations are selected using RGB Red and RGB Blue, it is important to set the document to RGB color space. Even if a CMYK Red or Blue looks the same as an RGB equivalent, it won't work on the laser. Get in the habit of setting up your Illustrator files as RGB for laser cutting.
- Grey Scale and RGB
- As mentioned above, it's best to use grey scale fill for objects you wish to raster engrave. It's possible to fill with grey values selected using RGB colors (eg 100 R 100 G 100 B)
Importing and Editing Images
Images can be imported into Adobe by dragging the picture from your computer onto the canvas or copy pasting the image from the internet. All images that are entered will default be rastered because the colors are not absolutely red or blue like cutting needs to be.
Using Image Trace
The image entered is normally something like a PNG or JPG or similar picture. Adobe Illustrator needs it to be an SVG file to be able to print to the printer as a raster. This can be done by clicking the image and going to the image properties and clicking "Image Trace".

This image trace will scan your image and produce it as a Scalable Vector Graphic (SVG) which means it can be resized to any size and keep its quality. This SVG is whats needed for the UCP to be able to cut. Without this SVG the image will not be printed. Each of these image traces are used in different situations to produce a different outcome:
- High/Low Fidelity Photo: Used for tracing actual images. High is for high quality and low is for lower quality images (Try both to see which is better)
- 3/6/16 Colors: Limit the number of colors in the design to the designated amount. If there are more then Adobe will change similar colors to the same color. This is useful for clipart and similar images without too much detail. This will still retain similar colors to the base image but can lessen the detail of multiple colors possibly enhancing the look of cutting.
- Shades of Grey: Changes all colors into different shades of grey. This keeps the overall look of the image as lighter colors will be lighter shades of grey and darker colors will be darker greys. This is useful for printing as it is more of a representation of what your image will print like. Since the cutter can't do colors the different shades of grey represent the different levels of intensity of cutting.
- Black and White Logo: Changes all of the colors to either a black or white. Very useful for creating contrasting images because it will either cut somewhere or not, not having different shades of cutting. Every color that is changed to black will be cut and every color that is white will not be cut. Very useful when cutting glass/clear material as different intensities of cutting do not show distinguishable shades in the material.
- Silhouettes: Turns all colors of the image to black. Used for just cutting the shadow of a full image instead of wanting detail inside. Also allows you to easily get the outline of an image. More information on getting the outline in Outlining an Image
These are not all the possible options but the most useful ones. Feel free to try the others and figure out their uses. You can also keep switching between all of the options to see which is the best fit for your image.
Outlining an Image
Sometimes you might not want to raster an image and would just like to vector cut the outline of the image, or vector outline the outside of an image and raster the inside. Outlining images is also very important for cutting on glass or clear material because different colors don't show up well on transparent materials.
To create an outline of an image to vector cut the image rather than raster, firstly you need to image trace it.

Next you need to expand the image to allow editing on the paths.

Then you need to change the stroke to what color you want (blue for vector, red for cut, any other for raster) and set the fill to nothing. This will remove all colors inside and just leave the shell outline.

You must remember that sometimes the outline square of the image is still there. To remove this you can visit the Editing the Paths of an Image section to help delete it. Short answer is double click a path to go into isolation mode, click a path and delete it.
If you want to remove some of the paths that were outlined (Like some extraneous inner paths) you can check the Editing the Paths of an Image section. This can be useful for creating an outline for cutting out a rastered image. You can outline the entire image and delete everything but the outline and place the rastered image inside the outline. This will raster the inside but cut out the entire image.
Editing the Paths of an Image
After image tracing an object and expanding the path. This creates the paths of the object that it thinks is best but sometimes you don't want all of them. In order to remove some of these you first need to go into isolation mode by double clicking on a path. Then you can click individual paths and delete then how you see fit.
You might find while deleting some paths that multiple paths are connected together. These paths are grouped together and can be released by clicking on the paths and clicking Release. This allows you to click the individual paths and delete them.
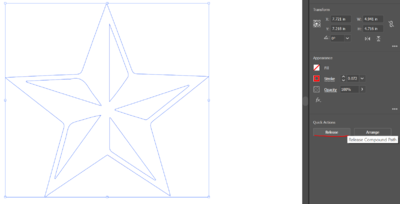
Release makes all the paths individual objects

Now you can delete the inside paths and create the outline


Now you would be able to place this outline over a copied, traced, version of the image and have the image also be cut out.
Using Text
To insert text into your file click the "T" on the toolbar and click somewhere that you to type. Then type whatever you want and can change the font, size, alignment and other properties in the properties tab of the text. If you right click on the text icon in the toolbar you can do some other text settings like typing on a path or vertically.
There are a couple different things you can do with text for laser cutting. You can mess with the outline and fill to raster or cut the outline or fill the inside with color.
- Outlining: Once you write the text, you can go to the properties of the textbox and change the outline. Changing this to anything other than red or blue will just raster it. If you change it to blue, you can vector cut the outline, this looks very nice as a contrast to just rastering the entire middle because it leaves the middle as the base color. On the other hand if you use a red outline then you can cut out all the letters and then use them on something else like on another board. You can ignore the outline by setting the outline to the no outline color (white with a red slashed line).
- Inside Fill: Any fill on the inside will just be rastered out. Using this without any outline will just cause a shaded out section looking like the text. The intensity of what is rastered depends on what color you choose as the fill. The darker the color the darker the shade that will be burned out. If you didn't want any fill then changing it to the no fill will do (white with a red slashed line).
If you combine both the outlining and fill then you can do things like vectoring the outline of text and rastering the inside to provide even more contrast. Using different fills can have different effects, the lighter color you use the lighter raster it will do inside.
Advanced Coloring
Once you have accustomed yourself to coloring in Adobe Illustrator, (basic help here) this section can help you with some of the more advanced tools and techniques for coloring.
- Gradient Tool (G): A gradient is a smooth change from one color to another. This tool is used to change the fill of a shape or object into a gradient. To add a gradient, choose the gradient tool them click on your fill. This will create a gradient from the left to right side, if you want to create a custom angle, you can drag click from one spot to another. A gradient is displayed by a straight line with circles on each end and in the middle, two diamonds above the line, and black square/circle a little off each end. You can include more colors in the gradient by clicking on the line, adding a new circle.
Each of these shapes have a job. The circles represent which color will appear on that side of the gradient. The inside of the circle will change to match the color. The location of the circle also effects the gradient. The location of the circle represents where the color will be solid (where the gradient finishes). The closer the two circles are together, the smaller the length of the gradient and the same for longer. You can create more of these by clicking on the line wherever you want the new color.
The white rhombus above the line represents where the middle of the gradient will be. This can be moved around closer or farther from the two color circles. By default, this will be halfway between both.
The little black circle on one end is the movement side, you can move where the gradient is by clicking and dragging this. Then adobe will automatically place it back on the shape along the line created in the beginning. Clicking and dragging the black square on the other side will let you change the length of the gradient line. If you click a little bit past the square, you can change the angle of the gradient in a circle with the center as the black circle on the other end.

- Mesh Tool: The mesh tool is used to create a mesh object, which is a multicolored object with many colors flowing from one into another. This basically means that you can have many gradients and not just in a straight line. The many lines created once a mesh is created are called the mesh lines. These help manipulate the color transitions. Where two mesh lines cross is a mesh point. This is represented as a diamond and works the same as an anchor point except it also accepts a fill. Anchor points (appearing as squares) are similar to mesh points but dragging and moving these will move the line that it resides on. The area between any four mesh points is the mesh patch.
To create a regular pattern of mesh points, you can select your object and select Object -> Create Gradient Mesh. A regular pattern follows the outside edges of your shape and makes each row and column even. The highlight option matters if you already have a fill color chosen. Flat will just make the entire shape your previously chosen fill. To center means the edges will have the previously chosen color and will gradient to white (default) towards the center. To edge does the opposite, chosen color in middle and gradient towards edges. The highlight is the percentage of white to apply to your previous fill. The closer to 100, the more white the highlight (chosen by the appearance) will appear.
If you have a gradient, you can convert it into a mesh by selecting the object and choosing Object -> Expand and that will convert it. If you have a mesh and would like to convert it back into a path, you can select the object and choose Object -> Path -> Offset Path -> and choose 0 for the offset. Then just move the gradient and the path will be beneath it. You can change the color of an area by clicking on the anchor/mesh point and change the fill. Or you can open the swatches tab (of fill) and drag over a color onto a mesh patch and it will automatically change the surrounding mesh/anchor points.
- Fx: There are too many Fx to list them all but this resource provides a great explanation for each type of Fx. Each effect will have settings allowing you to change how much it effects certain aspects of your shape like how many columns there should be or how fine grained it should blur.


Live Paint
Live paint is used to cut objects into sections and be able to change their fills individually. These sections are divvied up based on enclosure, meaning something looking like the number "8" would have two sections because it has two closed shapes. You can convert an object into a live paint object by selecting it (or selecting multiple shapes) and clicking Object -> Live Paint -> Make, or using the hotkey Ctrl + Alt + X. You can change the individual fills of each section but not the outline, the stroke must stay the same for the entire shape and can be changed by using the properties tab like normal.
- Live Paint Bucket Tool (K): The live paint bucket tool is used to fill in sections of a live paint object. Once hovering over a section, the outline of the section will outline red to show you where your fill will be. The color can either be changed by using the left and right arrow keys to move one left or right (based on your current swatches) or by clicking fill and changing the color manually.
- Live Paint Selection Tool (Shift + L): The Live paint selection tool is used to select individual sections in a live paint object. You can manually change the fill of sections in the properties tab of that section as well. If you try and select a live paint object that is not enclosed, it will not allow you to edit the fill of that object.

Gradient tool, mesh tool, adobe color themes, live paint bucket tool, live paint selection tool, fx in properties tab https://creativepro.com/illustrator-live-paint-selection-tool/
Adobe Illustrator Tips
- Make sure when you are creating the new page for design, that the advanced option is set to RGB mode or else you won't be able to make the colors for vector cutting.
- If you are in CMYK mode or vector cuts don't seem to be showing up as vector cuts in the UCP then check this setting.
- In order to cut out an image you need to image trace it. See Using Image Trace for more help.
- When rastering images onto glass and clear acrylic, do not try and use intricate pictures with many colors.
- Glass and clear material doesn't differ much depending on how deep the cut is. Normally try and make it a silhouette or black and white logo and it will cut much nicer.
- When trying to cut through a material, if the cut is not going all the way through, make sure you check that the material thickness and type are correct.
- When creating your artboard, you should set the size to be the size of your material not of the entire print bed to reduce chances of printing off your material.
- In general, the stroke property of something is the outline and the fill is the inside, this is true for shapes, text etc... For example if you want to just vector the outline of text (in the laser cutter), you can change the stroke to 255 BLUE and the fill to nothing (white with red line through it) and that will outline the text.