BitLocker/PersonalUse
Overview
BitLocker can be used on fixed hard drives (i.e. internal to your computer) as well as on portable hard drives (i.e. USB). If you want to hold a secure, offline copy of files that you want to be preserved, BitLocker To Go with a portable hard drive with data to be stored and a hardware token as the key can be used together to do so.
Prerequisites
- A portable hard drive formatted with an NTFS (preferred), FAT16, FAT32, or exFAT file system.
- Any desktop edition of Windows 11 except Home. BitLocker encryption is not included as a feature of Windows 11 Home, though encrypted drives can still be accessed via Windows 11 Home.
- A YubiKey security token. Other security tokens may work, but this procedure will focus on using a YubiKey.
- (optional) One or more blank USB flash drives at least 500MB in size, formatted with any Windows-writable file system.
Initializing the YubiKey and hard drive
- Log in locally to the machine you wish to use for encryption. This procedure will not work over Remote Desktop.
- Download and install the YubiKey personalization tool. Choose the first option (not the command line interface version). If you are using a UMIACS-supported workstation, please contact UMIACS Staff to install this on your machine.
- Insert your YubiKey into any USB slot on the machine you wish to use for encryption and launch the personalization tool. Select Static Password at the top and then Advanced.
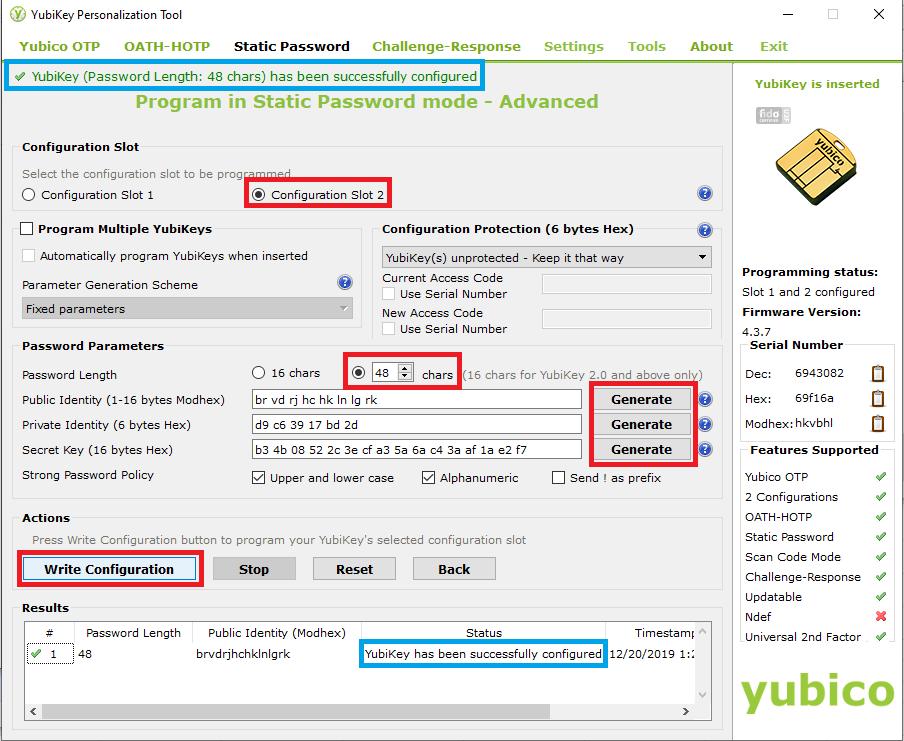
- Select Configuration Slot 2(*) and change the password length to 48 chars. Then click all three Generate buttons in order to generate the identities and the secret key and finally Write Configuration. Click cancel (do not save) on the prompt that pops up to save the .csv file, as this saves the Public Identity, Private Identity, and Secret Key in plaintext. Ensure that "YubiKey has been successfully configured" is output in the Results window, and then click Exit in the top right to exit the tool.
- (*) NOTE: The YubiKey token has two configuration slots. These are nearly functionally identical, but the key difference for the sake of this document is that Slot 2 requires you to hold the sensor on the device down for 2 seconds in order to activate, whereas Slot 1 instantaneously activates when you touch the sensor. We recommend using Slot 2 so that you do not mistakenly emit the password configured below. If you are already using Slot 2 on your YubiKey, slot 1 can still be used.
- Insert your portable hard drive into any USB slot and search BitLocker in the start menu to open the Manage BitLocker control panel item.
- Expand Removable data drives - BitLocker To Go by clicking the arrow on the right and then click Turn on BitLocker on the portable hard drive.
- BitLocker will initialize for a few seconds and then pop up with a menu asking how you want to unlock the drive. Choose Use a password to unlock the drive and physically touch the YubiKey's sensor for 3 seconds to get it to output the password you configured previously in each password field.
- The menu should automatically advance to asking how you want to back up the recovery key. The recovery key is the only way to get into the encrypted drive if you lose the YubiKey. We strongly recommend the Save to a file option for reasons that we will get into. If you choose to print out the recovery key, store it somewhere safe such as a safe deposit box.
- Plug in your first USB flash drive and choose to save the file on it.
- If you previously had anything saved on your portable hard drive before formatting it as part of the prerequisites, choose to Encrypt entire drive. This is the safest way to ensure everything on the drive is protected. Otherwise (if this is a brand new blank drive), leave the default option of Encrypt used disk space only.
- Leave the default of Compatible mode to better ensure the files on the encrypted drive will be readable from other devices (which may be running earlier versions of Windows) if need be.
- Continue through the menus and finally choose to Start encrypting.
- BitLocker will begin encrypting and a separate window will pop up to show you the status. This step will either take a long time if you chose to Encrypt entire drive, or complete very quickly if you chose to Encrypt used disk space only. You do not have to wait for encryption to complete to proceed with the remaining steps, but you do need to wait for encryption to complete before disconnecting the portable hard drive from the machine.
- Download the portable version of KeePassXC Password Manager. Then extract it to your USB flash drive.
- Launch KeePassXC.exe from the extracted folder and choose to Create new database.
- Choose descriptive phrases for the Database Name and Description and click Continue.
- Leave all the options on the next menu at default unless you know what you are doing and have good reason to change them and click Continue.
- Choose a memorable password and click Done.
- Choose to save the file on your USB flash drive.
- In your newly created database, choose to Add a new entry from the top pane.
- Make the Title something memorable. Open the recovery key text file saved earlier, copy the Identifier into the Username field and the Recovery Key into the Password/Repeat fields. Leave some descriptive text in the Notes section to help clarify which fields are which of the BitLocker attributes. Click OK and then exit out of the database back on the main menu.
- Delete the recovery key text file permanently (NOT the database file you just created). If you leave the recovery key text file on the USB drive, your encrypted portable hard drive is only as secure as that USB flash drive is, rather than needing both the USB flash drive and the password for the database to access the recovery key.
- (Optional) Copy the contents of the first USB flash drive onto one or more additional USB flash drives to safeguard against loss of both the YubiKey and any single USB flash drive.
- Clearly label the USB flash drive(s) and store them somewhere secure, such as a safe deposit box. If you have multiple USB flash drives, store them separately.
- Your portable hard drive is now securely BitLocker-encrypted, with one or more USB drives serving as access to the recovery key.


Unlocking the drive
Unlocking the drive with the YubiKey
To later unlock the drive from the same or a different computer:
- Physically plug the drive and YubiKey in. Click on the notification you get in the notification area, which will open the unlock menu.
- Physically touch the YubiKey's sensor for 3 seconds to get it to emit the password. It will automatically unlock afterwards.
- The drive is now unlocked until it is unplugged again.


Unlocking the drive with the recovery password
To later unlock the drive from the same or a different computer if you are not in possession of your YubiKey:
- Physically plug one of your USB flash drives containing a database with the recovery key in.
- Open the recovery database using the password you set for it and then copy the password for the entry inside of it. This is the recovery key.
- Physically plug the drive in. Click on the notification you get in the notification area, which will open the unlock menu.
- Click on More options and then Enter recovery key.
- Enter the copied recovery key from your database file and click Unlock.
- The drive is now unlocked until it is unplugged again. If you have lost your YubiKey, we strongly recommend buying a new YubiKey, decrypting BitLocker on the drive, and then repeating the initial procedure to re-encrypt it with the new YubiKey.


Extra configuration
Set up Auto-unlock
BitLocker has the ability to auto-unlock an encrypted drive for a specific user(s) when plugged into a specific computer(s) if so desired. This creates an entry in the Windows registry on each computer's local data storage for each user you turn it on for. The entry stores a copy of the volume master key for the encrypted drive that is itself encrypted with a combination of the user's username and either the user's password, if there is one, or computer credentials.
We do not recommend turning this on as it undermines the concept of separation of the unlock methods for the drive from any specific computer. If you do want to turn this on, please ensure the user account(s) that you turn it on for are secure (i.e. have sufficiently complex passwords) and the computer(s) that you turn it on for are in secure locations.
To enable auto-unlock for a drive (per user per computer):
- Insert your already-encrypted portable hard drive into any USB slot, unlock it, and search BitLocker in the start menu to open the Manage BitLocker control panel item.
- Expand Removable data drives - BitLocker To Go by clicking the arrow on the right and then click Turn on auto-unlock on the portable hard drive.
- The drive will now auto-unlock when plugged into the computer you are currently on for your user account only. You can turn it off again by clicking on the Turn off auto-unlock option that appears in the same location after clicking the turn on button.

Use an encrypted drive as a backup drive
One of the more useful things you may want to do with a BitLocker-encrypted portable hard drive is set up automatic backup to it. This can be done by following the procedure on this page, though please note you will need to unlock the drive each time when plugging it into a computer, or have configured auto-unlock for that computer, before it is accessible by backup software.