Network/VPN/MFA: Difference between revisions
Jump to navigation
Jump to search
No edit summary |
No edit summary |
||
| (12 intermediate revisions by 3 users not shown) | |||
| Line 1: | Line 1: | ||
This page outlines the steps required to enable Multi Factor Authentication (MFA) for the Pulse Secure VPN. | This page outlines the steps required to enable Multi Factor Authentication (MFA) for the Pulse Secure VPN. '''Please note that this is mandatory as of May 10th, 2019.''' | ||
== | ==Prerequisites== | ||
* Device enrolled with [[Duo | UMIACS Duo]] | |||
{{Note|<b>Pro-tip:</b> Select ‘Save Settings’ on the secondary authentication prompt to have Duo automatically | ==Configuring MFA== | ||
The Pulse VPN multi-factor authentication implementation relies on a secondary authentication source to fulfill the MFA requirement. As a result, you will be prompted for credentials twice. | |||
* <b>First credential:</b> UMIACS password | |||
* <b>Second credential:</b> Your preferred MFA verification option: | |||
{|class="wikitable" | |||
!Secondary Password Value: | |||
! Result | |||
|- | |||
| push | |||
| Send a push verification to your Duo connected device. | |||
|- | |||
| phone | |||
| Send a phone call verification to your Duo connected device. | |||
|- | |||
| <press YubiKey> | |||
| If you have a physical YubiKey token then you would press the YubiKey for the one time password. | |||
|} | |||
Please note that registering a YubiKey for use with the VPN requires the UMIACS Tech Staff to program it for you. Please [[HelpDesk | contact us]] if you would like to register a YubiKey for this purpose. '''We only support registering YubiKey tokens for this purpose, no other hardware token.''' | |||
{{Note|<b>Pro-tip:</b> Select ‘Save Settings’ on the secondary authentication prompt to have Duo automatically use your preferred method.}} | |||
==MFA Push Configuration Example:== | |||
# Connect with your existing Pulse VPN profile. | |||
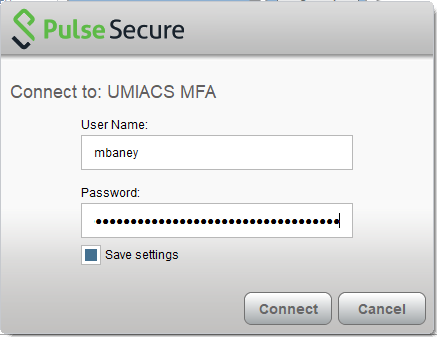
# Enter your UMIACS credentials for the first authentication box and tick "Save settings". | |||
#: [[File:Vpnmfa5.png]] | |||
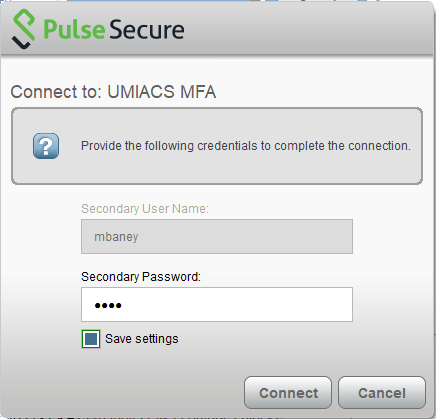
# Type `push` into the password field on the second authentication box, tick "Save settings", and then click Connect. You should then receive a push to your mobile device to complete authentication. This will occur every time you connect to the VPN going forward. | |||
#: [[File:Vpnmfa6.png]] | |||
Latest revision as of 16:20, 24 October 2022
This page outlines the steps required to enable Multi Factor Authentication (MFA) for the Pulse Secure VPN. Please note that this is mandatory as of May 10th, 2019.
Prerequisites
- Device enrolled with UMIACS Duo
Configuring MFA
The Pulse VPN multi-factor authentication implementation relies on a secondary authentication source to fulfill the MFA requirement. As a result, you will be prompted for credentials twice.
- First credential: UMIACS password
- Second credential: Your preferred MFA verification option:
| Secondary Password Value: | Result |
|---|---|
| push | Send a push verification to your Duo connected device. |
| phone | Send a phone call verification to your Duo connected device. |
| <press YubiKey> | If you have a physical YubiKey token then you would press the YubiKey for the one time password. |
Please note that registering a YubiKey for use with the VPN requires the UMIACS Tech Staff to program it for you. Please contact us if you would like to register a YubiKey for this purpose. We only support registering YubiKey tokens for this purpose, no other hardware token.
| Pro-tip: Select ‘Save Settings’ on the secondary authentication prompt to have Duo automatically use your preferred method. |
MFA Push Configuration Example:
- Connect with your existing Pulse VPN profile.
- Enter your UMIACS credentials for the first authentication box and tick "Save settings".
- Type `push` into the password field on the second authentication box, tick "Save settings", and then click Connect. You should then receive a push to your mobile device to complete authentication. This will occur every time you connect to the VPN going forward.

