Network/VPN/macOS: Difference between revisions
Jump to navigation
Jump to search
No edit summary |
|||
| (32 intermediate revisions by 9 users not shown) | |||
| Line 1: | Line 1: | ||
The UMIACS VPN is accessible through the Ivanti Connect Secure Client. Alternatively, you can establish a connection through a [https://vpn.umiacs.umd.edu/ web browser], but this may fail if you have an outdated version of Ivanti Connect Secure already installed. | |||
==Prerequisites== | ==Prerequisites== | ||
* Device enrolled with [[Duo | UMIACS Duo]] | * macOS 13.x or higher as of the current version of the Ivanti Connect Secure Client | ||
* | * A [[Accounts#UMIACS_Account | full UMIACS account]] | ||
* Device enrolled with [[Duo | UMIACS Duo]] for multi-factor authentication | |||
* An established network connection (wired or wireless) | |||
== Connecting through the | == Connecting through the Ivanti Connect Secure client == | ||
#'''Download the client:''' | #'''Download the client:''' | ||
#:[ | #:[https://obj.umiacs.umd.edu/ivanti-connectsecure/macOS/PulseSecure-macOS-22.7R4.dmg macOS Ivanti Connect Secure Client] | ||
#:''Upon starting the client for the first time it | #:''Upon starting the client for the first time it may ask to upgrade the client. This will pull an up-to-date version of the client with the most recent configuration.'' | ||
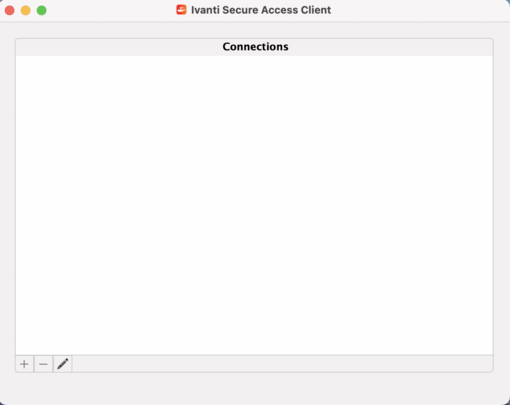
#'''Open the client and click 'Add' (+) under the connection section.''' | #'''Open the client and click 'Add' (+) under the connection section.''' | ||
#:[[Image: | #:[[Image:Ivanti client1.png|thumb|left|510px|[macOS] Click the 'Add' (+) button to create a new connection]]<br style="clear:both"/> | ||
#'''In the 'Name' field, enter a descriptive name for this vpn Connection.''' | #'''In the 'Name' field, enter a descriptive name for this vpn Connection.''' | ||
#'''In the 'Server URL' enter 'vpn.umiacs.umd.edu'''' | #'''In the 'Server URL' enter 'vpn.umiacs.umd.edu'''' | ||
#:[[Image: | #:[[Image:Ivanticonnection.png|thumb|left|510px|[macOS] Enter the name of the vpn server]]<br style="clear:both"/> | ||
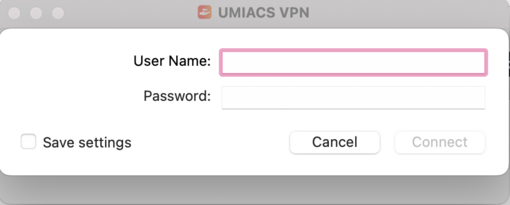
#'''Enter your UMIACS credentials and hit connect.''' | #'''Enter your UMIACS credentials and hit connect.''' | ||
#:[[Image: | #:[[Image:Ivanticlientmac5.png|thumb|left|510px|[macOS] Enter UMIACS Credentials]]<br style="clear:both"/> | ||
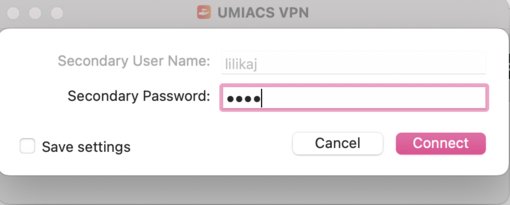
#'''Complete the [[Network/VPN/MFA | MFA]] Verification Step | #'''Complete the [[Network/VPN/MFA | MFA]] Verification Step. For example, if you wish to push a notification to your device, type the word "push" into the secondary password box. | ||
#:[[Image: | #:[[Image:SecondaryloginmacOS.png|thumb|left|510px|[macOS] Enter a secondary password.]]<br style="clear:both"/> | ||
::The | ::The Ivanti VPN multi-factor authentication implementation relies on a secondary authentication source to fulfill the [[Network/VPN/MFA | MFA]] requirement. As a result, you will be prompted for credentials twice. | ||
::{|class="wikitable" | ::{|class="wikitable" | ||
| Line 39: | Line 37: | ||
::Please note that registering a YubiKey for use with the VPN requires interaction with UMIACS Tech Staff. Please [[HelpDesk | contact us]] if you would like to register a YubiKey for this purpose. | ::Please note that registering a YubiKey for use with the VPN requires interaction with UMIACS Tech Staff. Please [[HelpDesk | contact us]] if you would like to register a YubiKey for this purpose. | ||
{{Note|<b>Pro-tip:</b> Select ‘Save Settings’ on the secondary authentication prompt to have Duo automatically use your preferred method.}} | {{Note|<b>Pro-tip:</b> Select ‘Save Settings’ on the secondary authentication prompt to have Duo automatically use your preferred method.}} | ||
You should now be connected to the UMIACS VPN. You can close the window and the VPN will remain connected. | |||
If you encounter an error, please refer to the "Setup Security Requirement" section bellow. | |||
==Checking VPN Status== | ==Checking VPN Status== | ||
# In the top right hand corner, on your status bar, you should see an S icon in a black circle. If there's a green arrow, that means you are connected! If there is nothing, that means you are not. | # In the top right hand corner, on your status bar, you should see an S icon in a black circle. If there's a green arrow, that means you are connected! If there is nothing, that means you are not. | ||
#: [[Image: | #: [[Image:CheckingVPNstatus1.png|thumb|left|610px|[macOS] The top image is connected, the bottom image is not.]]<br style="clear:both"/> | ||
# You can click this icon, as well, and it will show you the status of your connection. | # You can click this icon, as well, and it will show you the status of your connection. | ||
#:[[Image: | #:[[Image:CheckingVPN2.png|thumb|left|610px|[macOS] The Pulse drop down menu.]]<br style="clear:both"/> | ||
# If the icon is not in the status bar, you can find Pulse Secure in your Applications folder. There you will see a list of connections. | # If the icon is not in the status bar, you can find Pulse Secure in your Applications folder. There you will see a list of connections. | ||
==Setup Security Requirement (Follow these steps if you encounter an error while connecting through the | ==Setup Security Requirement (Follow these steps if you encounter an error while connecting through the Ivanti Secure client) == | ||
# | # Click the Apple logo at the top left of your desktop | ||
# | # Click '''System Settings''' | ||
# Click '''Privacy & Security''' | |||
# | # Scroll to the '''Security''' section and select '''App Store and identified developers''' | ||
#* You will have to enter your credentials | |||
# | # Click '''Next''' to the message "System Software From Developers "Pulse Secure LLC" was blocked from loading" if prompted. | ||
# Click '''Allow''' to enable the extension. | |||
# Close the '''System Settings''' window. | |||
# | |||
# ''' | |||
Latest revision as of 01:49, 12 December 2024
The UMIACS VPN is accessible through the Ivanti Connect Secure Client. Alternatively, you can establish a connection through a web browser, but this may fail if you have an outdated version of Ivanti Connect Secure already installed.
Prerequisites
- macOS 13.x or higher as of the current version of the Ivanti Connect Secure Client
- A full UMIACS account
- Device enrolled with UMIACS Duo for multi-factor authentication
- An established network connection (wired or wireless)
Connecting through the Ivanti Connect Secure client
- Download the client:
- macOS Ivanti Connect Secure Client
- Upon starting the client for the first time it may ask to upgrade the client. This will pull an up-to-date version of the client with the most recent configuration.
- Open the client and click 'Add' (+) under the connection section.
- In the 'Name' field, enter a descriptive name for this vpn Connection.
- In the 'Server URL' enter 'vpn.umiacs.umd.edu'
- Enter your UMIACS credentials and hit connect.
- Complete the MFA Verification Step. For example, if you wish to push a notification to your device, type the word "push" into the secondary password box.
- The Ivanti VPN multi-factor authentication implementation relies on a secondary authentication source to fulfill the MFA requirement. As a result, you will be prompted for credentials twice.
Second Credential Password Value: Result push Send a push verification to your Duo connected device phone Send a call verification to your Duo connected device. <press YubiKey> If you have a physical token then you would press the YubiKey for the one time password.
- Please note that registering a YubiKey for use with the VPN requires interaction with UMIACS Tech Staff. Please contact us if you would like to register a YubiKey for this purpose.
| Pro-tip: Select ‘Save Settings’ on the secondary authentication prompt to have Duo automatically use your preferred method. |
You should now be connected to the UMIACS VPN. You can close the window and the VPN will remain connected.
If you encounter an error, please refer to the "Setup Security Requirement" section bellow.
Checking VPN Status
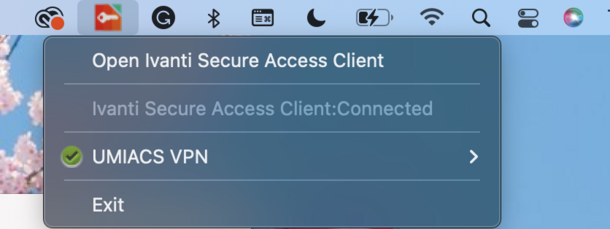
- In the top right hand corner, on your status bar, you should see an S icon in a black circle. If there's a green arrow, that means you are connected! If there is nothing, that means you are not.
- You can click this icon, as well, and it will show you the status of your connection.
- If the icon is not in the status bar, you can find Pulse Secure in your Applications folder. There you will see a list of connections.
Setup Security Requirement (Follow these steps if you encounter an error while connecting through the Ivanti Secure client)
- Click the Apple logo at the top left of your desktop
- Click System Settings
- Click Privacy & Security
- Scroll to the Security section and select App Store and identified developers
- You will have to enter your credentials
- Click Next to the message "System Software From Developers "Pulse Secure LLC" was blocked from loading" if prompted.
- Click Allow to enable the extension.
- Close the System Settings window.


