Google Drive/Drive for Desktop: Difference between revisions
No edit summary |
No edit summary |
||
| (3 intermediate revisions by one other user not shown) | |||
| Line 14: | Line 14: | ||
:[[File:Screenshot 2022-01-28 124229.jpg|500px]] | :[[File:Screenshot 2022-01-28 124229.jpg|500px]] | ||
Another window should then pop-up asking you to sign in with your browser. Select this option and then sign in with your | Another window should then pop-up asking you to sign in with your browser. Select this option and then sign in with your <DIRECTORYID>@umd.edu email address. | ||
:[[File:Screenshot 2022-01-28 124326.jpg|400px]] | :[[File:Screenshot 2022-01-28 124326.jpg|400px]] | ||
| Line 39: | Line 39: | ||
Once downloaded, open the downloaded file and install Drive for Desktop. Once Drive for Desktop is installed it will show a sign in with browser window. | Once downloaded, open the downloaded file and install Drive for Desktop. Once Drive for Desktop is installed it will show a sign in with browser window. | ||
:[[File:Screen Shot 2022-01-31 at 10.11.30 AM.png|500px]] | :[[File:Screen Shot 2022-01-31 at 10.11.30 AM.png|500px]] | ||
Select the "Sign in with browser" option and then sign in with your <DIRECTORYID>@umd.edu email address. | |||
:[[File:Screenshot 2022-01-28 124326.jpg|400px]] | |||
You will then be prompted with the UMD CAS window, sign in with your UMD credentials. | |||
:[[File:Screenshot 2022-01-28 124341.jpg|500px]] | |||
Another window should then pop-up with the prompt: "Make sure that you downloaded this app from Google". You did, so go ahead and select Sign in. | |||
:[[File:Screenshot 2022-01-28 124413.jpg|400px]] | |||
Congratulations, Drive for Desktop is now successfully installed! Now, to select the folders you would like to have backed up, you need to go the the "Preferences" page. This can be found by selecting the Google Drive logo in the top of your screen, then select the setting cog in the top of the window that pops-up, then select the "Preferences" option. | |||
:[[File:Screen Shot 2022-01-31 at 10.15.10 AM.png|400px]] | |||
Once in the "Preferences" page, select "Add Folder" to add a folder to be backed up to your Google Drive. | |||
:[[File:Screenshot 2022-01-28 124534.jpg|500px]] | |||
At this point select any local folder on your machine that you would like to be backed up to your Google Drive. You can add as many folders as you would like by simply repeating the "Add Folder" step. You are also given the option to back up your photos to Google Photos instead of your drive, select the option of your preference. | |||
:[[File:Screenshot 2022-01-28 124602.jpg|500px]] | |||
Additionally, you also have the option to customize how your files stored solely on your Google Drive will appear on your machine. If you select the "Google Drive" option in the preferences window under your computer name, you will be able to select how files are stored in the Google Drive directory that will now appear in your file browser. Select the option of your preference. | |||
:[[File:Screenshot 2022-01-28 125356.jpg|500px]] | |||
Latest revision as of 13:47, 12 March 2024
If you are migrating from Backup and Sync, please follow the migration steps here.
Overview
Drive for desktop is an application for Windows and macOS that lets you quickly access Google Drive content directly from your operating system's file browser. Drive for desktop also automatically syncs local files and directories of your choosing to your Google Drive in the background. This allows you to continuously back up your data as you create or modify it on your local machine(s) without needing to manually upload each file to your Google Drive.
For Linux, you can set up Rclone with a cronjob to copy files to your Google Drive periodically. Instructions to do this can be found here.
Installation
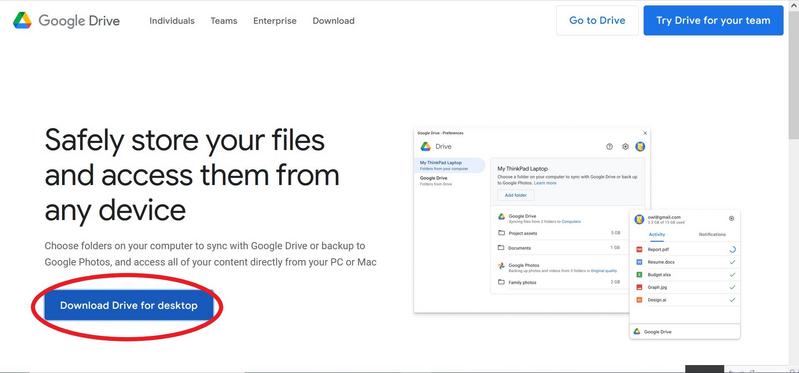
Drive for desktop can be downloaded here.
Windows Setup
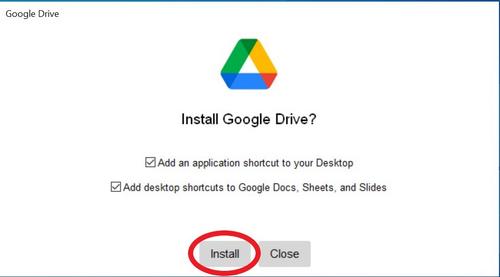
Once downloaded, open the downloaded file. This should bring up the Drive for Desktop installation window. Select your preferences for appication shortcuts and desktop shortcuts and then select install.
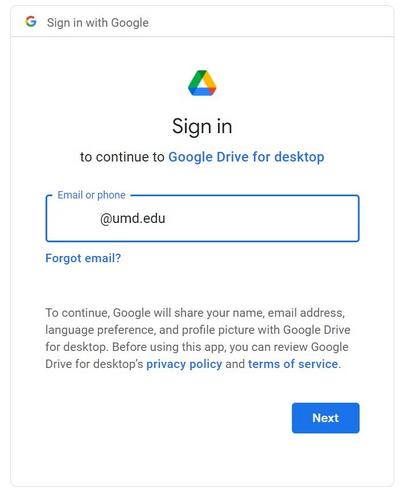
Another window should then pop-up asking you to sign in with your browser. Select this option and then sign in with your <DIRECTORYID>@umd.edu email address.
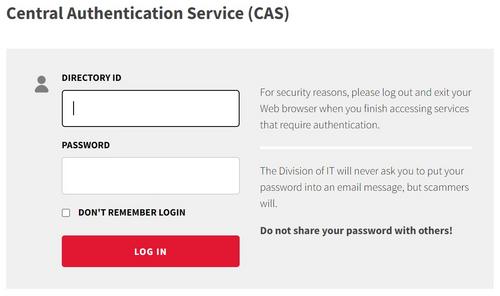
You will then be prompted with the UMD CAS window, sign in with your UMD credentials.
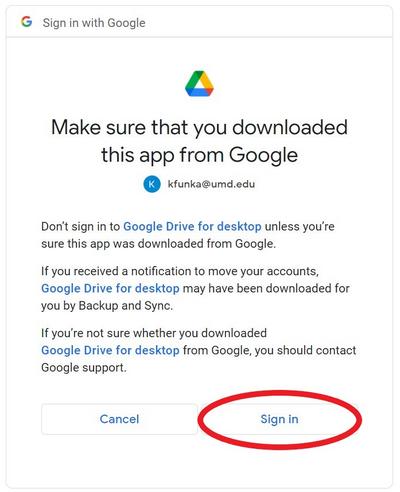
Another window should then pop-up with the prompt: "Make sure that you downloaded this app from Google". You did, so go ahead and select Sign in.
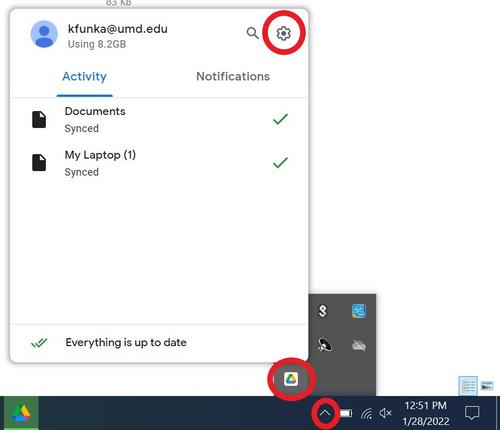
Congratulations, Drive for Desktop is now successfully installed! Now, to select the folders you would like to have backed up, you need to go the the "Preferences" page. This can be found by selecting the up arrow in the bottom right corner in your taskbar, then select the Google Drive logo, then select the setting cog in the top of the window that pops-up, then select the "Preferences" option.
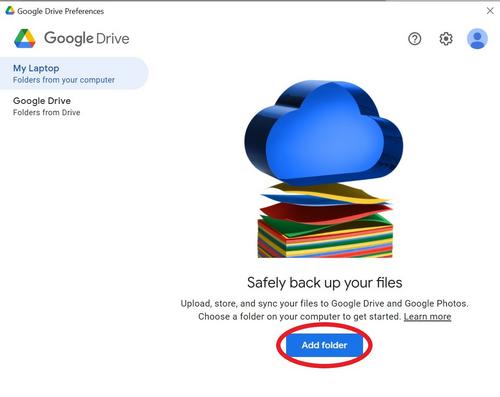
Once in the "Preferences" page, select "Add Folder" to add a folder to be backed up to your Google Drive.
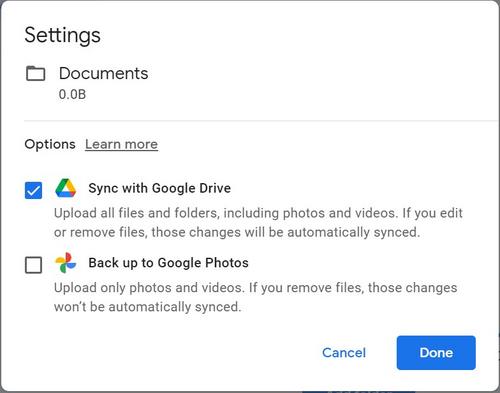
At this point select any local folder on your machine that you would like to be backed up to your Google Drive. You can add as many folders as you would like by simply repeating the "Add Folder" step. You are also given the option to back up your photos to Google Photos instead of your drive, select the option of your preference.
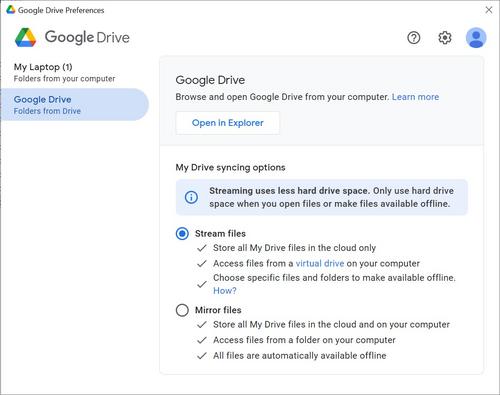
Additionally, you also have the option to customize how your files stored solely on your Google Drive will appear on your machine. If you select the "Google Drive" option in the preferences window under your computer name, you will be able to select how files are stored in the Google Drive directory that will now appear in your file browser. Select the option of your preference.
Mac Setup
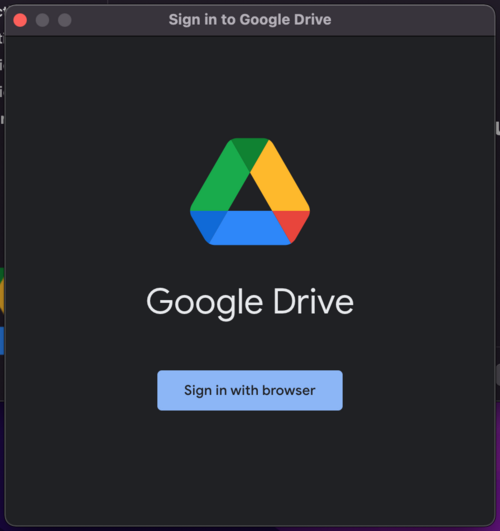
Once downloaded, open the downloaded file and install Drive for Desktop. Once Drive for Desktop is installed it will show a sign in with browser window.
Select the "Sign in with browser" option and then sign in with your <DIRECTORYID>@umd.edu email address.
You will then be prompted with the UMD CAS window, sign in with your UMD credentials.
Another window should then pop-up with the prompt: "Make sure that you downloaded this app from Google". You did, so go ahead and select Sign in.
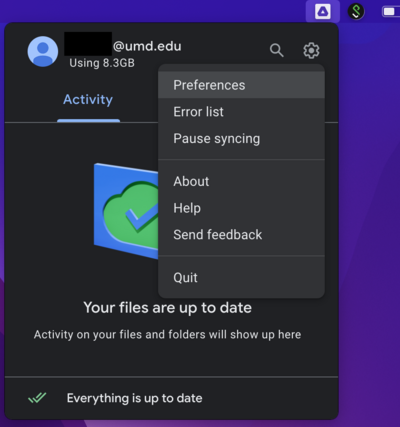
Congratulations, Drive for Desktop is now successfully installed! Now, to select the folders you would like to have backed up, you need to go the the "Preferences" page. This can be found by selecting the Google Drive logo in the top of your screen, then select the setting cog in the top of the window that pops-up, then select the "Preferences" option.
Once in the "Preferences" page, select "Add Folder" to add a folder to be backed up to your Google Drive.
At this point select any local folder on your machine that you would like to be backed up to your Google Drive. You can add as many folders as you would like by simply repeating the "Add Folder" step. You are also given the option to back up your photos to Google Photos instead of your drive, select the option of your preference.
Additionally, you also have the option to customize how your files stored solely on your Google Drive will appear on your machine. If you select the "Google Drive" option in the preferences window under your computer name, you will be able to select how files are stored in the Google Drive directory that will now appear in your file browser. Select the option of your preference.
