Custom Catan Board
Build Overview
This page documents the creation of a 3D printed Catan board (for up to 4 players) and custom box for storing the pieces. This project involves 3D printing the many board game pieces, woodworking to create the box, wood painting, and figuring painting. This project is based on an online Instructables tutorial.
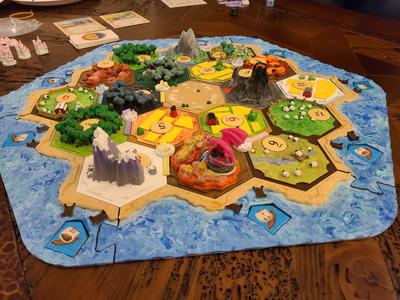
The board completed and being played.

The box storing all the pieces.


The build can be broken down into a few different steps:
- 3D printing the pieces
- Laser cutting the box
- Gluing the box together
- Painting/varnishing the box (ensure this is done AFTER gluing, otherwise, you might chip the paint, or the glue won't be as strong)
- Decorating the box (might not be necessary depending on what type of box you built)
- Lining the box (this is not necessary, but might help save the pieces from breaking)
- Painting the game pieces
- Getting the remaining game pieces
Printing the Pieces
The 122 different pieces you will need are:
- 1x desert tile
- 1x each of the hill/brick tiles (3 total)
- 1x each of the mountain/ore tiles (3 total)
- 1x each of the pasture/wool titles (4 total)
- 1x each of the forest/lumber tiles (4 total)
- 1x each of the field/grain resource (4 total)
- 6x water borders
- 16x citys (4 for each player)
- 20x settlements (5 for each player)
- 60x roads (15 for each player)
- 1x dragon
Most of these pieces can be found on the Instructables webpage, but the water border pieces can be found here.
It will be a long process of printing all the pieces as the best option is to print most of them individually as they are prone to error or slight printing issues. I have found that it is possible to print many of the settlements, cities, and roads together using the sequential print option. This can be found in the Custom print settings page, if you search "print sequence", you can change the option to "one at a time". This makes the printer completely finish one piece before starting on the next. This will stop mistakes from happening with the nozzle quickly moving between the different pieces. However, this will limit how many you can print at once.
Luckily, the infill only really needs to be at 5% since they do not need to be insanely sturdy. The layer height can be .2mm for the hex tiles and water pieces and .1mm for the dragon, cities, settlements, and roads. The only piece that will need support is the dragon, however you will likely want to use dissolvable support PVA as ripping PLA support off can damage the pieces. In total, the printing time will be somewhere around 75-100 hours, depending on the running variables.
The color of the pieces does not matter much if you are painting over the pieces. The best options are either to try and match the printing material color with the desired painted color, or use a neutral color like a light grey or white that paints over easily.
I'd recommend at least planning the box, if not working on it while the pieces are printing as this will be a lot of waiting.
Check the pieces as they are being printed to see if they need to be reprinted. Some pieces (especially the sheep with trees) might have parts that fall off, like the tree tops. These flaws don't require a reprint as the pieces still look good, but that is up to you.
For each hex tile, you will need to use wire cutters to snip off the circles around the corners that are printed to reduce warping. You will also likely need to sand down all the bottom edges of the hex tiles for the pieces to fit snuggly in the water borders.
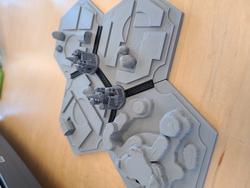
Test the pieces together as they come out to make sure they look cohesive.
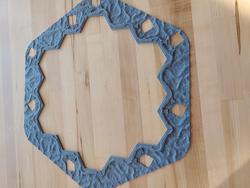
The border pieces should tightly fit together to form a hexagon.
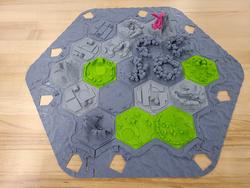
After sanding, the pieces should fit tight together.


Planning the Box
To create the box, I used a laser cutter to cut 3/16 inch thick wood into pieces to be glued together.
I planned my box using an online resource, however, you can use any resource to create your box (help can be found on this wiki page. There are many different designs you can do and that depends on what type of box you want. Some options are sliding tops (top slides off the side of the box), a box with hinges (like a chest), or a top with latches. I chose the latch top as my box was very wide and hinges likely wouldn't have been strong enough with the thickness (3/16 inch) of the wood I chose.
There are many different options you can choose for your box. For mine, I chose to have three sections, one for the player pieces, one for the hex tiles, and one for the rest of the game pieces and resources. To make the dividers, I measured the inside of the box and created a rectangle in Adobe Illustrator that is slightly shorter than the height of the inside of the box.
Once you have created your box design, you can add designs to the top or sides by adding pictures to the Illustrator file. Laser cutting is simple using your desired material by following the laser cutter training.
Assembling the Box
Assembling the box before painting is crucial to ensure that no paint is messed up when gluing individually painted parts together. If you used the box creator programs talked about above, this step should be very simple. All you should need to do is apply wood glue (or your other desired glue) to the joints and clamp them together to dry.
If you are making two box bottoms and attaching them with hinges like I did, I recommend gluing all 4 sides to the bottom/top at once, to ensure they fit together before the glue hardens.
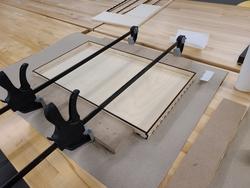
The box top being glued.
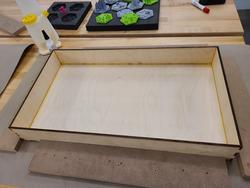
The box bottom being glued.


Painting and Varnishing the Box
This is the step that gives you the most freedom. You can decide what color (if any) wood stain you want to apply. This normally will be one quick coat, applied with a brush or paper towel. This gives the box the color. The varnish is used for adding a protective layer over the wood. The type can be any you want, like polyurethane. The instructions will tell you how many coats is required, how long each coat should dry, whether sanding is necessary, etc.
To apply these materials, you will need to do only the outer or inner side of the either of the box sides at once. This process will be very time consuming as it requires a lot of applying quick layers and then waiting. You should be applying this in a big open area, or outside as the smell is overpowering.
The most important thing you can do first is testing out the color and varnish on a small piece of unused wood. This can be a small square piece from an unusable area after laser cutting. This will allow you to see the end product before actually using your box.
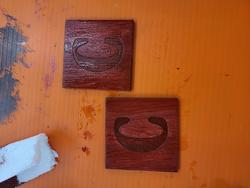
Pieces of engraved wood to test the paint/varnish.
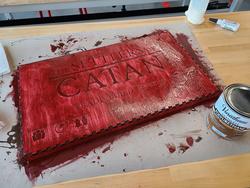
Immediately following an application of varnish.


For mine, I used a barn red wood stain and oil based polyurethane from home depot. I applied one layer of the stain and three of the varnish.
Decorating the Box
You might decide to add many different decorations, or none, it is up to your preference. Some examples of things you can add are: metal corners, handles, decorative handles, latches, decorative legs, etc. You can buy these online, or from a hardware store. What you can do will depend on the wood you have chosen. Thin wood will not be able to have any large nails drilled in for fear of splitting the wood. This also might mean handles can't be used to carry boxes.
If you chose a box without a built in lid system, you will need some systems like latches or hinges to keep your box shut. If you have a heavy lid like I did, hinges might not be strong enough to safely manage the lid, so a fully detachable lid held in by latches is more effective.
Lining the Box
A drawback to adding decoration to the box is screws might be too long and peek out into the inside of the box. This could damage pieces or cause harm to people handling the box. There are many ways you can fix this, like padding the inside with foam, felt, or other soft materials.
Even if you have no extruding screws, you might want to add padding to the box in order to protect the pieces.
Painting the Game Pieces
You might think at this point, the hard point is over. Think again. Although painting is not difficult itself, there are many pieces to paint, so be patient. This part is at least more fun.
There are a few options here, you can make the entire board fit together with a common theme and colors and each different tile type has a certain feature. This would be cohesive and easy to distinguish the different types. I chose a different option, to make each piece unique. This option creates a more colorful and vibrant board. For example, my four wheat tiles tiles each had their own season.
There are different types of paint that you can use, but research and test it thoroughly to make sure it works well. I used generic acrylic paint and used many layers to make an even coat. I painted most of the pieces using a paint brush, the basic method. However, for the settlements and cities, each of the pieces needed a base coat of white, so I applied multiple coats of spray paint before adding acrylic paint details applied by paint brush.
No matter what you choose, have fun with it! This is the most important step to making the game your own.
Dealing with the Remaining Pieces
After you have completed all of the above, you might realize you are still missing some game pieces. You can buy or make the rest of the pieces, or if you already own a copy of Catan, you could just move the pieces from the original game to the 3D version.
The remaining pieces you will need:
- The circle number tiles for inside the hex tiles (showing number roll frequency) with the letter on the back - You can laser cut these out of wood by measuring the size of the normal piece and manually laser cutting both sides. One side is easy but to do the other, you can just approximate the middle of the backside.
- The port tiles for the water - again you can manually make these by measuring the dimensions of the normal game piece size and laser cutting your own.
- Resource/Development cards - these are a little harder to make yourself. You can custom order cards from places like Etsy, or you can buy replacement cards (from amazon or from Catan's website)
- The player build cost cards - These can be as customized as you want, and can be made in the laser cutter however you like.
- Longest Road/Largest Army awards - These can be as customized as you want, and can be made in the laser cutter however you like.