Adobe Illustrator: Difference between revisions
No edit summary |
No edit summary |
||
| Line 15: | Line 15: | ||
*Shape Tool: This tool can be used to make shapes that can be filled in or set the outline as a vector or as a cut. Right clicking this will let you select one of many types of shapes. | *Shape Tool: This tool can be used to make shapes that can be filled in or set the outline as a vector or as a cut. Right clicking this will let you select one of many types of shapes. | ||
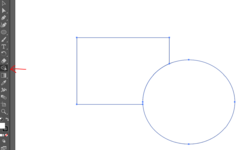
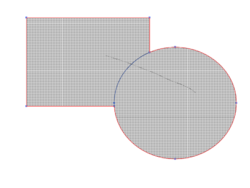
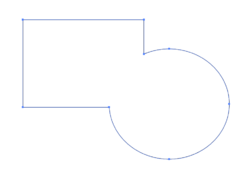
*Shape Builder Tool: This is a very useful tool for merging multiple shapes into one. First, you need to select all the shapes overlapped with sides desired to be removed. Next you click the Shape Builder tool on the toolbar. Then you draw a line from the first shape through the path you want deleted into the second shape. Adobe will do its best to merge the paths of the two or more shapes. After you have drawn the line and before releasing your click, the red outlines will be the combined shape and the blue edge will be the deleted edge. | *Shape Builder Tool: This is a very useful tool for merging multiple shapes into one. First, you need to select all the shapes overlapped with sides desired to be removed. Next you click the Shape Builder tool on the toolbar. Then you draw a line from the first shape through the path you want deleted into the second shape. Adobe will do its best to merge the paths of the two or more shapes. After you have drawn the line and before releasing your click, the red outlines will be the combined shape and the blue edge will be the deleted edge. | ||
<gallery class="center" heights= | <gallery class="center" heights=200px widths=250px> | ||
File:Shapebuilder.PNG | This is the shape builder tool | File:Shapebuilder.PNG | This is the shape builder tool | ||
File:Mergedshapes.PNG | This shows you how the merged shapes will look | File:Mergedshapes.PNG | This shows you how the merged shapes will look | ||
File:Mergedshapesfinal.PNG | This is the final shape | File:Mergedshapesfinal.PNG | This is the final shape | ||
</gallery> | </gallery> | ||
And once this new shape has been created, you can do everything you could with a normal square or any other shape. You can change the outline to something else or change the fill and now everything inside will be that same fill. | |||
=== Role of Colors and Types of Cutting === | === Role of Colors and Types of Cutting === | ||
Revision as of 03:03, 13 January 2020
Adobe Illustrator is a graphic design application used to create Universal Control Panel (UCP, laser cutter printer program) compatible files that can be printed. Adobe illustrator is not the only file that can create files compatible for printing but it is the program that is default installed on the two computers in the prototyping room hooked up to the cutters. From adobe illustrator you can print to the UCP by printing and setting the printer as VLS. If you have another program you use to create graphics, you can export the graphic as an image and import it into Adobe to print on the computers in the room.
Adobe Illustrator is available for all UMD students on terpware with a valid student account. You can then create designs on your own computer and just bring it in to be printed.
If you would like anything added to the wiki please comment in the discussion tab at the top or inform a manager.
Adobe Illustrator Basics
The easiest way to get started is clicking create new and either using one of the preset templates for size or go to art & illustration and making a large canvas by changing the size to some large number bigger than you need like 15 inches by 15 inches (Make sure you change the units from points to inches).
Make sure you are in RGB mode under "Advanced Options" because if you aren't then you won't be able to make a full blue line for vector cutting (To change, go to File->Document Color Mode).

Basic Tools
There are many basics for Adobe Illustrator that can help you out. All of these can be found on then default toolbar
- Shape Tool: This tool can be used to make shapes that can be filled in or set the outline as a vector or as a cut. Right clicking this will let you select one of many types of shapes.
- Shape Builder Tool: This is a very useful tool for merging multiple shapes into one. First, you need to select all the shapes overlapped with sides desired to be removed. Next you click the Shape Builder tool on the toolbar. Then you draw a line from the first shape through the path you want deleted into the second shape. Adobe will do its best to merge the paths of the two or more shapes. After you have drawn the line and before releasing your click, the red outlines will be the combined shape and the blue edge will be the deleted edge.
This is the shape builder tool
This shows you how the merged shapes will look
This is the final shape


And once this new shape has been created, you can do everything you could with a normal square or any other shape. You can change the outline to something else or change the fill and now everything inside will be that same fill.
Role of Colors and Types of Cutting
Colors all have a specific role in Adobe Illustrator and cause different effects in the laser cutting. The laser cutter needs to know what's distinguished as a vector/raster/cut so each of these has their own color.
- Vector: This cutting is blue, or RGB value of 255 BLUE/0 RED/0 GREEN. This causes the laser cutter to trace over the lines that are designated as blue with a more powerful laser. This is useful for doing outlines of an image or tracing the outlines of words.
- Cut: This cutting is red, or RGB value of 255 RED/0 Blue/0 Green. This causes the laser to cut through whatever material you have to remove it from the larger block of material. The laser cutter knows how strong to fire to cut the laser because it uses the type of material and material thickness to know how much power would be needed. If you are having problems with your material not cutting all the way through make sure the thickness and type are correctly inputted.
- Raster: This cut works by engraving different colors at different intensities to distinguish the colors. This makes your images look more like black and white images. Any color that is not full RED or full BLUE (other than white) will be rastered.
White will not show up as anything.
Importing and Editing Images
Images can be imported into Adobe by dragging the picture from your computer onto the canvas or copy pasting the image from the internet. All images that are entered will default be rastered because the colors are not absolutely red or blue like cutting needs to be.
Using Image Trace
The image entered is normally something like a PNG or JPG or similar picture. Adobe Illustrator needs it to be an SVG file to be able to print to the printer as a raster. This can be done by clicking the image and going to the image properties and clicking "Image Trace".

This image trace will scan your image and produce it as a Scalable Vector Graphic (SVG) which means it can be resized to any size and keep its quality. This SVG is whats needed for the UCP to be able to cut. Without this SVG the image will not be printed. Each of these image traces are used in different situations to produce a different outcome:
- High/Low Fidelity Photo: Used for tracing actual images. High is for high quality and low is for lower quality images (Try both to see which is better)
- 3/6/16 Colors: Limit the number of colors in the design to the designated amount. If there are more then Adobe will change similar colors to the same color. This is useful for clipart and similar images without too much detail. This will still retain similar colors to the base image but can lessen the detail of multiple colors possibly enhancing the look of cutting.
- Shades of Grey: Changes all colors into different shades of grey. This keeps the overall look of the image as lighter colors will be lighter shades of grey and darker colors will be darker greys. This is useful for printing as it is more of a representation of what your image will print like. Since the cutter can't do colors the different shades of grey represent the different levels of intensity of cutting.
- Black and White Logo: Changes all of the colors to either a black or white. Very useful for creating contrasting images because it will either cut somewhere or not, not having different shades of cutting. Every color that is changed to black will be cut and every color that is white will not be cut. Very useful when cutting glass/clear material as different intensities of cutting do not show distinguishable shades in the material.
- Silhouettes: Turns all colors of the image to black. Used for just cutting the shadow of a full image instead of wanting detail inside. Also allows you to easily get the outline of an image. More information on getting the outline in Outlining an Image
These are not all the possible options but the most useful ones. Feel free to try the others and figure out their uses. You can also keep switching between all of the options to see which is the best fit for your image.
Outlining an Image
Sometimes you might not want to raster an image and would just like to vector cut the outline of the image, or vector outline the outside of an image and raster the inside. Outlining images is also very important for cutting on glass or clear material because different colors don't show up well on transparent materials.
To create an outline of an image to vector cut the image rather than raster, firstly you need to image trace it.

Next you need to expand the image to allow editing on the paths.

Then you need to change the stroke to what color you want (blue for vector, red for cut, any other for raster) and set the fill to nothing. This will remove all colors inside and just leave the shell outline.

You must remember that sometimes the outline square of the image is still there. To remove this you can visit the Editing the Paths of an Image section to help delete it. Short answer is double click a path to go into isolation mode, click a path and delete it.
If you want to remove some of the paths that were outlined (Like some extraneous inner paths) you can check the Editing the Paths of an Image section. This can be useful for creating an outline for cutting out a rastered image. You can outline the entire image and delete everything but the outline and place the rastered image inside the outline. This will raster the inside but cut out the entire image.
Editing the Paths of an Image
After image tracing an object and expanding the path. This creates the paths of the object that it thinks is best but sometimes you don't want all of them. In order to remove some of these you first need to go into isolation mode by double clicking on a path. Then you can click individual paths and delete then how you see fit.
You might find while deleting some paths that multiple paths are connected together. These paths are grouped together and can be released by clicking on the paths and clicking Release. This allows you to click the individual paths and delete them.
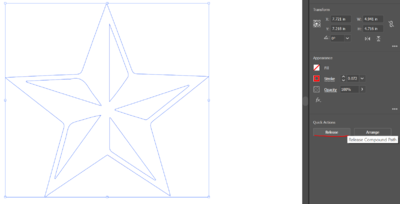
Release makes all the paths individual objects
Now you can delete the inside paths and create the outline


Now you would be able to place this outline over a copied, traced, version of the image and have the image also be cut out.
Using Text
To insert text into your file click the "T" on the toolbar and click somewhere that you to type. Then type whatever you want and can change the font, size, alignment and other properties in the properties tab of the text. If you right click on the text icon in the toolbar you can do some other text settings like typing on a path or vertically.
There are a couple different things you can do with text for laser cutting. You can mess with the outline and fill to raster or cut the outline or fill the inside with color.
- Outlining: Once you write the text, you can go to the properties of the textbox and change the outline. Changing this to anything other than red or blue will just raster it. If you change it to blue, you can vector cut the outline, this looks very nice as a contrast to just rastering the entire middle because it leaves the middle as the base color. On the other hand if you use a red outline then you can cut out all the letters and then use them on something else like on another board. You can ignore the outline by setting the outline to the no outline color (white with a red slashed line).
- Inside Fill: Any fill on the inside will just be rastered out. Using this without any outline will just cause a shaded out section looking like the text. The intensity of what is rastered depends on what color you choose as the fill. The darker the color the darker the shade that will be burned out. If you didn't want any fill then changing it to the no fill will do (white with a red slashed line).
If you combine both the outlining and fill then you can do things like vectoring the outline of text and rastering the inside to provide even more contrast. Using different fills can have different effects, the lighter color you use the lighter raster it will do inside.
Adobe Illustrator Tips
- Make sure when you are creating the new page for design, that the advanced option is set to RGB mode or else you won't be able to make the colors for vector cutting.
- If you are in CMYK mode or vector cuts don't seem to be showing up as vector cuts in the UCP then check this setting.
- In order to cut out an image you need to image trace it. See Using Image Trace for more help.
- When rastering images onto glass and clear acrylic, do not try and use intricate pictures with many colors.
- Glass and clear material doesn't differ much depending on how deep the cut is. Normally try and make it a silhouette or black and white logo and it will cut much nicer.
- When trying to cut through a material, if the cut is not going all the way through, make sure you check that the material thickness and type are correct.