WindowsPrinting
Introduction
This will guide you through the process of installing and using the printers available within UMIACS.
Pre-Installation Knowledge on Printing at UMIACS
Printing at UMIACS
If the computer you are on is not directly connected to UMD's/UMIACS' network, you must first connect to the VPN, and must be on the VPN whenever you print thereafter.
- As alternatives, you can either:
- Hard-wire into a UMD/UMIACS network before continuing.
- Copy your files onto a UMIACS-supported system, such as your available Nexus submission nodes, and print from there.
- Copy your files onto a USB drive and print via USB at a printer directly.
Installation of printer queue
After you are connected, follow these steps for adding a printer queue:
- Go to Start and search for "add a printer" in the search box. Click on the "Add a printer or scanner" option.
- In the top right of the Settings menu that opens, click on "Add device".
- Wait a few seconds for the "Add manually" option to come up, and click it.
 ->
-> 
- In the Add Printer menu that pops up, choose "Select a shared printer by name", and type
http://print.umiacs.umd.edu:631/printers/<printername>into the dialog box, where <printername> is replaced with the name of the printer that you want to print to. Click Next.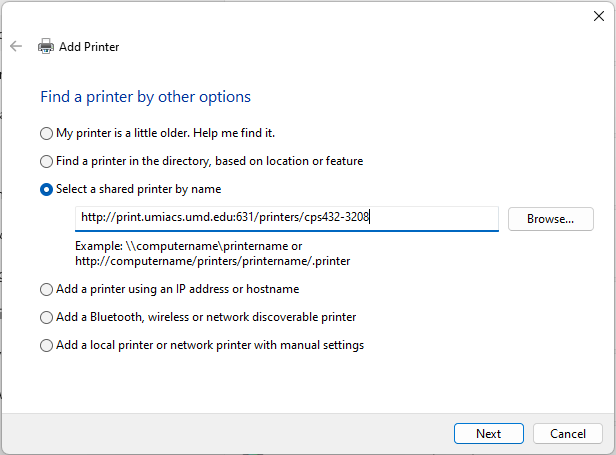
- In this example, we are using cps432-3208 as the printer name.
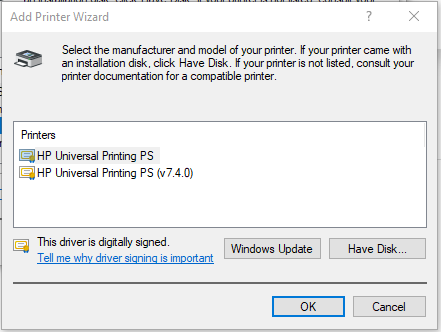
- Select the manufacturer and model of your printer. Almost all UMIACS-managed printers are HP-brand, so choose HP unless you know for a fact that your printer is not HP-brand. You can either select a model-specific driver if you have one installed and you know the printer's exact model, or a HP Universal Printing driver. Click OK.
- If you do not have HP as an available manufacturer option at all, download and install the latest HP Universal Print Driver for Windows. The PostScript (PS) driver is usually fine unless you want to print with an option only available in PCL6, in which case choose the PCL6 driver.
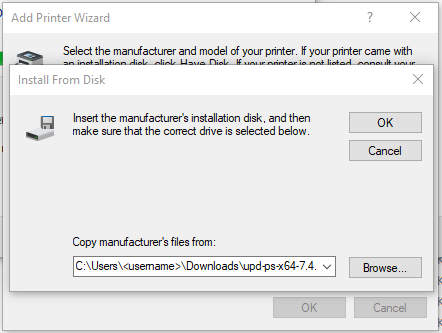
- To install the driver, unzip the file you download, then click the "Have Disk..." button. Enter the full folder path of the extracted zip file and click OK. Do NOT choose the "Browse..." option as this will only let you select individual files; typing the full file path will let it select the entire folder and determine the right files automatically. Choose either of the two drivers that appear.
- For example, if you download the file to C:\Users\<username>\Downloads\upd-ps-x64-7.4.0.25959.zip, and then extract the file also to C:\Users\<username>\Downloads, enter
C:\Users\<username>\Downloads\upd-ps-x64-7.4.0.25959in the "Copy manufacturer's files from:" box, and click OK. Make sure to replace <username> with the username you are logged into Windows with.
- For example, if you download the file to C:\Users\<username>\Downloads\upd-ps-x64-7.4.0.25959.zip, and then extract the file also to C:\Users\<username>\Downloads, enter
- To install the driver, unzip the file you download, then click the "Have Disk..." button. Enter the full folder path of the extracted zip file and click OK. Do NOT choose the "Browse..." option as this will only let you select individual files; typing the full file path will let it select the entire folder and determine the right files automatically. Choose either of the two drivers that appear.

- or
 ->
-> 
- If you do not have HP as an available manufacturer option at all, download and install the latest HP Universal Print Driver for Windows. The PostScript (PS) driver is usually fine unless you want to print with an option only available in PCL6, in which case choose the PCL6 driver.
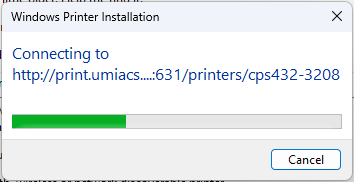
- Wait a few seconds for your computer to connect to the printer with the driver you picked. Eventually, a window will pop up saying that the printer was successfully installed with the driver you chose. Click Next.
 ->
-> 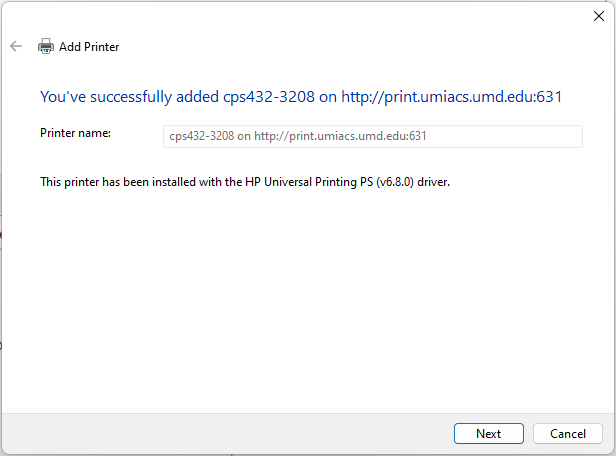
- Choose to set the printer as your default printer or print a test page if you want to, and click Finish. You can now start using the printer.


Troubleshooting
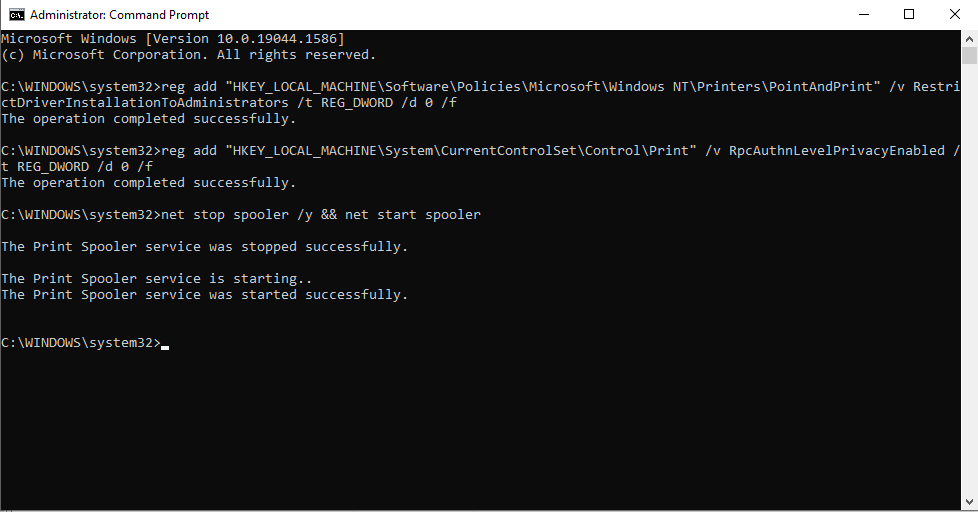
If you receive the following error when attempting to add a printer queue, the issue may be that your computer is configured for a higher level of printer security than is default at UMIACS as a result of the PrintNightmare vulnerability.

To resolve this error:
- Click on the Start menu and type "cmd" in the run bar.
- Right-Click on the cmd button, and select "Run as Administrator" - THIS IS VERY IMPORTANT!
- Select "Yes" when it asks if you want to allow the following program to make changes.
- From the Command Prompt, run these commands in order:
reg add "HKEY_LOCAL_MACHINE\Software\Policies\Microsoft\Windows NT\Printers\PointAndPrint" /v RestrictDriverInstallationToAdministrators /t REG_DWORD /d 0 /f
reg add "HKEY_LOCAL_MACHINE\System\CurrentControlSet\Control\Print" /v RpcAuthnLevelPrivacyEnabled /t REG_DWORD /d 0 /f
net stop spooler /y && net start spooler
- Attempt to add the printer queue again.


Removing a printer queue
To remove a printer queue, open the Start menu and search for and go to Control Panel. Next, click on "View devices and printers." To remove the queue, right click on the printer and select "Remove device". If you wish to add the printer back, follow the instructions above.

Duplex Printing
Many printers in UMIACS support duplex (2 sided) printing. To make the duplex printing default, first make sure the appropriate printer queue is installed via the directions above. Afterwards, go to start, then “Devices and Printers.” Once the printer has been installed proceed by right clicking on the queue then selecting “Printing preferences.”

After a few seconds the following menu will come up. Make sure you are on the “Printing Shortcuts” tab and select the “EcoSMART Settings” option then click on okay. This modification will allow you to print 2-sided whenever you choose to use this printer.

Store and Print PIN-Protected Jobs
PIN-protected jobs provide a way to ensure jobs are not printed until you are ready to pick them up. This can be useful if you have a sensitive job that you want to print on a public printer at UMIACS. Follow the below steps to store a job and then print it at the printer.
Create a stored job
- From the software program, select the Print option.
- Select the printer from the list of printers, and then select Properties or Preferences (name varies by software program)
- Click the Job Storage tab.
- Under Job Storage Mode, select Personal Job.
- In the drop-down menu under Make Job Private/Secure, select PIN to print, and type in a 4-digit number.
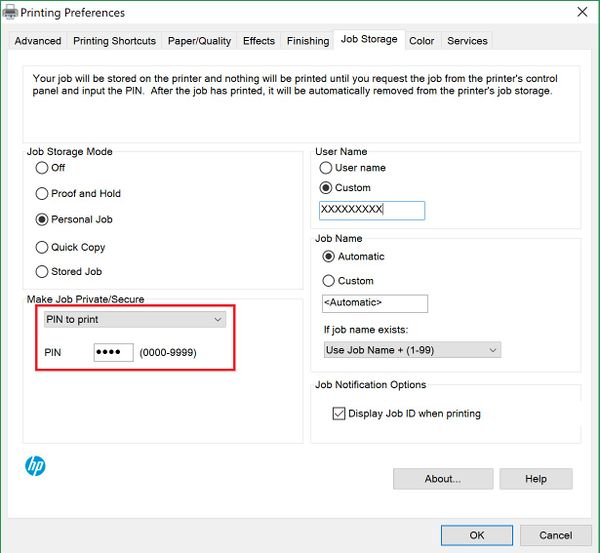
- Note: You will need to provide the entered PIN (4-digit number) at the printer's control panel.
- Click the OK button to close the Document Properties/Preferences dialog box. In the Print dialog box, click Print.


Print a stored job
After you have created a stored job using the instructions above, follow these steps to print from the printer's control panel.
- From the Home screen on the printer control panel, select Print.
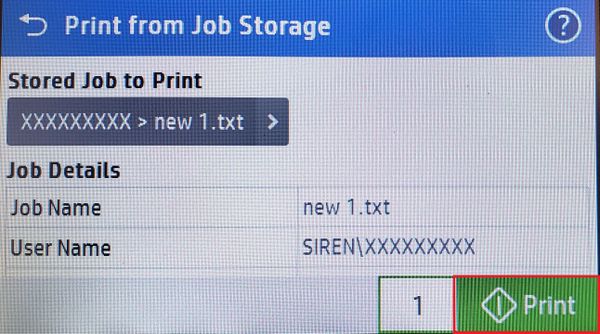
- Select Print from Job Storage.
- Select Choose, and then select the name of the folder where the job is stored.
- Select the name of the job, enter your chosen PIN (4-digit number), and click Ok.
- Select Print to print the job.
- Note: The print job is deleted from memory after it prints.


