Replication:Replication Monitor 2.0
From Adapt
Overview
This is an update of the original replication monitor. Except for some front-end pages, it is a complete rewrite from version 1.0 that introduces several new features.
- New database schema for improved performance
- Multi-threaded replication
- Improved reporting
- Better linking of event log items to individual items.
The SRB Replica monitor is a simple webapp that will watch registered directories and ensure that copies exist at designated mirrors. The monitor stores enough information to know if files have been removed from the master site and when the last time a file was seen. In addition any action that the webapp takes on files is logged. The monitor does NOT do any type of integrity checking, this is the responsibility of additional components.
Files
- srb-monitor2.war: webapp
- srb-monitor2.sql: SQL database schema
Quick Setup
- 1. Requirements
- MySql (tested on 4.1)
- Apache/Jarkata Tomcat (5.5 or higher)
- MySQL connector (Version 5.0 or higher)
- 2. Create database
- Create a new database called 'srbmon', grant permissions and setup table structure.
Welcome to the MySQL monitor.  Commands end with ; or \g.
Your MySQL connection id is 2 to server version: 4.1.20

Type 'help;' or '\h' for help. Type '\c' to clear the buffer.

mysql> create database srbmon;
Query OK, 1 row affected (0.01 sec)

mysql> grant all on srbmon.* to monitor@localhost identified by 'YOUR_PASSWORD';
Query OK, 0 rows affected (0.00 sec)

mysql> use srbmon;
Database changed
mysql> source srb-monitor2.sql;
ERROR 1146 (42S02): Table 'srbmon.ACTIVITY_LOG_ENTRY' doesn't exist
ERROR 1146 (42S02): Table 'srbmon.ACTIVITY_LOG_ENTRY' doesn't exist
...
...
Query OK, 0 rows affected (0.00 sec)
Records: 0  Duplicates: 0  Warnings: 0

mysql> exit
Bye
The srb-monitor.sql listed is the file from above. Set YOUR_PASSWORD to a password to use for this database.
- 3. Install webapp
- Install tomcat on your server and verify it's working. Shutdown the server and place a copy of the srb-monitor2.war file in your TOMCAT/webapps directory. Create a new file called srb-monitor2.xml in your TOMCAT/conf/Catalina/localhost directory. In the configuration file, place the following:
<?xml version="1.0" encoding="UTF-8"?>
<Context path="/srb-monitor2">
    <Logger className="org.apache.catalina.logger.FileLogger" prefix="srbmon2." suffix=".log" timestamp="true"/>
    <Realm className="org.apache.catalina.realm.DataSourceRealm"
           dataSourceName="jdbc/srbmon2db" debug="99" roleNameCol="rolename"
           userCredCol="password" userNameCol="username"
           userRoleTable="userroles" userTable="users"  localDataSource="true"/>

    <!-- change url, username, and password to match your mysql setup -->
    <Resource auth="Container" driverClassName="com.mysql.jdbc.Driver"
              validationQuery="SELECT 1" testOnBorrow="true" maxActive="20" maxIdle="10"
              maxWait="-1" name="jdbc/srbmon2db" type="javax.sql.DataSource"
              url="jdbc:mysql://localhost/srbmon" username="monitor" password="YOUR_PASSWORD" />

    <!-- Number of days before a collection is checked. 0 to disable -->
    <Parameter name="checkTime" value="0"/>

    <!-- max number of replications that will run at a time. This is number of
    replicas, not number of collecitons running -->
    <Parameter name="maxTasks" value="5"/>

</Context>
You should edit the username, and password fields under resource to match what you used in the previous step.
If you haven't already done so, you will need to place a copy of the mysql connector in your tomcat TOMCAT/common/lib directory so the monitor can use the database for authentication. The monitor requires version 5.0 or later
You can now restart tomcat and browse to http://localhost:8080/srb-monitor2 where localhost is the name of the machine you installed the monitor on.
- 4. Register your first collection
- When the monitor starts up, you will see a status screen with no collections.
- Click Add Collection from the status screen.
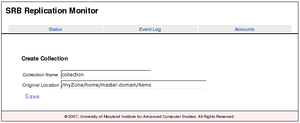
- Enter a descriptive name, and the srb directory you want to replicate. Click Save when finished.
- Now click manage replicas to add a new replica.
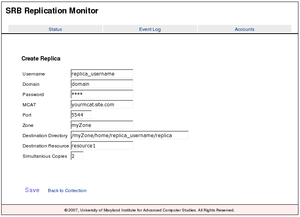
- Enter the information for an account that will be used to create the replica. This account must have read access to the previously entered directory. The directory and resource listed are destination resources.
- 5. Start the sync
- Click on the Status tab, Next to your collection, click the green icon on the right to begin replication
Usage
There are three main sections to the replication monitor.
- Status - view current status and manage collections
- Event Log - detailed event list of everything the replica monitor has done.
- Accounts - Control access to the replica monitor.
Status
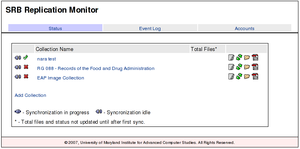
The status screen shows an overview of all monitored collections. Clicking on a collection will bring up an expanded view of the collection.
- Collection Name - descriptive name of the collection, preceded with two icons showing if a collection is currently replicating, and if a collection has ever been successfully checked. Clicking on the name of a collection will bring up an expanded view of the collection.
- Total Files - Count of monitored files, this will not be accurate until after the first complete sync has finished.
- File:Mon2-stopped.png" File:Mon2-running.png Collection is currently idle or replicating
- File:Mon2-file-ok.png Collection has successfully synced
- File:Mon2-file-bad.png Collection has never completed a sync
- File:Mon2-edit.png Edit collection and replicas
- File:Mon2-start.png File:Mon2-stop.png Start/Stop replicating the collection
- File:Mon2-browse.png Browse items in a collection
- File:Mon2-report.png View report of offline items in a collection
The following operations are available from the collection details view
- File:Mon2-delete.png Delete Collection
- File:Mon2-log.png View logs for collection
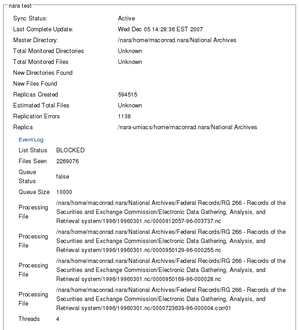
When a replication is in process, the details window will show the following information for each replication site that is part of a collection
- Event Log - view event log for current replication
- list status - RUNNING (scanning directories), BLOCKED (work queue is fill, waiting for items to finish copying, FINISHED (comparison of master/replica site has finished)
- queue size - how many items are waiting to be replicates. There is a max of 10,000 items that can be in queue.
- queue status - true/false - has the queue been shutdown and is waiting for work to finish
- Files Seen - number of files the list process has looked at
- File Processing - One for each simultaneous copy. This is the file that is currently being copied. If there is no work, this may be empty
- Threads - number of simultaneous copies allowed.
Collection Configuration
There are two parts to configuring a collection for monitoring in the replica monitor. First, you need to specify a directory that will be used as the source of data. Second you need to configure a set of replica sites that are used to receive copies of data from the master site. There are a few simple requirements for the replica collections. They include
- replica sites and master site must be federated.
- Account information listed in the replica must be able to read (write not needed) all items in the source directory
A common practice that works for replicating is to create a second account rooted in the replica zone, and give this account read access to the master collection. This provides a degree of safety in that this account cannot change the original copy, and redundancy in that the replica account does not rely on the master zone for authentication
- Collection Name - descriptive name for the collection
- Original Location - SRB directory containing the master collection.
- username - replica username to connect to the srb
- domain - domain of the replica account to you
- password - account password
- MCAT - mcat of the destination site
- Port - port for mcat
- Zone - replica zone
- Destination Directory - destination directory for replica, will create if it doesn't exist
- Destination Resource - resource to use for copy
- Simultaneous Copies - number of files to copy at the same time. Generally, this is under 5 to prevent overloading your mcat
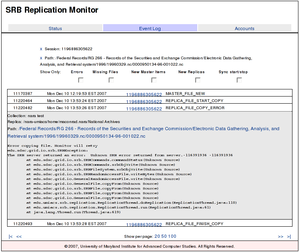
Event Logs
The event logs track every action that occurs while syncing a collection. As the logs can grow quite large, there are a number of filtering options available. The beginning and end of every sync is recorded as well as any new files or new replicas that were created and any errors that may have occurred. For a new file, you will generally see 3 entries per file, an entry for a new master file discovered, and two entries for the beginning and ending of the replica creation.
- Show per page: display 20, 50, or 100 log items per page
- |< >| - start at beginning or end of logs
- << >> - show previous or next page
Filters at the top are available to display only certain log types.
- Errors - show only errors that occurred during transfer. This is any error from master site to replica
- Missing Files - Logged when a master file has gone missing.
- New Master Items - Logged when a new master file has been found
- New Replica - show when a new replica was created.
- Sync Start/Stop - show when syncs started and stopped, good for showing over time involved in syncing a collection
In addition to filtering by type, clicking on the session ID, or the path of an item will filter for items of that path or session. Any collection, replica, session, or path filters will be listed at the top of the page. Clicking the =x= before the filter will remove it.
Account Management
System Configuration
System configuration is done in the TOMCAT/conf/Catalina/localhost/srb-monitor.xml file for the webapp. This included database connection properties and some properties controlling logging and how replica sites are checked.
The settings that most will want to change are:
    <!-- Time after which a replica check is needed, in hours -->
    <Parameter name="edu.umiacs.checkTime" value="168" />
    <!-- Max number of running replica's, if set to 0 or blank, then no limit -->
    <Parameter name="edu.umiacs.maxSyncThreads" value="5" />
    <!-- Max number of attempts to copy a file if we get an error -->
    <Parameter name="edu.umiacs.maxRetry" value="5" />
    <!-- Should we schedule sync's or require them to be run manually -->
    <Parameter name="edu.umiacs.autoSync" value="false" />
Implementation
Replication Workflow
The core of the replication is composed of three parts, directory list thread, work queue, and worker threads.
First is a directory list thread(dlt) that crawls the MCAT of the master and replica sites comparing file names and checksums. For files that have a mis-matched checksum or do not exist on the replica, the dlt adds the items to the work queue. The dlt will add newly found items to the list of monitored items. For replica items that have been found correct, their last seen timestamp will be updated and replica set active if inactive. Items that need to be replicated will be logged and have their status set to inactive. They will become active only after a replication is successful.
The work queue stores a list of all items that need to be replicated in a linked blocking queue. This queue is fed from the list thread and read from by the worker threads. The work queu also manages starting up or shutting down worker threads and tracks if an abort has been requested. When the work queue ends, it takes care of logging the finish, and turning off all worker threads and marking all items that have not been seen offline.
The third part, worker threads, are started by the work queue and block waiting for the dlt to add items to the work queue. When an item appears, the thread is notified and attempts to copy it. Up to five attempts will be made to copy an individual file. Each time a file fails, a log message will be generated. When an item finishes copying, the item's timestamp will be updated and the replica item set active
