BrickNotes
From Adapt
NARA/UMD Brick Configuration for 24-bay brick
Motherboard
RAID
Misc Info |
|
Installation
Disk config
all 400gb drives are connected to the two Areca controllers, top 12 to controller 1 and the bottom 12 to the second. Two internal root drives are connected to the 3ware card. The 3ware card was setup to mirror both drives and be the primary boot device. The Areca raids are not visible during install and drivers need to be added later (see below).
[root@erasrb2 ~]# df
Filesystem           1K-blocks      Used Available Use% Mounted on
/dev/mapper/VolGroup00-root
                      20158332   6227876  12906456  33% /
/dev/sda1               101086     12381     83486  13% /boot
none                    517336         0    517336   0% /dev/shm
/dev/mapper/VolGroup00-home
                      20158332     77968  19056364   1% /home
RedHat Enterprise Linux 4
Installed onto sda (3ware RAID), registered w/ rhn using UMIACS keys, installed all available patches. This brought us up to kernel 2.6.9-5.0.5.
Correction, this will now bring us up to update 1, running kernel 2.6.9-11. So just substitute it for the rest of the doc
[root@erasrb2 ~]# rhnreg_ks --activationkey=xxxx
Reading DMI info failed
[root@erasrb2 ~]# rpm --import /usr/share/rhn/RPM-GPG-KEY
[root@erasrb2 ~]# up2date --nox -fu

Fetching Obsoletes list for channel: rhel-i386-ws-4...
########################################

Name                                    Version        Rel
----------------------------------------------------------
HelixPlayer                             1.0.4          1.1.EL4.2         i386
ImageMagick                             6.0.7.1        12                i386
ImageMagick-c++                         6.0.7.1        12                i386
ImageMagick-c++-devel                   6.0.7.1        12                i386
...
...
3Ware RAID Configuration
Download the 3dm software:
[root@erasrb2 ~]# tar -tzf 3dm2-x86-9.2.tgz
[root@erasrb2 ~]# cd x86
[root@erasrb2 x86]# ./install.3dm
3ware 3DM2 installation, configuration and removal script.
(c) 2004 3ware, Inc. All rights reserved.

Script version: v2.03.00.004 for x86
****************************


3DM2 supports two modes of operation.
-------------------------------------
0 - 3DM2 with remote/local GUI via WEB interface (Default)
1 - 3ware error logger only

Which mode would you like 3DM2 configured? [0 - 3DM2]
** 3DM2 selected. **

***************************************
*** Important RPM related question. ***
***************************************
* Answer N if you are using the install.3dm script to install 3DM2.
  If you answer N install.3dm will install all 3DM2 components.
* Answer Y if RPM was used for installing the driver/3DM2 software.
  3ware RPM packages install all 3DM2 components and only need to have
  the configuration portion of this script run.

Was RPM used to install the Escalade driver and/or 3DM2? (Y/N) [N]

**** 3DM2 version being installed is: 2.03.00.025 for x86 ****

Please enter the location for the help files. [/usr/local/doc/3dm2] /opt/3dm2/doc
Please enter the location for the message files. [/etc/3dm2/msg] /opt/3dm2/msg

Would you like to have email notification enabled? (Y/N) [Y]
Please enter the name of your mail server. [erasrb2.nara.gov]: localhost
Please enter the name of the user you want sending email notification. [root]:
Please enter the name of the user you want receiving email notification. [3ware_admin]: toaster@umiacs.umd.edu

Email Notification Severity Levels.
-----------------------------------
1) Errors
2) Warnings
3) Information

Please enter the email notification severity level (1,2,3). [1]: 3
Please enter the port number you would like to use for web monitoring. [888]:
Would you like 3DM2 connection security to limit connections to localhost only? (Y/N) [Y]

*** Starting 3DM2 using configuration found in /etc/3dm2/3dm2.conf ***
[1] 3866

Cleaning up installation files....

Starting 3ware DiskSwitch daemon: [  OK  ]
[1]  + Done                          /etc/init.d/3dm2 start
[root@erasrb2 x86]# chkconfig --list 3dm2
3dm2            0:off   1:off   2:off   3:on    4:on    5:on    6:off
Now, on the localhost you can fire up mozilla and manage the raid at https://127.0.0.1:888/, default password for User and Admin is '3ware'.
If you want to connect remotely, you can tunnel ssh as follows:
[toaster@loach ~]$ ssh dhcp223 -N -f -L8080:localhost:8080
toaster@dhcp223's password:
[toaster@loach ~]$ ssh dhcp223 -N -f -L8081:localhost:8081
toaster@dhcp223's password:
[toaster@loach ~]$
Now to configure monitoring of the 3ware raid. In /etc/3dm2/3dm2.conf set the following:
EmailEnable 1
EmailSender toaster
EmailServer 127.0.0.1
EmailRecipient toaster
EmailSeverity 3
Now start/stop the 3dm daemon. You can remotely monitor it by doing:
[toaster@loach ~]$ ssh 207.245.162.200 -N -f -L8888:localhost:888
Areca Drivers
The supplied drivers require a kernel recompile that's not worth it. Luckily someone for a RHEL4 clone (centOS) was nice enough to make drivers for the 5.0.5 kernel release. From the above <nop>CentOS link, you should install the kernel-smp-module-arcmsr-2.6.9-5.0.5.EL-1.20.00.07-2 and kernel-module-arcmsr-2.6.9-5.0.5.EL-1.20.00.07-2 packages. You should have updates the kernel to 5.0.5 by now.
After installing the above RPM's, you'll need to add the following line to /etc/modprobe.conf
alias scsi_hostadapter1 arcmsr
and rebuild the initrd so volumes will be available during boot. You shouldn't have to do this, but lvm won't detect devices unless this is done.
[root@erasrb2 ~]# cd /boot
[root@erasrb2 boot]# cp initrd-2.6.9-5.0.5.ELsmp.img initrd-2.6.9-5.0.5.ELsmp.img.bak
[root@erasrb2 boot]# rm initrd-2.6.9-5.0.5.ELsmp.img
[root@erasrb2 boot]# mkinitrd initrd-2.6.9-5.0.5.ELsmp.img 2.6.9-5.0.5.ELsmp
Sensors
Run 'sensors-detect' and use defaults for everything. When finished, add the following line to /etc/sysconfig/lm_sensors 'MODULE_4=w83781d' (from the above sensors link)
[root@erasrb2 etc]# mv /etc/sensors.conf /etc/sensors.conf.bak
[root@erasrb2 etc]# cp ~/2735.sensors.conf /etc/sensors.conf
[root@erasrb2 etc]# /etc/init.d/lm_sensors restart
Stopping lm_sensors:                                       [  OK  ]
Starting lm_sensors:                                       [  OK  ]
Adding new raid volumes
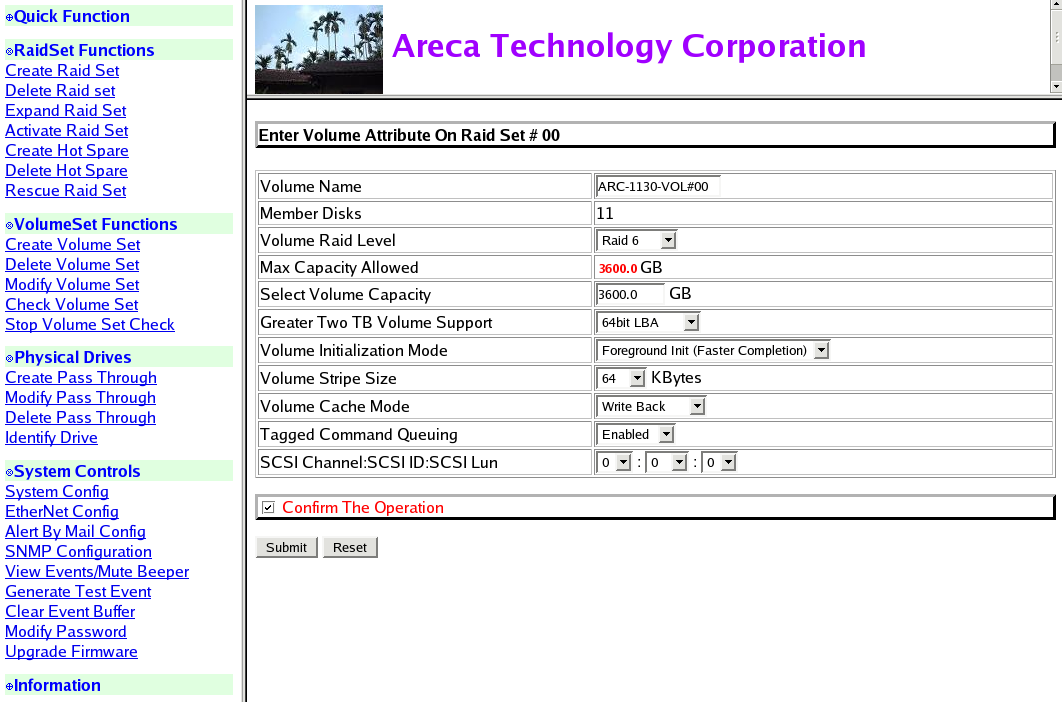
From the web interface (run '/root/archttppci32 8080'), or bios on boot, there are a few steps in creating raids. You should look at the users manual for more details than this. Basically it boils down to two steps, create raid sets or groups of related disks and mark spares, next carve out volumes from the raid sets. One each controller, we created one 11-disk raid set and one (1) hot spare (disk 12). A volume of maximum size was created on that set as a raid 6, with 64-bit LBA. Screenshot
If you added or removed devices after boot, linux will not automagically detect them, so you must manually probe them in by echoing commands into /proc/scsi/scsi. A good overview of what you can do to scsi at runtime can be found at the linux doc project
Adding a new device:
[root@erasrb2 scsi]# echo "scsi add-single-device 3 0 0 0" > scsi
Removing a device:
[root@erasrb2 scsi]# echo "scsi remove-single-device 2 0 0 0" > scsi
You can see currantly loaded devices by looking at /proc/scsi/scsi
[root@erasrb2 scsi]# cat /proc/scsi/scsi
Attached devices:
Host: scsi0 Channel: 00 Id: 00 Lun: 00
  Vendor: ATA      Model: WDC WD800JD-22JN Rev: 05.0
  Type:   Direct-Access                    ANSI SCSI revision: 05
Host: scsi1 Channel: 00 Id: 00 Lun: 00
  Vendor: ATA      Model: WDC WD800JD-22JN Rev: 05.0
  Type:   Direct-Access                    ANSI SCSI revision: 05
Host: scsi3 Channel: 00 Id: 00 Lun: 00
  Vendor: Areca    Model: ARC-1130-VOL#00  Rev: R001
  Type:   Direct-Access                    ANSI SCSI revision: 03
LVM Config
When you pvcreate a device, it looks like you're losing a LOT of space, but in reality it's just being displayed differently (Gib vs GB) Explanation here
[root@erasrb2 scsi]# pvcreate /dev/sdd
  Physical volume "/dev/sdd" successfully created
[root@erasrb2 scsi]# vgcreate  -s 32768k raid2 /dev/sdd
  Volume group "raid2" successfully created
[root@erasrb2 scsi]# vgdisplay raid2
  --- Volume group ---
  VG Name               raid2
  System ID
  Format                lvm2
  Metadata Areas        1
  Metadata Sequence No  1
  VG Access             read/write
  VG Status             resizable
  MAX LV                0
  Cur LV                0
  Open LV               0
  Max PV                0
  Cur PV                1
  Act PV                1
  VG Size               3.27 TB
  PE Size               32.00 MB
  Total PE              107288
  Alloc PE / Size       0 / 0
  Free  PE / Size       107288 / 3.27 TB
  VG UUID               WmpGTs-dKyP-Go9L-4BSq-HtE4-Rhy3-depMs7

[root@erasrb2 scsi]# lvcreate -l107288 -nvault2 raid2
  Logical volume "vault2" created
[root@erasrb2 scsi]# lvdisplay raid2
  --- Logical volume ---
  LV Name                /dev/raid2/vault2
  VG Name                raid2
  LV UUID                KW5JA3-keyS-AfPa-eXtD-QOv6-w1tV-5KOVVz
  LV Write Access        read/write
  LV Status              available
  # open                 0
  LV Size                3.27 TB
  Current LE             107288
  Segments               1
  Allocation             inherit
  Read ahead sectors     0
  Block device           253:2


[root@erasrb2 scsi]# mke2fs /dev/raid2/vault2
mke2fs 1.35 (28-Feb-2004)
max_blocks 4294967295, rsv_groups = 0, rsv_gdb = 1024
Filesystem label=
OS type: Linux
Block size=4096 (log=2)
Fragment size=4096 (log=2)
439451648 inodes, 878903296 blocks
995491 blocks (0.11%) reserved for the super user
First data block=0
Maximum filesystem blocks=880803840
26822 block groups
32768 blocks per group, 32768 fragments per group
16384 inodes per group
Superblock backups stored on blocks:
        32768, 98304, 163840, 229376, 294912, 819200, 884736, 1605632, 2654208,
        4096000, 7962624, 11239424, 20480000, 23887872, 71663616, 78675968,
        102400000, 214990848, 512000000, 550731776, 644972544

Writing inode tables: done
inode.i_blocks = 180232, i_size = 4243456
Writing superblocks and filesystem accounting information: done

This filesystem will be automatically checked every 38 mounts or
180 days, whichever comes first.  Use tune2fs -c or -i to override.
SRB Installation
The SRB will be running w/ an MCAT on this server until connectivity at NARA1 is finished. Prior to installing, we tweaked the shared memory settings on the host to improve postgres performance
In /etc/sysctl.conf, add:
#
# increase max shared memory to 256MB
kernel.shmmax=268435456
kernel.shmall=268435456
The MCAT was installed using the install.pl script and installed using the srb account into ~/srb.
During mcat install, we applied the 3.3.1.p1 patch and also used the gen_uuid.c from [site] (copy to SRB3_3_1/src/lib). Vaults were configured at /vault1/vault, and /vault2/vault. Default domain was nara and zone was nara-dc.The install.pl was modified to use '207.245.162.200' for the MCAT's ip address, in addition to vault configuration.
Two accounts, eap.nara and webuser.nara were setup for the image collection. The image collection is owned by eap.nara with webuser.nara having read-only access to the collection. The image collection was loaded into vault1.
Now, we have to tune postgres a little bit.
In /etc/fstab, add 'noatime' to the mount for /home. In srb/pgsql/data/psotgresql.con change the shared buffers to:
shared_buffers = 28672
IPTables config
In /etc/sysconfig/iptables, we added the two lines:
-A RH-Firewall-1-INPUT -m state --state NEW -m tcp -p tcp --dport 5544 -j ACCEPT
-A RH-Firewall-1-INPUT -m state --state NEW -m tcp -p tcp --dport 20000:20200 -j ACCEPT
so we had to modify the SRB a little to use a select set of ports. In ~srb/srb/SRB3_3_1; run
 ./configure --enable-installdir=/home/srb/srb/SRBInstall --enable-psgmcat --enable-psghome=/home/srb/srb/pgsql --enable-commports
make clean; make; make install
restart the SRB.
Database Backups
The postgresql databases are dumped and vacuumed nightly. The pg_backup.sh in ~/srb is the script used to do this. It dumps backups to /vault2/dumps. You can restore using the following command (substitute current backup where appropriate)
gunzip /vault2/dumps/July-2005/2005-07-01/10:38-postgresql_database-MCAT-backup.gz
pg_restore -d database -F c /vault2/dumps/July-2005/2005-07-01/10:38-postgresql_database-MCAT-backup
-- Main.MikeSmorul - 01 Jul 2005